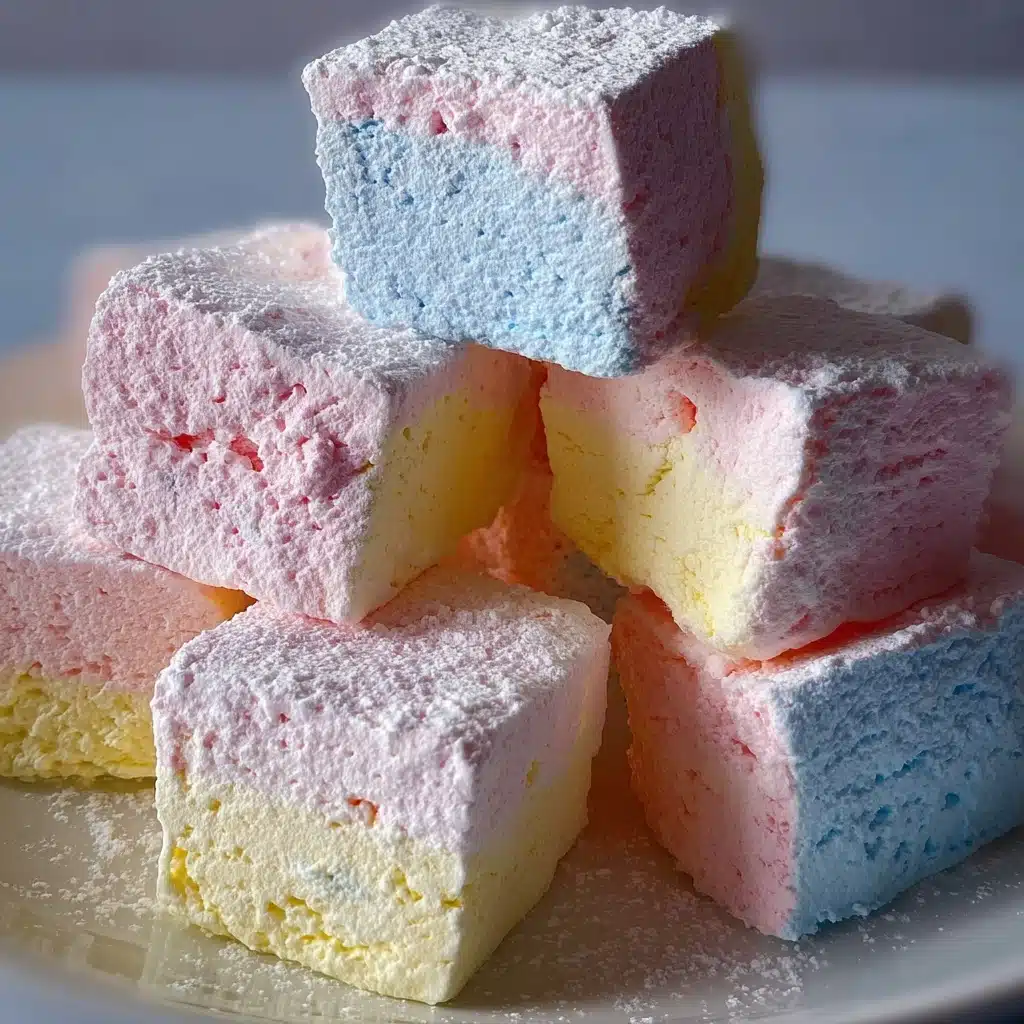
Homemade Marshmallows Recipe
There’s something totally magical about biting into a fluffy cloud of sugar that you’ve made yourself! Homemade Marshmallows aren’t just delicious—they’re a hands-on kitchen adventure, transforming simple ingredients into pillowy treats that make store-bought marshmallows feel like distant relatives. Whether you’re swirling them into hot cocoa, toasting them golden over a campfire, or gifting them in adorable bags, you’ll love how these melt-in-your-mouth confections bring joy to any moment. Get ready to amaze your taste buds with every irresistibly soft bite!

Ingredients You’ll Need
The beauty of homemade marshmallows lies in their simplicity; each ingredient plays a key role in bringing that luscious texture and subtle sweetness. Here’s what you’ll need and why each is essential to the final result.
- Unflavored gelatin (3 envelopes): This is the crucial ingredient that gives marshmallows their signature airy, bouncy texture—don’t substitute with flavored gelatin!
- Cold water (1 cup, divided): Water is used to dissolve the gelatin and to make the sugar syrup; make sure it’s cold for best results.
- Granulated sugar (2 cups): Adds the sweetness and helps create the candy structure as it’s cooked into syrup.
- Light corn syrup (1 cup): Prevents the sugar from crystallizing and keeps the marshmallows smooth and glossy.
- Salt (1/4 teaspoon): A pinch of salt balances the flavors and adds depth, making the marshmallows taste extra delicious.
- Pure vanilla extract (1 tablespoon): Adds warmth and aroma—don’t be tempted to skip it, real vanilla makes all the difference!
- Powdered sugar (1/2 cup): This coats the marshmallows and prevents them from sticking together; it also lends a delicate, sweet finish.
- Cornstarch (1/2 cup): When combined with powdered sugar, it ensures the marshmallows stay light and dust-free.
- Cooking spray: Helps release the marshmallows beautifully from the pan—generously greased surfaces are your secret to easy slicing!
How to Make Homemade Marshmallows
Step 1: Bloom the Gelatin
Pour 1/2 cup of cold water into the bowl of your stand mixer and sprinkle the gelatin over it. Let it sit for several minutes so the gelatin “blooms”—this means absorbing the water and becoming thick and jelly-like. It’s an essential step for that melt-in-your-mouth, squishy texture in your finished homemade marshmallows.
Step 2: Prepare the Sugar Syrup
In a medium saucepan, combine the granulated sugar, light corn syrup, the remaining 1/2 cup of water, and salt. Place the pan over medium heat and stir gently until the sugar is completely dissolved. Be patient—undissolved sugar can lead to grainy marshmallows, so let it all blend together smoothly before moving on.
Step 3: Cook to the Perfect Temperature
Attach a candy thermometer to your saucepan, making sure it doesn’t touch the bottom for an accurate reading. Increase the heat and let the syrup cook without stirring until it hits precisely 240°F (115°C), which is known as the “soft-ball” stage in candy making. This ensures your homemade marshmallows have that classic, pillowy bite with a tender chew.
Step 4: Combine and Whip
Slowly and carefully pour the hot syrup into the bloomed gelatin in your stand mixer bowl while the mixer is running on low. Once everything is in, gradually increase the speed to high. Beat for 10 to 12 minutes until the mixture becomes thick, shiny, and has tripled in volume. Then, add the vanilla extract and mix just until incorporated—this is when your kitchen starts to smell absolutely heavenly!
Step 5: Prepare the Pan and Dusting Mixture
Meanwhile, whisk together the powdered sugar and cornstarch in a small bowl. Coat a 9×13-inch baking dish with cooking spray, making sure to coat every corner. Sprinkle a generous layer of the sugar-cornstarch mix along the bottom and sides—this helps the marshmallows pop out easily and keeps each piece soft and fluffy.
Step 6: Spread and Set
Scrape the glossy marshmallow mixture into your prepared pan. Use a spatula (lightly oiled or sprayed) to spread it evenly to all corners. Dust the top with more powdered sugar-cornstarch mix. Now comes the hardest part: waiting! Let the marshmallows set uncovered at room temperature for at least 4 hours, or even overnight, to achieve that perfect soft bounce.
Step 7: Cut and Enjoy
When your homemade marshmallows are fully set, run a knife around the edges and turn the slab out onto a cutting board. Cut into squares—oil your knife or dip it in warm water for neater cuts. Toss each marshmallow in the leftover powdered sugar-cornstarch mix so the sides stay plush and non-sticky. Cue the applause, because you just made pure happiness from scratch!
How to Serve Homemade Marshmallows
Garnishes
Give your homemade marshmallows that extra touch by dipping or drizzling them with melted chocolate, sprinkling with crushed nuts, or dusting with cocoa powder for a dramatic finish. Even a pinch of flaky sea salt can elevate each bite into something truly gourmet.
Side Dishes
Pair your homemade marshmallows with steaming mugs of hot chocolate, rich espresso, or cups of tea for a cozy treat. And if you’re heading outdoors, nothing beats a classic s’more: sandwich your marshmallow between graham crackers and chocolate for the ultimate fireside bite.
Creative Ways to Present
Think outside the box! Skewer marshmallows with fresh fruit for a whimsical dessert platter, or pop them into small gift boxes lined with parchment for heartfelt homemade gifts. For a special breakfast, try adding marshmallow cubes to pancakes or waffles—kids and grown-ups will both swoon.
Make Ahead and Storage
Storing Leftovers
Homemade marshmallows keep their springy texture best when stored in an airtight container at room temperature. Layer them with parchment or wax paper to prevent sticking. They’ll stay perfectly fresh for about a week—if they last that long!
Freezing
You can freeze homemade marshmallows if you’ve made a big batch! Place them in a single layer on a tray, freeze until solid, and then transfer to a freezer-safe bag. They’ll keep for up to three months. Thaw at room temperature for an hour or two—easy as can be.
Reheating
While these marshmallows are best enjoyed fresh, if they’ve become a little firm, a quick 5-10 second zap in the microwave will revive their airy texture. Just watch closely—they melt fast and you don’t want them to lose their charming shape!
FAQs
How do I keep my homemade marshmallows from getting sticky?
Toss each piece in the powdered sugar and cornstarch mixture after cutting to keep marshmallows soft and separate. Store in layers with parchment or wax paper in an airtight container.
Can I add flavors or colors?
Absolutely! Add a few drops of food coloring or different extracts like peppermint or almond right after the vanilla. Swirl gently for a marbled look or mix thoroughly for a bold, even color and taste.
Do I need a stand mixer?
A stand mixer is ideal because the mixture gets very thick, but a strong hand mixer works if you don’t mind holding it for 10–12 minutes. Just be sure to use a large bowl, as the mixture expands dramatically!
Why didn’t my marshmallows set?
The most common culprits are not cooking the sugar syrup to the right temperature or using expired gelatin. Double-check your thermometer and ingredient freshness for best results.
Can I double the recipe?
Yes! Just use a larger pan (such as a rimmed baking sheet) and make sure your mixer can handle the increased volume. Whipping time may increase slightly, but you’ll be rewarded with even more homemade marshmallow bliss.
Final Thoughts
Once you’ve tried making your own homemade marshmallows, you’ll wonder how you ever settled for store-bought! From their cloudlike fluffiness to their amazing versatility, these are treats worth the (very little!) effort. Give them a whirl in your own kitchen—your taste buds and your friends will thank you.