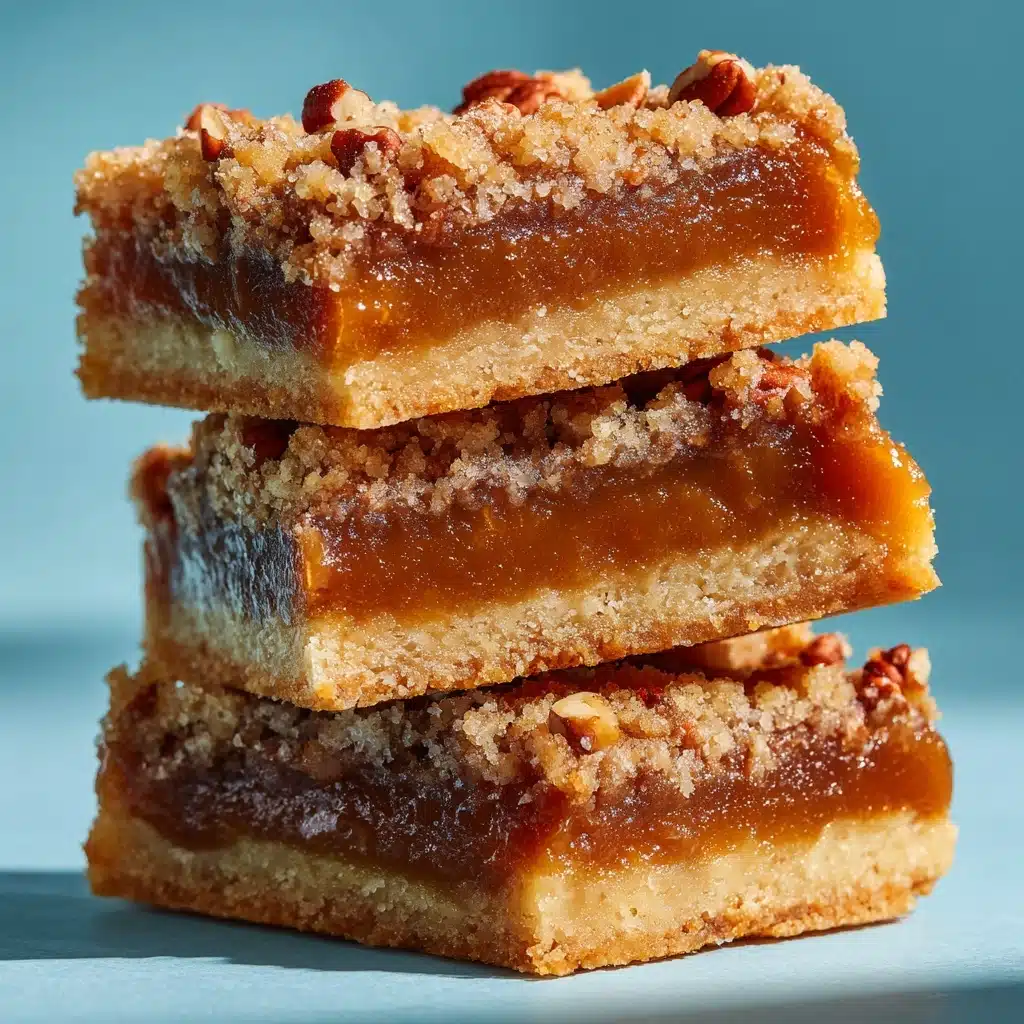
Butter Tart Bars Recipe
There’s something magical about Butter Tart Bars—the way they combine a crisp, buttery base with a gooey, caramelized topping instantly transports you to a cozy kitchen bustling with the scents of vanilla and brown sugar. Whether you grew up loving the classic Canadian butter tart or you’re discovering them for the first time, these bars deliver all the nostalgic flavor with much less fuss. Slice them up for a family gathering, box them for a bake sale, or sneak one for yourself after dinner. Every bite is sweet, gooey, and absolutely irresistible!
Ingredients You’ll Need
Let’s talk about the beautiful simplicity of what goes into Butter Tart Bars. Each ingredient has a job to do, coming together to create those beloved textures and that rich, sweet flavor. This straightforward list means you can whip up a batch almost any time the craving strikes!
- Unsalted butter (for both crust and filling): The foundation of the flavor—creates that tender shortbread base and adds richness to the filling. Softened for the crust, melted for the filling.
- Granulated sugar: This mixes with butter in the crust to ensure it’s light, sweet, and wonderfully crisp.
- All-purpose flour: Adds body to both the base and the filling, helping everything set beautifully.
- Salt: Just a touch sharpens and balances the sweet flavors so the bars never taste flat.
- Brown sugar: The star of the filling, infusing every bite with caramel depth and gooey magic.
- Large eggs: Essential for binding the filling and giving it that custardy, silky finish.
- Baking powder: Ensures the filling has a little lift, so it’s not too dense.
- Vanilla extract: Just a splash adds irresistible aroma and warmth.
- Pecans or raisins (optional): For an authentic touch—pecans bring crunch, raisins give a burst of juicy sweetness.
How to Make Butter Tart Bars
Step 1: Prep Your Pan and Oven
Start by preheating your oven to 350°F (175°C). Meanwhile, line an 8×8-inch baking pan with parchment paper, leaving a bit of an overhang on two sides—this makes it so much easier to lift the bars out later. The parchment not only prevents sticking but also gives you neat squares with no fuss.
Step 2: Make the Buttery Crust
In a medium bowl, cream together your softened butter and granulated sugar until the mixture is light and fluffy. This helps the crust bake up tender and flavorful. Add your flour and a pinch of salt, mixing just until a soft dough forms. Don’t overwork it! Press this dough evenly into the bottom of your prepared pan—fingertips work best. Pop it into the oven for 12 to 15 minutes, until it’s faintly golden and smells toasty.
Step 3: Whip Up That Gooey Butter Tart Bars Filling
While the crust is baking, grab a fresh bowl and whisk together your brown sugar and eggs. Pour in melted butter, add the tablespoon of flour, baking powder, vanilla, and a pinch of salt, and whisk until smooth and shiny. If you’re adding pecans or raisins, fold them in now. This simple filling is the heart of your Butter Tart Bars—it should be glossy and pourable but not runny.
Step 4: Assemble and Bake
Once the crust is ready, carefully pour the filling over the hot base, making sure it’s evenly distributed. Return the pan to the oven and bake for 22 to 25 minutes. The top will turn a lovely golden color, and the center should look set but still a little wobbly in the very middle—that’s exactly what you want for that classic gooey texture.
Step 5: Cool and Slice With Care
Now comes the hard part: patience. Let your Butter Tart Bars cool completely in the pan (it’s so worth it!). Once cool, use the parchment overhang to lift them out. Use a sharp, damp knife to cut into neat bars, wiping between slices for the tidiest edges. Each slice reveals crisp crust, shimmering golden filling, and (if you added them) pops of nuts or fruit.
How to Serve Butter Tart Bars

Garnishes
While Butter Tart Bars are delightful all on their own, you can dress them up with a little flourish. A light dusting of powdered sugar adds elegance, and a handful of toasted pecan halves scattered on top before serving gives an extra crunch. For a special touch, a drizzle of caramel or a few fresh berries on the side can make your plate pop.
Side Dishes
These rich bars are perfect with a warm mug of coffee or tea. If you’re serving them for dessert, a scoop of vanilla ice cream or a dollop of barely-sweetened whipped cream on the side helps to balance their sweetness. Pairing with a fruit salad featuring fresh berries or orange segments brings some brightness to the table.
Creative Ways to Present
Butter Tart Bars look fantastic stacked on a rustic wooden tray for a bake sale or cut into tiny squares and arranged on a tiered platter for parties. You can also wrap bars individually in parchment paper and tie with baker’s twine for a homemade gift that feels extra special. For potlucks, cut them into small bites so everyone can sample a piece (or two!).
Make Ahead and Storage
Storing Leftovers
Butter Tart Bars store very well at room temperature for up to three days in an airtight container. If your kitchen is warm, keep them in the fridge to preserve that gooey filling and buttery base. Always use parchment or wax paper between layers to prevent sticking.
Freezing
If you want a stash of Butter Tart Bars ready for future cravings, you’re in luck—they freeze beautifully! Arrange the cooled, sliced bars between sheets of parchment in an airtight container or freezer bag. They’ll keep for up to two months. Simply thaw at room temperature whenever you need a treat.
Reheating
If you love warm Butter Tart Bars, just pop a slice in the microwave for a few seconds. (Five to ten seconds is perfect!) For slightly crisp edges, reheat briefly in a 300°F oven. Just be careful not to overheat, or you’ll lose some of that signature gooiness.
FAQs
Can I use walnuts or other nuts instead of pecans?
Absolutely! Walnuts, almonds, or even a mix of your favorite nuts add great texture and flavor. Just chop them roughly to about the same size as pecans so every bar gets a nice bit of crunch.
Can I make Butter Tart Bars without nuts or raisins?
Definitely. The bars are just as delicious with a plain filling—nothing gets in the way of that rich, buttery caramel flavor! This is a great option if you’re serving someone with allergies or just want the classic gooey texture.
Why did my filling sink or turn out too runny?
If your filling is runny or sinks, it may have needed a bit more baking time or wasn’t spread evenly. Bake until the center just jiggles very slightly, then let it cool completely to help it set. Also, measuring flour and eggs accurately ensures the filling thickens as it bakes.
Can I double this recipe for a 9×13-inch pan?
Yes! Just double all of the ingredients and bake in a 9×13-inch pan, keeping an eye on the baking times—they may be similar, but check doneness with a toothpick in the center. The bars will be a huge crowd-pleaser at gatherings.
How do I get neat, clean slices?
Letting the bars cool fully is key! Use the parchment paper to lift them out, then slice with a sharp knife. Wiping the knife clean between each cut helps create perfect edges without pulling or tearing the filling.
Final Thoughts
If you’ve never made Butter Tart Bars at home, there’s no better time to jump in. They’re bursting with heartwarming flavor, simple enough for a weeknight treat, and always a hit at any celebration. Give them a try and watch your kitchen fill with sweet aromas—and your friends and family asking for seconds!