Luxurious Black Forest Cake Recipe
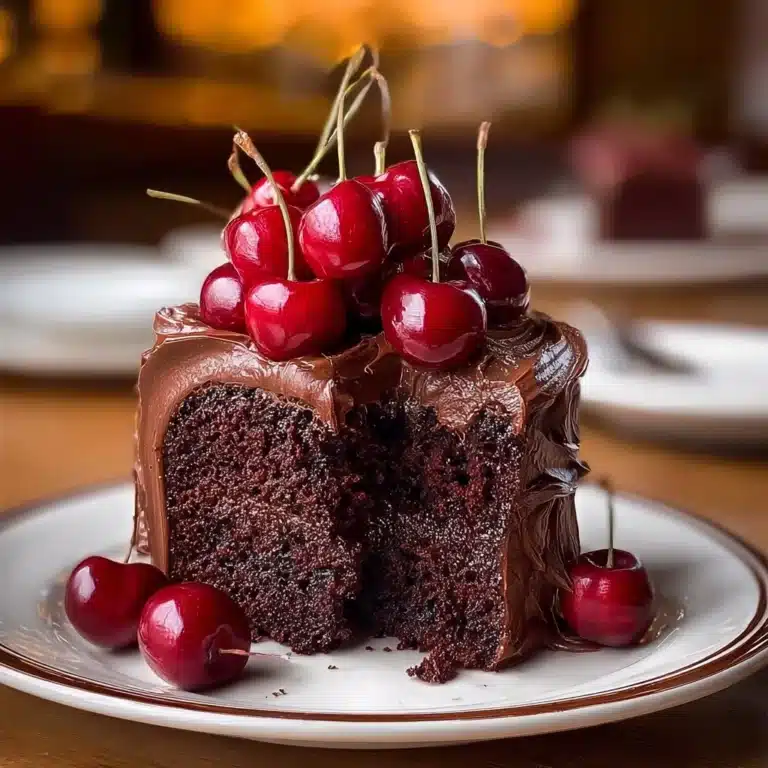
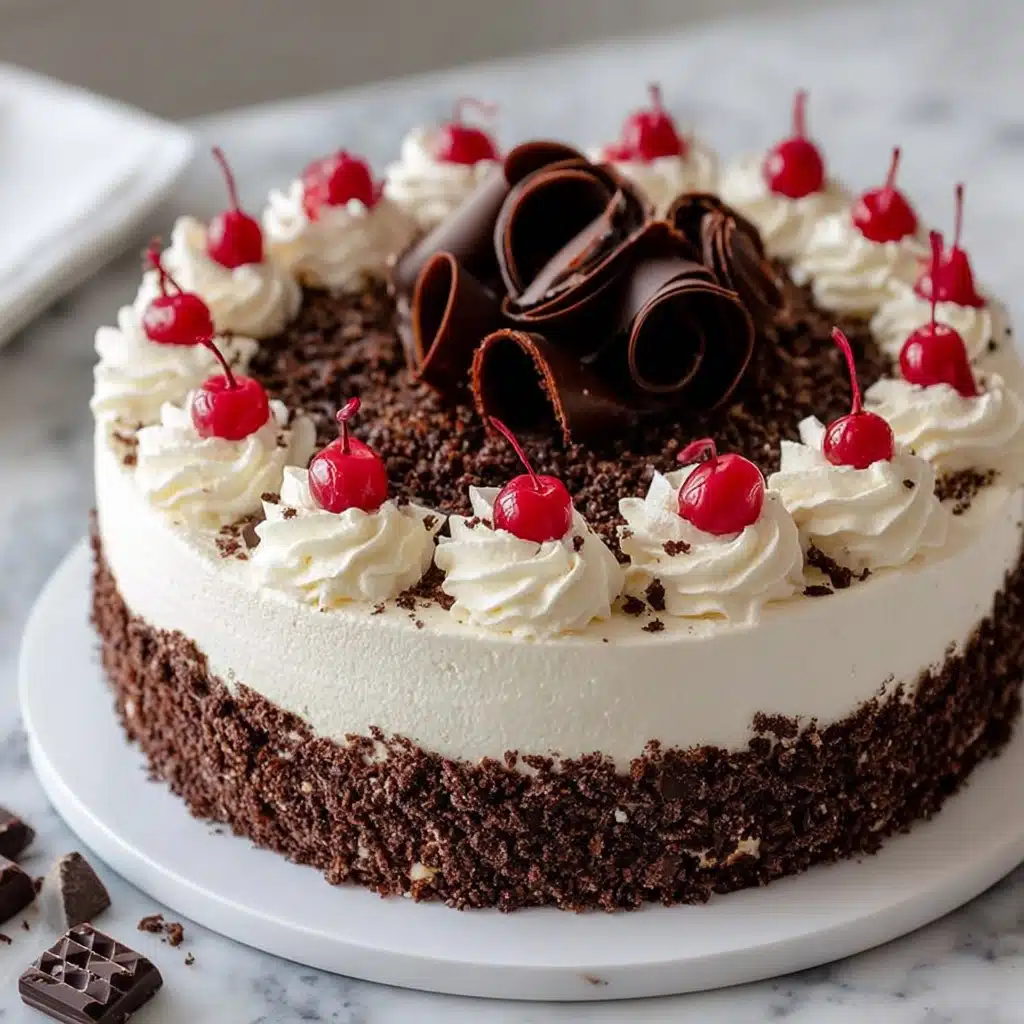
If you’re searching for a showstopping dessert that tastes as stunning as it looks, the Luxurious Black Forest Cake truly delivers on every front. This cake is my go-to when I want something rich, celebratory, and a bit decadent. Layers of moist chocolate sponge, airy whipped cream, and juicy sour cherries come together into a harmonious bite—with a dramatic flourish of chocolate shavings on top. Every forkful is a little moment of joy, making this Luxurious Black Forest Cake a centerpiece for any occasion worth celebrating.

Ingredients You’ll Need
Each ingredient here is thoughtfully chosen to add depth, moisture, and intrigue to the final cake. Don’t be intimidated—this lineup is wonderfully simple, yet every component shines in its own way to make the Luxurious Black Forest Cake unforgettable.
- Eggs: Separating the eggs helps create a remarkably light and airy cake base that stands up to fillings.
- Granulated sugar: Sweetens the sponge and helps stabilize the batter for an ideal crumb.
- All-purpose flour: The structure builder, ensuring your layers are sturdy yet tender.
- Cocoa powder: A good-quality cocoa gives your cake a deep, chocolatey flavor that’s simply irresistible.
- Baking powder: Lends just the right amount of lift for delicate, fluffy layers.
- Salt: A touch intensifies flavors and keeps the sweetness in check for this classic cake.
- Heavy cream: Freshly whipped, it brings that signature silky richness and beautiful cloud-like texture.
- Powdered sugar: Dissolves perfectly into the cream, making it stunningly smooth and sweetened just right.
- Vanilla: An aromatic boost that lifts and perfumes every layer of whipped cream.
- Pitted sour cherries: Their tart brightness soaks into the cake, creating those classic juicy pockets.
- Cherry juice: The secret to a uniquely flavorful, subtly rosy cream filling.
- Chocolate shavings or curls: The essential finishing touch for that iconic Black Forest look and a little extra decadence.
How to Make Luxurious Black Forest Cake
Step 1: Prep the Pans and Preheat
Start by heating your oven to 350°F (175°C), and take a moment to line two 8-inch round cake pans with parchment paper after greasing them. This helps the cakes pop out without any resistance and keeps your layers perfectly intact for assembly later.
Step 2: Whip Up the Egg Yolks and Sugar
In one bowl, beat the egg yolks with granulated sugar until the mixture becomes pale and thick. This stage is important for that plush crumb and helps the cake stay soft but not dense. You’ll notice the mixture lightens up and doubles in volume.
Step 3: Beat the Egg Whites
In a separate clean bowl, whisk the egg whites until they form stiff peaks. This is what gives our Luxurious Black Forest Cake its signature delicate and airy bite. Fold them into the batter gently to avoid losing any of that beautiful lift.
Step 4: Combine the Dry Ingredients
Next, sift together the flour, cocoa powder, baking powder, and salt. Sifting not only aerates the ingredients but also prevents any pesky lumps, ensuring each bite of cake is consistently smooth and evenly chocolatey.
Step 5: Fold and Combine
Gradually fold the sifted dry ingredients into the egg yolk mixture, taking care not to overmix. Once incorporated, gently fold in the fluffy egg whites. The goal is a glossy, light batter that holds its shape but still flows.
Step 6: Bake the Cakes
Divide the batter between your prepared pans. Bake for 18 to 22 minutes, or until a toothpick inserted in the center comes out clean. Let them cool in the pans for a bit, then carefully transfer to a rack to cool completely—patience at this stage pays off with easier assembly.
Step 7: Whip the Cream
While the cakes are cooling, beat the heavy cream with powdered sugar and vanilla until stiff peaks form. It should be lush and thick but still soft enough to spread. Set aside half for the cherry-infused layer.
Step 8: Prepare the Cherries and Cherry Cream
Drain your pitted sour cherries, reserving a quarter cup of juice. Mix this juice into half of the whipped cream, infusing it with a subtle pink hue and tangy cherry flavor—making that signature Luxurious Black Forest Cake filling.
Step 9: Assemble the Layers
Set the first cake layer on your serving plate. Gently spread the cherry-kissed whipped cream over the surface, then evenly scatter the drained cherries. Place the second cake layer on top, pressing ever so lightly for stability.
Step 10: Finish and Chill the Cake
Frost the top and sides of the cake with the remaining plain whipped cream. Shower generously with chocolate shavings or curls, and add a few extra cherries for flair. Chill the Luxurious Black Forest Cake for at least 2 hours to meld the flavors and make slicing easier.
How to Serve Luxurious Black Forest Cake
Garnishes
What truly makes a Luxurious Black Forest Cake irresistible is the finishing touch. Top it with billowy swirls of whipped cream, a handful of whole cherries, and an avalanche of dark chocolate shavings. For extra decadence, a dusting of powdered sugar gives the entire cake a snowy, picturesque look fit for celebrations.
Side Dishes
This cake shines on its own, but it pairs beautifully with a scoop of vanilla bean ice cream or a small glass of cherry liqueur on the side. If you crave something lighter, a bowl of fresh berries with a mint sprig offers a refreshing complement to all that chocolatey richness.
Creative Ways to Present
For personal desserts, try reimagining the Luxurious Black Forest Cake as mini trifles layered in glasses. Or cut it into elegant squares, topped with whipped cream rosettes and a single cherry for a bite-sized treat. Even served rustic, as thick slabs with oozy whipped cream, this cake always impresses.
Make Ahead and Storage
Storing Leftovers
To keep your Luxurious Black Forest Cake tasting its best, cover it tightly with plastic wrap or use a cake dome and refrigerate. The cake stays moist for up to three days, and the cherries help deepen the flavors with time. If you’ve made individual portions, transfer them to airtight containers to prevent the cream from picking up fridge odors.
Freezing
You can freeze slices of Luxurious Black Forest Cake! Wrap each piece tightly in plastic wrap, then place in a freezer bag or container. It’ll keep well for about a month. Thaw overnight in the fridge—just keep in mind, the whipped cream will soften a bit upon thawing, but the taste remains superb.
Reheating
Unlike some cakes, the Luxurious Black Forest Cake is served chilled and doesn’t require reheating. If you want a slightly softer texture, let a slice sit at room temperature for 10–15 minutes before enjoying. Don’t microwave or heat, as that can melt the delicate cream layers.
FAQs
Can I use fresh cherries instead of canned?
Absolutely! When in season, fresh sour cherries add gorgeous color and juiciness. Just pit them and use as you would the canned version, and consider adding a splash of cherry juice or syrup to intensify the flavor.
Is it necessary to chill the Luxurious Black Forest Cake before serving?
Yes, chilling is key! Two hours in the fridge gives the whipped cream time to firm up, the flavors to meld, and makes for much cleaner slices. It transforms the cake from good to truly luxurious.
Can I make the cake layers ahead of time?
Definitely. The chocolate cake layers can be baked a day in advance, wrapped tightly, and left at room temperature or refrigerated. Assemble with the cream and cherries just before serving for maximum freshness.
What’s the best way to make those decorative chocolate shavings?
Use a vegetable peeler on a block of good-quality chocolate at room temperature for easy, elegant curls. If you like bigger shavings, briefly warm the chocolate with your hand before peeling.
How do I get perfectly clean cake slices?
Run a sharp knife under hot water, wipe it dry, then slice the cake. Repeat between cuts. This technique helps you glide right through those luscious whipped cream layers without making a mess!
Final Thoughts
This recipe is my little secret for making any gathering memorable, and I hope you find your own joy in baking and sharing the Luxurious Black Forest Cake. Don’t wait for a special occasion—treat yourself and those you love to this unforgettable classic. Happy baking!