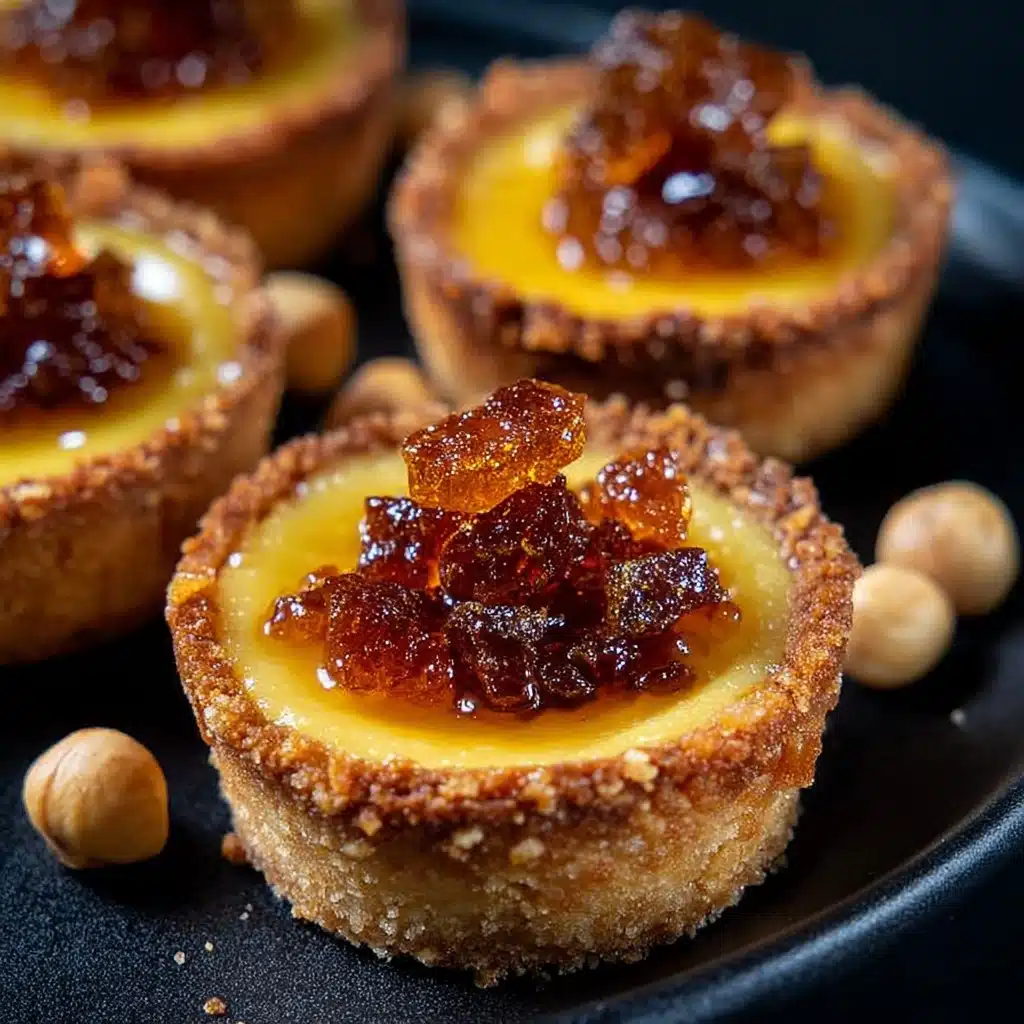
Hazelnut Crème Brûlée Tartlets Recipe
Hazelnut Crème Brûlée Tartlets are the kind of dessert that will make you the hero of any dinner party. Imagine that classic crème brûlée moment—the golden, caramelized sugar crack—nestled inside a nutty, buttery tartlet shell. These tartlets combine French sophistication with a rustic, toasted hazelnut twist, making each bite layered with flavor and contrast. The crunchy base, silky custard, and dramatic brûléed top come together in an unexpectedly easy yet elegant treat that celebrates everything we love about dessert.

Ingredients You’ll Need
The beauty of Hazelnut Crème Brûlée Tartlets lies in the simplicity of the ingredients. Each one has a starring role, from the aromatic hazelnuts in the crust to the rich cream in the custard. Take a moment to gather high-quality items—you’ll really taste the difference in such an elegant dessert.
- Ground hazelnuts: Toasted hazelnuts bring deep, nutty flavor that makes the crust irresistibly aromatic.
- Graham cracker crumbs: Adds familiar sweetness and texture, helping create a crisp crust.
- Melted butter: Binds the crust together while contributing richness.
- Pinch of salt: Just a touch intensifies the flavors and keeps the sweetness balanced.
- Egg yolks: Give the custard its dreamy, creamy texture.
- Heavy cream: Lends a lush, luxurious mouthfeel to the filling that sets up perfectly.
- Granulated sugar: Sweetens the custard and, later, forms that iconic brûlée crowning crackle.
- Vanilla extract: Adds pure, aromatic warmth to the custard, enhancing all the other flavors.
- Extra sugar (for brûlée topping): Essential for achieving that glossy, caramelized shell you get to shatter with your spoon.
- Crushed hazelnuts (for garnish): Optional, but brings beautiful texture and visual appeal to the final presentation.
How to Make Hazelnut Crème Brûlée Tartlets
Step 1: Prepare and Preheat
Set the stage for baking greatness by preheating your oven to 350°F (175°C). This ensures your crusts start cooking the moment they hit the oven, helping them set and crisp perfectly. Meanwhile, gather and measure all your ingredients so they’re ready for action—a small step that makes the whole process more enjoyable.
Step 2: Make the Hazelnut Crust
Combine ground hazelnuts, graham cracker crumbs, melted butter, and a pinch of salt in a bowl. Stir until the mixture resembles damp sand and holds its form when pressed. Evenly divide the mixture among your mini tartlet pans, pressing firmly into the base and up the sides. A flat-bottomed measuring cup works wonders for getting a neat, even crust that bakes up crisp and golden.
Step 3: Bake and Cool the Crust
Pop the tartlet shells into your preheated oven and bake for 8 to 10 minutes, until the edges look slightly toasted and wonderfully fragrant. Remove the crusts and let them cool completely in their pans—warm crusts and custard don’t get along, so patience pays off here.
Step 4: Whisk the Custard Filling
In a medium bowl, whisk together the egg yolks, heavy cream, sugar, and vanilla extract until the mixture is smooth and pale. You want a silky base with no streaks of yolk. This custard is rich but not heavy, and the vanilla carries just the right amount of warmth to balance the hazelnuts below.
Step 5: Fill and Bake the Tartlets
Lower your oven temperature to 300°F (150°C). Carefully pour or ladle the custard into the cooled tartlet shells, filling almost to the top. Bake for 25 to 30 minutes, until the custard is set around the edges but still has a gentle jiggle in the center. Let the tartlets cool to room temperature, then chill them thoroughly—it’s the secret to that smooth, dreamy texture.
Step 6: Brûlée the Tops
Once your Hazelnut Crème Brûlée Tartlets are completely chilled, sprinkle an even layer of sugar on each tartlet. Using a kitchen torch, slowly caramelize the sugar until it melts, bubbles, and turns deep golden brown. If you don’t have a torch, you can broil them for a few minutes, watching closely. Give the burnt sugar a minute to harden for that satisfying crack!
How to Serve Hazelnut Crème Brûlée Tartlets
Garnishes
For a bit of flair, top each tartlet with a sprinkle of crushed hazelnuts or a dusting of powdered sugar right before serving. Fresh berries or a tiny mint leaf also add color and a burst of freshness that pairs beautifully with the caramel and nutty notes.
Side Dishes
Pair these Hazelnut Crème Brûlée Tartlets with a cup of strong espresso, a pitcher of cold brew coffee, or even a glass of prosecco for a sophisticated touch. If you’re serving these as part of a dinner party, a small bowl of lightly sweetened whipped cream or vanilla bean ice cream on the side makes for an extra-special dessert course.
Creative Ways to Present
Serve your tartlets on vintage plates, atop a swirl of hazelnut praline sauce, or nestled in cupcake wrappers for a playful twist. For parties, arrange them on a tiered dessert stand, alternating tartlets with chocolate truffles or candied nuts for a decadent display. Even a simple platter dusted with cocoa or powdered sugar adds visual magic.
Make Ahead and Storage
Storing Leftovers
Once cooled and bruléed, Hazelnut Crème Brûlée Tartlets can be stored in the fridge for up to three days. Place them in an airtight container, and use strips of parchment between the tops so the caramel stays crisp. Serve straight from the fridge for the ultimate refreshing bite.
Freezing
If you want to make these tartlets ahead, freeze the baked, unbruléed tartlets tightly wrapped in plastic wrap and foil for up to one month. Thaw overnight in the refrigerator, then finish with the brûlée topping just before serving for maximum crackly drama.
Reheating
To revive a chilled tartlet, simply let it sit at room temperature for 10 to 15 minutes before serving. Avoid microwaving, as it can melt the sugar crust and alter the texture of the custard. If needed, you can re-torch the tops to refresh that glassy finish.
FAQs
Can I use almonds instead of hazelnuts?
Absolutely! Toasted almonds work wonderfully in the crust, and a little almond extract in the custard will echo those flavors. It’s a great way to personalize these tartlets if hazelnuts aren’t your favorite or you have them on hand.
Do I need a kitchen torch to make Hazelnut Crème Brûlée Tartlets?
A torch makes it easy to caramelize the sugar topping, but you can use your oven’s broiler in a pinch. Just monitor them closely and rotate the tartlets if necessary to get an even, glassy sugar top.
Why is my custard not set?
If your custard turns out runny or loose, it may need a few extra minutes in the oven. Look for edges that are set but a center that jiggles slightly—it will continue to firm up as it cools. Always bake at the lower temperature for that signature silky texture.
How far in advance can I brûlée the tops?
For best results, brûlée them just before serving. The caramelized sugar is at its crispiest immediately, though you can torch them up to two hours ahead and refrigerate, keeping in mind the crack gets softer over time.
Can I make one large tart instead of tartlets?
Yes, you can press the crust into a regular tart pan and assemble as directed, but you’ll likely need to increase the baking time to ensure the custard sets. Slice and brûlée each piece individually for beautiful, shareable servings.
Final Thoughts
If you’re craving a dessert that feels both classic and delightfully fresh, you’ll love giving Hazelnut Crème Brûlée Tartlets a try. They’re an absolute crowd-pleaser and guaranteed to inspire big smiles with every satisfying crack. Go ahead—treat yourself and your favorite people to a tartlet moment!