Oreo Cream Chocolate Roll Recipe
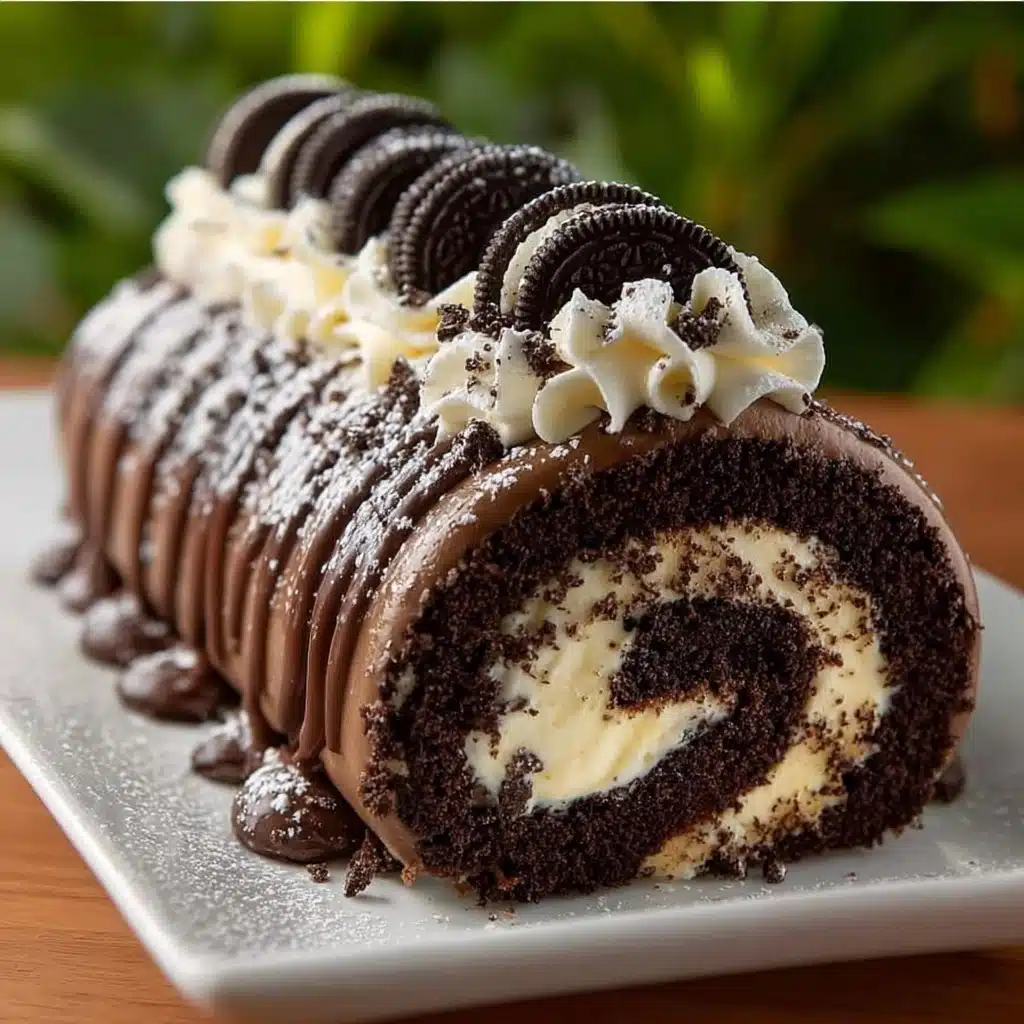
If you love all things cookies and cream, you are in for an absolute treat with this show-stopping Oreo Cream Chocolate Roll. Imagine a supremely soft and fluffy chocolate sponge wrapped around a dreamy whipped cream cheese Oreo filling, all finished with drizzled white chocolate and a playful sprinkle of crushed cookies. This recipe always turns heads at gatherings, but it’s secretly simple to make—no pastry chef skills required! Whether you’re celebrating something special or just indulging a sweet craving, the Oreo Cream Chocolate Roll is a dessert that elicits big smiles and the classic “just one more slice” plea from everyone who tries it.
Ingredients You’ll Need
Gathering your ingredients for the Oreo Cream Chocolate Roll couldn’t be easier. Each element plays a vital role: the cake gives structure and chocolate richness, the filling brings luxurious creaminess, and the toppings add that final whimsical cookies-and-cream touch. Here’s what you’ll want to have ready:
- Chocolate cake mix (or homemade chocolate sponge): The backbone of your roll, offering convenience and deep cocoa flavor.
- Large eggs: Bring extra moisture and help the cake hold together during that signature roll.
- Water: Keeps the cake tender and light—don’t skip it!
- Vegetable oil: An easy way to guarantee a moist, rich cake base.
- Cream cheese, softened: The creamy heart of the filling, it lends tang and sturdiness to your whipped layer.
- Heavy cream, chilled: Adds fluffy volume and a luxurious, melt-in-your-mouth texture.
- Powdered sugar: Sweetens and helps smooth out the filling perfectly.
- Vanilla extract: A splash for warmth and depth in both the cake and filling.
- Oreo cookies, crushed: The signature twist—folded into the cream and sprinkled on top for irresistible crunch and flavor.
- White chocolate chips, melted: A pretty drizzle that delivers creamy sweetness and visual flair.
- Extra crushed Oreos for garnish: Because more cookies make everything better!
How to Make Oreo Cream Chocolate Roll
Step 1: Bake the Chocolate Cake
Start by preheating your oven to 350°F (175°C) and lining a 10×15-inch jelly roll pan with parchment paper. Mix up your chocolate cake batter according to the package or your favorite recipe, using eggs, water, and oil for that pillowy softness. Spread the batter evenly into your prepared pan, making sure it gets into each corner, then slide it into the oven. Bake for 12 to 15 minutes until the cake springs back gently to the touch and a toothpick comes out mostly clean. This quick bake keeps the cake moist and flexible for rolling.
Step 2: Shape and Cool the Roll
As soon as the cake is baked, turn it out onto a clean kitchen towel that’s generously dusted with powdered sugar—this prevents sticking and adds subtle sweetness. Peel away the parchment paper and, while the cake’s still warm, gently roll it up from the short end inside the towel. Let it cool completely like this; the rolling process trains the cake to hold its spiral shape without cracking when filled.
Step 3: Prepare the Oreo Cream Filling
While your cake is cooling, it’s filling time! Beat the softened cream cheese in a bowl until luxuriously smooth, then add the powdered sugar and vanilla extract. In a separate bowl, whip the chilled heavy cream to stiff peaks—it should look billowy and hold its shape. Carefully fold the whipped cream into the cream cheese mixture, then gently stir in the crushed Oreos. This combo makes a fluffy, rich filling with irresistible cookie crunch in every bite.
Step 4: Assemble the Oreo Cream Chocolate Roll
Once the cake is cool, gently unroll it to reveal a slightly curled chocolate canvas. Spread the Oreo cream filling evenly over the surface, leaving a small border to prevent spillover. Now, roll it back up (without the towel this time!), nestling the cream inside and forming those gorgeous swirls. Wrap your roll in plastic and chill for about 30 minutes to help it slice cleanly and hold its shape.
Step 5: Top, Garnish, and Chill
For that show stopping finish, drizzle the top with melted white chocolate in swoopy lines or zig-zags—have fun with it! Pipe on a bit of extra filling if you like, then scatter generously with extra crushed Oreos. A few whole cookies lined up on top or along the side add a moment of visual drama, too. Let the Oreo Cream Chocolate Roll hang out in the fridge before serving for picture-perfect slices.
How to Serve Oreo Cream Chocolate Roll

Garnishes
A dessert this stunning deserves a little extra flourish! Right before serving, go wild with the garnishes: drizzle with more melted white chocolate, sprinkle a shower of crushed Oreos, or even top with a few whole cookies for a dramatic look. A dusting of powdered sugar or some whipped cream rosettes add that extra professional touch.
Side Dishes
The Oreo Cream Chocolate Roll takes center stage on any dessert table, but it pairs beautifully with a scoop of vanilla bean ice cream or a glass of cold milk. Fresh berries, especially strawberries or sliced bananas, contrast beautifully with the rich chocolate and cream, offering a fresh, fruity twist if you like a bit of balance.
Creative Ways to Present
Elevate presentation by slicing the roll into thick or thin spirals, then fanning them out on a platter. For parties, cut the roll into bite-size pinwheels for easy sharing. You can also arrange slices atop a bed of whipped cream or layer individually with berries in dessert cups for a dazzling parfait effect. Don’t forget to show off those gorgeous Oreo-studded swirls in each slice!
Make Ahead and Storage
Storing Leftovers
If you’re lucky enough to have leftovers, wrap the Oreo Cream Chocolate Roll tightly in plastic wrap and keep it refrigerated. It will stay fresh for up to three days, with the cream still luscious and the cake moist. The flavors meld even more overnight, making it a delicious late-night treat.
Freezing
To freeze, slice the roll into individual portions and wrap each one well in plastic wrap, followed by a layer of foil. Stash them in a zip-top freezer bag, and they’ll keep well for up to a month. Just thaw overnight in the refrigerator before serving, and you’ll have a ready-made Oreo Cream Chocolate Roll for whenever cravings strike!
Reheating
This dessert is best enjoyed cold, straight from the fridge, but if you prefer a slightly warmer bite, let a slice sit at room temperature for 10 to 15 minutes. Avoid microwaving, as this can melt the filling and ruin the structure of your beautiful roll.
FAQs
Can I use a homemade chocolate sponge instead of cake mix?
Absolutely! If you have a favorite chocolate sponge recipe, swap it in for the boxed mix. Just be sure it’s light and flexible enough to roll easily, and keep the pan size similar to ensure that classic swirl.
What’s the trick to preventing cracks when rolling the cake?
Rolling the cake while it’s still warm and pliable is key. Using a generously powdered kitchen towel to help roll and cool the sponge really makes a difference—don’t rush it, and always handle with care.
Can I make the Oreo Cream Chocolate Roll ahead of time?
Yes! In fact, making it a day early can improve flavor and make slicing even easier. Just garnish right before serving for the freshest look and texture. It’s a perfect make-ahead dessert for busy hosts.
Is it possible to make a gluten-free version?
Definitely. Use your favorite gluten-free chocolate cake mix and double-check that your Oreos are gluten-free (many brands now offer them). The cream and topping are gluten-free as written, so just swap the cake base!
Do I need a jelly roll pan, or can I use something else?
A jelly roll pan is ideal, but if you only have a rimmed baking sheet that’s close in size, that’ll work too. The key is spreading the batter in an even, thin layer so it bakes up flexible for rolling.
Final Thoughts
If you’re searching for a dessert that always wows, you can’t go wrong with the Oreo Cream Chocolate Roll. It’s surprisingly easy, endlessly fun to decorate, and every bite is bursting with that perfect harmony of rich chocolate and cookies-and-cream bliss. Don’t be surprised if this becomes your go-to crowd pleaser—give it a try, and let your kitchen fill with smiles and sweet memories!