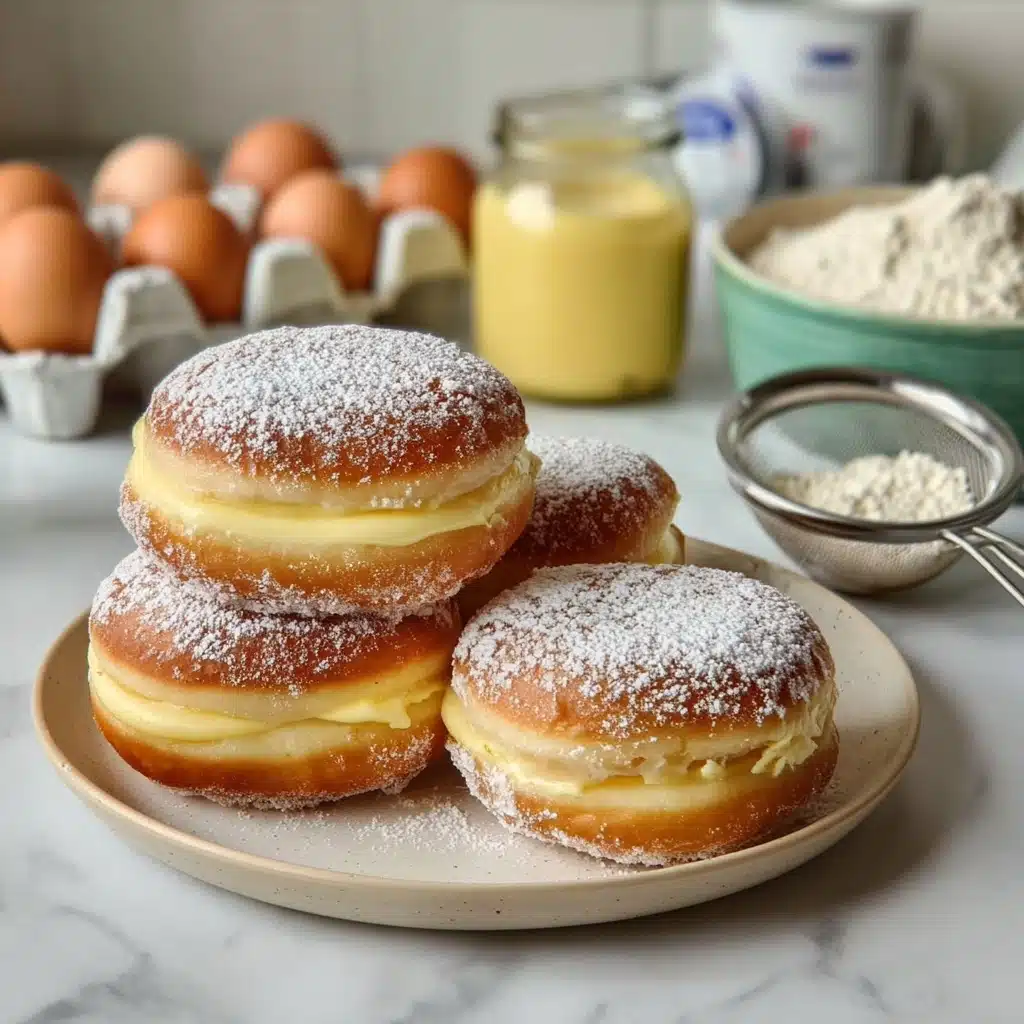
Fluffy Vanilla Cream Doughnuts Recipe
If your dessert dreams have ever included pillowy-soft pastries filled with a luxuriously smooth vanilla custard, these Fluffy Vanilla Cream Doughnuts are guaranteed to steal your heart. Imagine that perfect moment when you bite into a sugar-dusted doughnut, and it gives way to creamy, cool custard—the type of bite that makes you close your eyes in pure bliss. These homemade Fluffy Vanilla Cream Doughnuts bring that tender texture and irresistible flavor right into your own kitchen, making bakery-style joy something you can share and savor anytime.

Ingredients You’ll Need
The best part about these doughnuts is how the simplest ingredients come together to create unforgettable treats. Each element does its job to ensure the doughnuts are as airy and luscious as any you’d find at your favorite bakery. Here’s what you’ll need and why!
- All-purpose flour: This is the foundation, providing the perfect structure for that ultra-fluffy bite.
- Granulated sugar: A touch of sweetness elevates both the dough and the creamy filling.
- Active dry yeast: The essential lift! Yeast makes the doughnuts puff up so delicately.
- Salt: Just a pinch balances sweetness, letting all the other flavors shine.
- Warm milk: Warms up the dough and enriches every bite with tenderness and moisture.
- Unsalted butter, softened: For that melt-in-your-mouth richness that makes these doughnuts feel decadent.
- Large egg: Adds structure and a gentle richness to the dough.
- Vanilla: The star player in both dough and custard, it brings a lovely perfume and warmth.
- For the Custard Filling: This dreamy combo—milk, egg yolks, sugar, cornstarch, and vanilla—translates to the creamiest, silkiest filling you’ve ever tasted.
- Optional Garnish: A dusting of powdered sugar or a light glaze will send your Fluffy Vanilla Cream Doughnuts over the top!
How to Make Fluffy Vanilla Cream Doughnuts
Step 1: Make the Dough
Start by gathering a large bowl and mixing together the flour, sugar, yeast, and salt. These dry ingredients form the backbone of your dough. Next, add in the warm milk, soft butter, egg, and vanilla. Use your hands (or a stand mixer with a dough hook) to knead everything together until you have a smooth, slightly tacky dough. It only takes a few minutes but you’ll know it’s ready when it springs back gently when pressed. Cover that beauty and let it rise in a warm spot, allowing the yeast to work its magic until doubled in size—about an hour.
Step 2: Shape and Second Rise
Once your dough has puffed up, gently punch it down to release some air. Turn it out onto a lightly floured surface and divide into equal portions (about 10-12 pieces works well). Shape each piece into a round ball, making sure the surface is smooth for even frying. Lay them out on a parchment-lined tray, cover, and let them rise again until irresistibly puffy—this ensures your Fluffy Vanilla Cream Doughnuts will be cloud-like inside.
Step 3: Fry to Golden Perfection
Fill a heavy-bottomed pot with enough oil for frying, and heat it to about 350°F (keep a close eye with a thermometer if you have one). Gently lower a few rounds at a time into the oil, taking care not to overcrowd. Fry on each side until golden brown and delicious—usually just 2-3 minutes per side. Set them on a rack or paper towels to drain off excess oil. This step is what gives that signature soft-crisp exterior, ready for the creamy filling.
Step 4: Prepare the Vanilla Custard Filling
While the doughnuts cool, make your custard! Warm the milk in a saucepan until just steaming. In a separate bowl, whisk together the egg yolks, sugar, and cornstarch until smooth and pale. Slowly pour the hot milk into the yolk mixture, whisking nonstop to temper, then return it all to the saucepan. Whisk over medium heat until it thickens to a cream-pudding consistency. Remove from heat, stir in vanilla, and cool completely. This dreamy vanilla cream is what transforms these from good to unforgettable!
Step 5: Fill and Finish
Once everything is cool, it’s time for the best part! Fit a piping bag with a round tip and fill with custard. Use a skewer or small knife to make a pocket in each doughnut, then pipe in your glorious vanilla custard until you feel them plump up. Finish with a generous dusting of powdered sugar or a drizzle of glaze. Now, pause to admire your homemade Fluffy Vanilla Cream Doughnuts—if you can wait another second to dive in!
How to Serve Fluffy Vanilla Cream Doughnuts
Garnishes
A gentle snow of powdered sugar is classic, letting the doughnut’s golden crust peek through. You could also whisk up a simple glaze—just mix powdered sugar with a touch of milk and vanilla—for an extra layer of sweetness and shine. Sprinkles, edible flowers, or a drizzle of melted chocolate can also make each Fluffy Vanilla Cream Doughnut feel like a celebration.
Side Dishes
Pair these fluffy beauties with a cup of strong coffee or a chilly glass of milk for that dreamy bakery vibe at home. Serving them alongside a bowl of fresh berries adds a pop of color and a fruity contrast to the rich custard. For brunch, flank your doughnuts with crisp bacon or a simple fruit salad to balance the indulgence.
Creative Ways to Present
If you’re serving guests, pile these Fluffy Vanilla Cream Doughnuts on a cake stand or in a rustic bread basket lined with a pretty cloth. For a brunch buffet, try arranging them in staggered rows with small signs describing the flavor. Or, go all out and offer a doughnut bar with different dustings and sauces—letting everyone customize their own creamy creation!
Make Ahead and Storage
Storing Leftovers
If you somehow resist eating them all at once, place leftover Fluffy Vanilla Cream Doughnuts in an airtight container in the refrigerator. The custard filling needs to stay chilled, and they’ll stay fresh for up to two days. Bring them to room temperature for a few minutes before eating so the flavors shine.
Freezing
You can freeze the unfilled doughnuts! Once fried and cooled, wrap each doughnut tightly in plastic and place in a freezer bag. When the craving hits, thaw at room temperature, then pipe in your custard and finish with sugar. Freezing is best for the plain doughnuts—filled ones may become a bit soggy if frozen.
Reheating
To refresh day-old doughnuts, pop them in a preheated oven at 300°F for just a few minutes until warm and slightly revived. Avoid microwaving filled doughnuts, as the custard can become runny. Enjoy them warm for that just-baked aroma and pillowy texture!
FAQs
Can I bake these doughnuts instead of frying?
While baking can work, frying is what gives these Fluffy Vanilla Cream Doughnuts their signature golden crust and tenderness. If you do bake, expect a texture more like a soft bread roll than a true doughnut. For best results, stick to frying!
Can I use instant yeast instead of active dry?
Absolutely! You can substitute instant yeast in equal amounts. Skip the step where you let it dissolve—just mix it right in with the dry ingredients and follow the recipe as written.
How do I avoid custard lumps?
The secret is constant whisking when warming the custard, and always pour hot milk slowly into the egg yolks to temper them. If you still end up with lumps, just strain the custard through a fine mesh sieve for a silky finish.
Can I use a different filling?
Definitely! Fluffy Vanilla Cream Doughnuts take well to all sorts of creamy centers—chocolate custard, flavored whipped cream, even jam or lemon curd. The doughnut base is a great canvas for your favorite fillings.
How far in advance can I make these?
The dough can be made the night before and left to rise slowly in the fridge. This makes frying and filling the next morning a breeze! Assembled, filled doughnuts are best eaten the day they’re made, but will keep nicely for up to 48 hours if chilled.
Final Thoughts
There’s something incredibly joyful about making Fluffy Vanilla Cream Doughnuts from scratch, especially when you get to share them with people you love (or just keep them all to yourself!). Every bite is soft, creamy, and full of sweet vanilla flavor. Give this recipe a try and let homemade happiness steal the show in your kitchen!