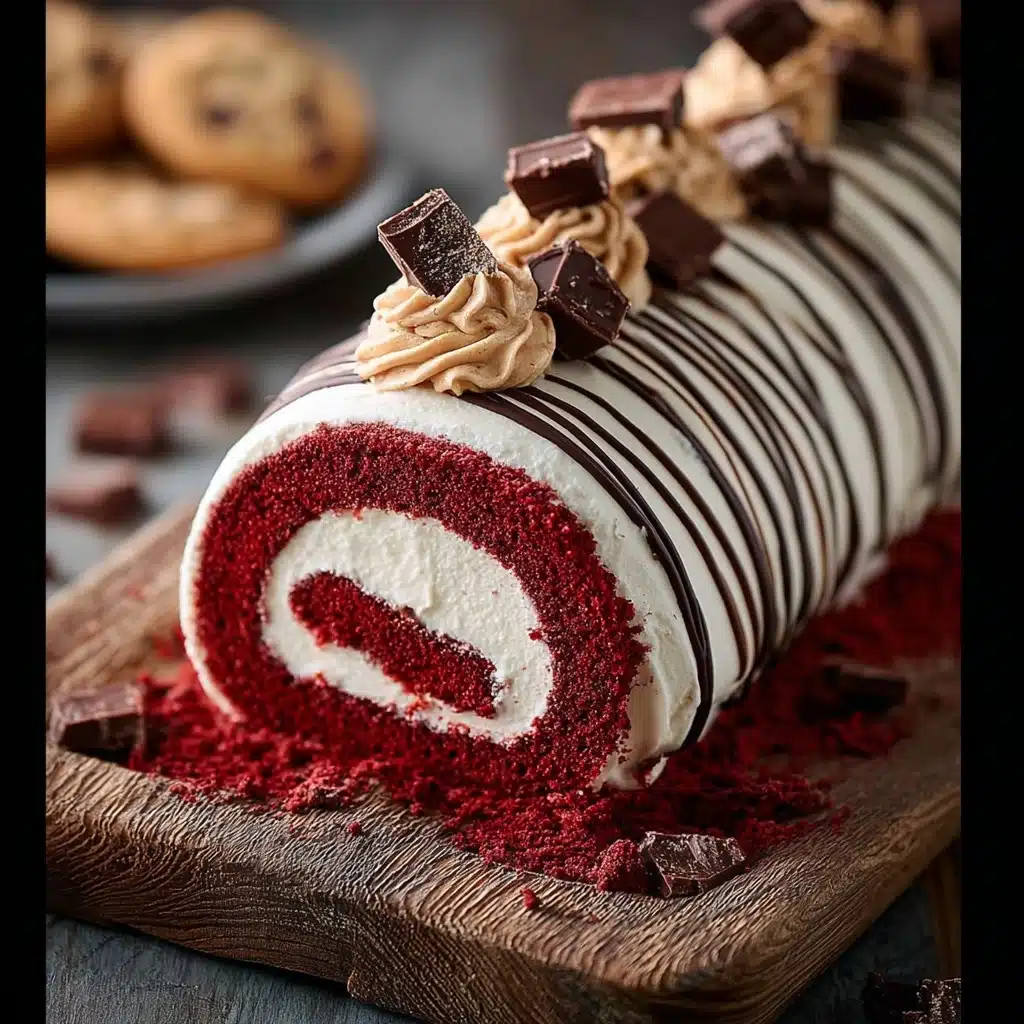
Red Velvet Swiss Roll Cake Recipe
If you adore the rich, velvety charm of red velvet cake but crave something a bit more playful and elegant, then you absolutely must try this Red Velvet Swiss Roll Cake. This delightful treat wraps that luscious, cocoa-tinged red cake around a dreamy cream cheese filling, all swirled together into a stunning spiral that’s as beautiful as it is delicious. Every bite offers a tender, moist crumb with just the right tang and sweetness, making it a show-stopping dessert that’s perfect for celebrations or any day that deserves a little extra indulgence.

Ingredients You’ll Need
Getting this Red Velvet Swiss Roll Cake just right comes down to a few simple, carefully chosen ingredients. Each one plays a crucial role in delivering the classic red velvet taste, the perfect sponge texture, and that irresistible creamy filling.
- 4 large eggs, room temperature: Eggs provide structure and help the sponge rise to fluffy perfection.
- 100 g (½ cup) granulated sugar: Adds sweetness and helps to whip the eggs to a pale, airy mixture.
- 60 ml (¼ cup) vegetable oil: Keeps the sponge moist and tender without weighing it down.
- 60 ml (¼ cup) buttermilk: Gives a slight tang and contributes to the soft crumb; you can substitute milk plus 1 tsp vinegar.
- 100 g (¾ cup) all-purpose flour: The foundation of the sponge, providing light structure.
- 15 g (2 tbsp) unsweetened cocoa powder: Adds that subtle chocolate depth that’s signature in red velvet.
- ½ tsp baking powder: Helps the cake rise gently and evenly.
- ¼ tsp baking soda: Works with the buttermilk to tenderize the crumb and create lift.
- ¼ tsp salt: Balances the sweetness and enhances overall flavor.
- 1 tsp vanilla extract: Brings warm, comforting notes to the sponge and filling.
- ½ tsp white vinegar: Boosts the cake’s red vibrancy and reacts with baking soda for lift.
- Red gel food coloring (as needed): Provides the vivid, signature red color without thinning the batter.
- 200 g (7 oz) cream cheese, softened: The star of the filling, lending richness and tang.
- 200 ml (¾ cup + 1 tbsp) heavy cream, cold: Whipped to add lightness and volume to the filling.
- 60 g (½ cup) powdered sugar: Sweetens the filling smoothly without grit.
- 150 g (5 oz) dark chocolate, chopped: For the luscious ganache topping—deep, rich, and glossy.
- 150 ml (⅔ cup) heavy cream: Warmed to infuse the ganache with creaminess and shine.
- Extra chocolate chunks, truffles, or curls: Fun decorations to make your cake bakery-worthy.
How to Make Red Velvet Swiss Roll Cake
Step 1: Prepare and Bake the Sponge
Start by preheating your oven to 175°C (350°F) and lining a jelly roll pan with parchment paper for an easy release. The magic begins here as you beat eggs and sugar vigorously until the mix is pale and tripled in volume—this aeration is what makes your sponge light and fluffy. Separately, combine the oil, buttermilk, vanilla, vinegar, and red gel food coloring to infuse the perfect vibrant hue and tang. Sift the dry ingredients carefully and fold them into the egg mixture, followed by blending the wet red mix until the batter is smooth and evenly colored. Pour the batter into the pan and bake a tender sponge in about 10 to 12 minutes, just until it springs back lightly when touched.
Step 2: Roll the Cake While Warm
Timing here is everything. Once out of the oven, immediately invert your sponge onto a powdered sugar or cocoa-dusted kitchen towel to prevent sticking. Peel off the parchment gently, then roll the cake up with the towel along the short side. This warm roll helps train the cake to bend without cracking. Let it cool completely while rolled to hold that shape beautifully.
Step 3: Whip Up the Cream Cheese Filling
While your sponge cools, whip the cream cheese with powdered sugar until silky smooth for that perfect tangy base. In a separate bowl, whip the heavy cream with vanilla to soft peaks and gently fold this into the cream cheese mixture. The result is an irresistibly fluffy and luscious filling that contrasts just right with the cake’s delicate crumb.
Step 4: Assemble the Red Velvet Swiss Roll Cake
Now for the fun and rewarding part! Carefully unroll your cooled cake and spread that heavenly cream filling evenly over the surface. Roll the cake back up tightly—this time without the towel! Wrapping it in plastic and chilling the roll for at least 30 minutes firms up the filling and makes slicing into neat, gorgeous spirals so much easier.
Step 5: Create the Ganache and Decorate
For a showstopping finish, warm heavy cream until steaming and pour over chopped dark chocolate, letting it sit so the chocolate melts perfectly before stirring until glossy and smooth. Drizzle or spread this luxurious ganache over your roll, then let your creativity shine by decorating with chocolate truffles, curls, or even a sprinkle of red velvet crumbs. This final flourish transforms your Red Velvet Swiss Roll Cake into a centerpiece worthy of any special occasion!
How to Serve Red Velvet Swiss Roll Cake
Garnishes
A little bit of extra flair can go a long way. Fresh berries, edible flowers, or a dusting of powdered sugar add brightness and elegance. Chocolate curls or delicate truffles elevate the indulgence factor, turning your cake into a feast for the eyes as well as the palate.
Side Dishes
This cake pairs wonderfully with a scoop of vanilla bean ice cream or a dollop of freshly whipped cream. For a fun twist, serve alongside tangy fruit compotes or a light berry coulis to balance the cake’s richness with fresh acidity.
Creative Ways to Present
Serving your Red Velvet Swiss Roll Cake doesn’t have to be traditional. Try slicing it into petite roulade servings for elegant tea-time treats, or cut into thick slices for a decadent dessert plate garnished with sauces and nuts. You can even make mini rolls using the same technique for individual celebrations or party favors!
Make Ahead and Storage
Storing Leftovers
Wrap your leftover Red Velvet Swiss Roll Cake tightly in plastic wrap and store it in the refrigerator. It will stay fresh and moist for up to three days, perfect for enjoying a slice or two without any loss of flavor or texture.
Freezing
Need to keep your Swiss roll longer? Wrap it securely in plastic and then in foil to prevent freezer burn. It stays tasty for up to one month. To enjoy, thaw overnight in the refrigerator before serving.
Reheating
Because this dessert is best served chilled, reheating isn’t necessary. If desired, allow it to come to room temperature for 20 minutes to soften the ganache slightly, but avoid warming to keep the filling’s texture intact.
FAQs
Can I use regular food coloring instead of gel?
You can, but gel food coloring is better because it provides vibrant color without altering the batter’s consistency. Liquid dyes may make the batter runnier, affecting the sponge’s texture.
Why do I need to roll the cake while it’s warm?
Rolling while warm prevents the cake from cracking later when you fill and roll it. It helps the sponge “learn” to bend and retain that shape after cooling.
Can I substitute the cream cheese filling with whipped cream?
Whipped cream alone won’t give the same tang and structure as cream cheese, so the filling might be too soft. For best results, combine whipped cream with cream cheese as per the recipe.
What’s the best way to slice this roll neatly?
Chill the roll well before slicing to firm up the cream filling and ganache. Use a sharp serrated knife and cut with a gentle sawing motion for clean edges.
Can I make this cake gluten-free?
Yes! Use a gluten-free flour blend suitable for baking. Ensure your blend includes xanthan gum or another binder for structure, or add a small amount separately.
Final Thoughts
This Red Velvet Swiss Roll Cake is such a joyous way to elevate the classic flavors and wow your friends and family with a stunning homemade creation. It’s not only irresistibly delicious but also a joy to make step by step. I promise once you try it, this cake will become your festive go-to and a centerpiece worthy of celebration. So, grab your ingredients, preheat that oven, and get ready to roll out pure happiness!