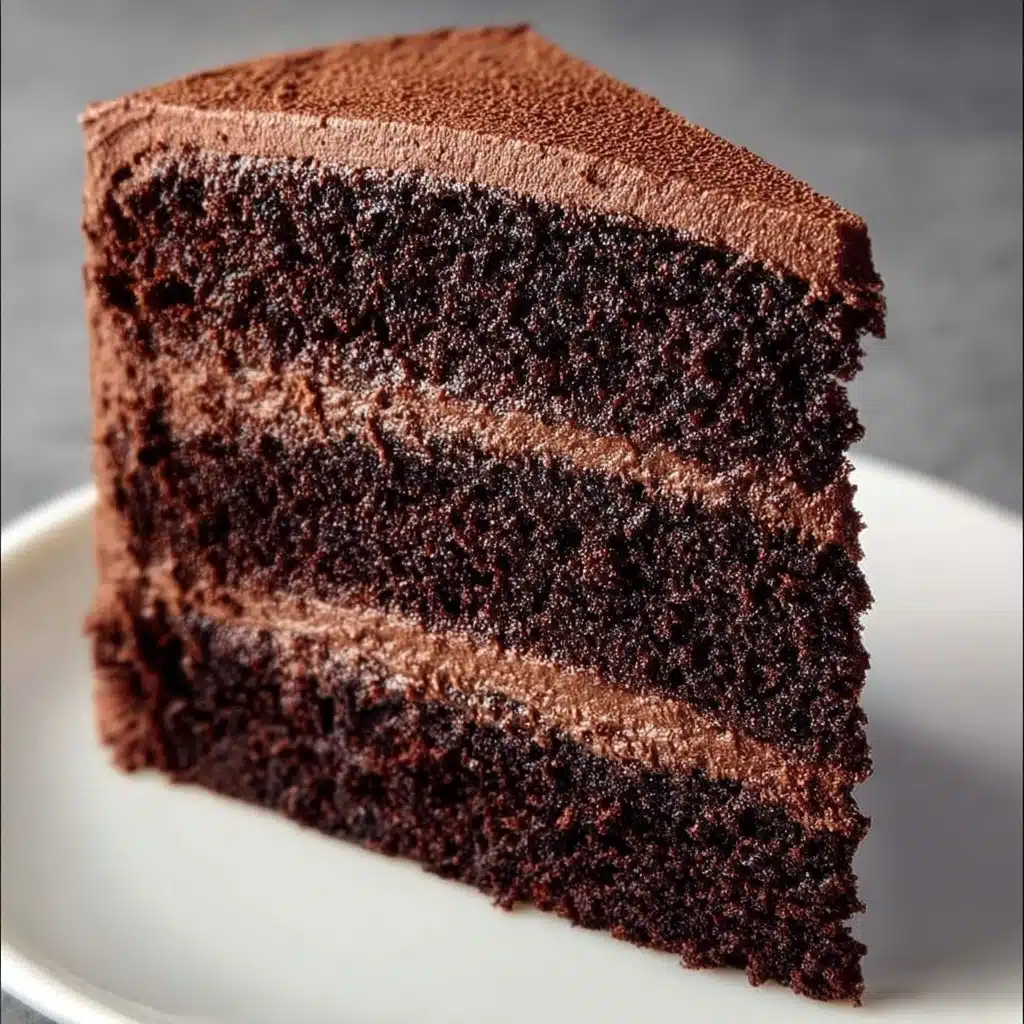
Chocolate Buttermilk Cake Recipe
If you’re on the hunt for a cake that balances deep chocolate flavor with a tender, moist crumb, you’ve just found your new favorite: the Chocolate Buttermilk Cake. This delightful dessert combines the tangy richness of buttermilk with the intense cocoa flavor to create a cake that’s irresistibly soft, perfectly balanced, and utterly indulgent. Whether it’s a special occasion or a casual treat, this Chocolate Buttermilk Cake promises to deliver smiles and seconds for everyone fortunate enough to taste it.

Ingredients You’ll Need
Gathering these simple but essential ingredients is your first step toward baking a cake that dazzles with flavor and texture. Each element plays a crucial role: from the flour giving structure, to the buttermilk providing moisture and a slight tang, and cocoa powder imparting that rich chocolate goodness.
- All-purpose flour: The base of your cake, giving it strength and body without heaviness.
- Unsweetened cocoa powder: This is what delivers the deep chocolate flavor, so choose a good quality one for best results.
- Baking powder: Helps the cake rise to a light and fluffy texture, making it airy but not crumbly.
- Baking soda: Works along with buttermilk to leaven and tenderize the crumb.
- Salt: Balances the sweetness and enhances all the other flavors beautifully.
- Sugar: Provides sweetness and contributes to the moist mouthfeel of the cake.
- Vegetable oil: Keeps the cake incredibly moist and tender, with a neutral flavor that lets the chocolate shine.
- Eggs: Add richness and structure, binding everything together perfectly.
- Buttermilk: Adds a subtle tang and reacts with leaveners to give a light, delicate crumb.
- Hot water or brewed coffee: Enhances the chocolate intensity while keeping the batter smooth and glossy.
- Vanilla extract: Rounds out the flavors with a warm sweetness that complements cocoa wonderfully.
How to Make Chocolate Buttermilk Cake
Step 1: Prepare the Dry Ingredients
Begin by sifting together the all-purpose flour, unsweetened cocoa powder, baking powder, baking soda, and salt into a large mixing bowl. Sifting not only combines these ingredients but also helps to aerate the mixture, ensuring your cake develops a light, delicate texture.
Step 2: Mix the Wet Ingredients
In a separate bowl, whisk the sugar, vegetable oil, eggs, and vanilla extract until the mixture is smooth and slightly thickened. This step ensures that the sugar begins to dissolve and the eggs are evenly incorporated to create a uniform batter.
Step 3: Combine Dry and Wet Ingredients Alternately
Gradually add the dry ingredient mixture into the wet ingredients in two parts, alternating with the buttermilk. This alternating method helps to keep the batter tender by minimizing gluten development. Mix just until combined to avoid overworking the batter.
Step 4: Add Hot Liquid
Finally, stir in the hot water or brewed coffee slowly. This addition thins the batter to a glossy, silky consistency and intensifies the chocolate flavor. Don’t be alarmed if the batter feels quite loose – this is how it creates a moist, tender crumb after baking.
Step 5: Bake the Cake Layers
Divide the batter evenly into three greased and lined 8-inch cake pans. Bake in a preheated oven at 175°C (350°F) for 25 to 30 minutes, or until a toothpick inserted in the center comes out clean. Allow the cake layers to cool completely in the pans before removing them.
Step 6: Prepare the Chocolate Frosting
Beat softened butter until creamy and smooth, then add the unsweetened cocoa powder and mix well. Gradually add the icing sugar with 4 to 6 tablespoons of milk, beating until light and fluffy. Stir in the vanilla extract and a pinch of salt to balance the sweetness and enhance the chocolate flavor.
Step 7: Assemble and Frost
Place one cake layer on your serving plate, generously spread with chocolate frosting, then repeat with the second and third layers. Cover the top and sides of the assembled cake with the remaining frosting, smoothing it out with a spatula. For an extra special touch, decorate with chocolate shavings or a drizzle of ganache.
How to Serve Chocolate Buttermilk Cake
Garnishes
To elevate your Chocolate Buttermilk Cake visually and adding texture, I love garnishing with chocolate shavings or a handful of fresh berries. A light dusting of cocoa powder or a dusting of powdered sugar can add a rustic charm. Toasted nuts or edible gold leaf also make for an elegant finish that impresses every guest.
Side Dishes
This cake pairs beautifully with a scoop of creamy vanilla ice cream or a dollop of lightly whipped cream to balance the richness. Fresh fruit, particularly raspberries or strawberries, provides a lovely tart contrast while a drizzle of caramel or berry coulis can add complex sweetness for a more decadent experience.
Creative Ways to Present
If you want to get creative, slice the cake into individual portions and present them in mini trifle glasses layered with whipped cream and berries for a stunning dessert parfait. Or cut into cubes and serve as cake pops dipped in chocolate glaze for a fun, handheld treat perfect for parties.
Make Ahead and Storage
Storing Leftovers
Your Chocolate Buttermilk Cake will stay moist and delicious stored in an airtight container at room temperature for up to 3 days. If your kitchen is warm, it’s better to store it in the refrigerator, but bring to room temperature before serving to enjoy the perfect texture and flavor.
Freezing
This cake freezes beautifully! Wrap the unfrosted layers tightly in plastic wrap and then in aluminum foil before freezing for up to 3 months. You can also freeze the entire frosted cake if well wrapped. Thaw overnight in the fridge and let come to room temperature before serving.
Reheating
If refrigerated or frozen, gently warm individual slices in the microwave for about 15-20 seconds on medium power. This quick heat-up will reactivate the moist crumb and make the chocolate frosting delightfully soft, just like freshly baked!
FAQs
Can I substitute regular milk for buttermilk in this recipe?
While buttermilk adds a unique tang and helps with the cake’s tender texture, you can substitute regular milk mixed with a tablespoon of lemon juice or vinegar to mimic the acidity. Let it sit for 5 minutes before using for the best results.
What makes this Chocolate Buttermilk Cake so moist?
The combination of vegetable oil and buttermilk keeps the cake wonderfully moist. Unlike butter, oil remains liquid at room temperature, which helps the crumb stay soft and tender. Buttermilk adds a tangy moisture and reacts with leavening agents to create a light texture.
Can I make this cake gluten-free?
You can experiment with a gluten-free all-purpose flour blend that contains xanthan gum. Keep in mind that texture may vary slightly, but the chocolate flavor will still shine. Adjust baking time as needed, checking for doneness with a toothpick.
Is brewed coffee necessary for the hot liquid?
Hot brewed coffee isn’t mandatory but it does enhance the chocolate flavor significantly, making it richer and more complex. If you prefer, use hot water instead — the cake will still be fantastic but slightly less intense in chocolate depth.
Can I use this frosting on other cakes?
Absolutely! This chocolate frosting is incredibly versatile and pairs well with various cakes, cupcakes, and even brownies. Its creamy, silky texture and rich cocoa flavor make it a crowd-pleaser across many desserts.
Final Thoughts
There’s something truly magical about baking a Chocolate Buttermilk Cake that turns everyday moments into celebrations. With its perfect balance of tangy buttermilk and rich chocolate, along with a fluffy, moist crumb, this cake is a joy to bake and even more of a joy to share. Dive into the process, enjoy the delicious results, and I promise this recipe will become a cherished favorite you reach for again and again.