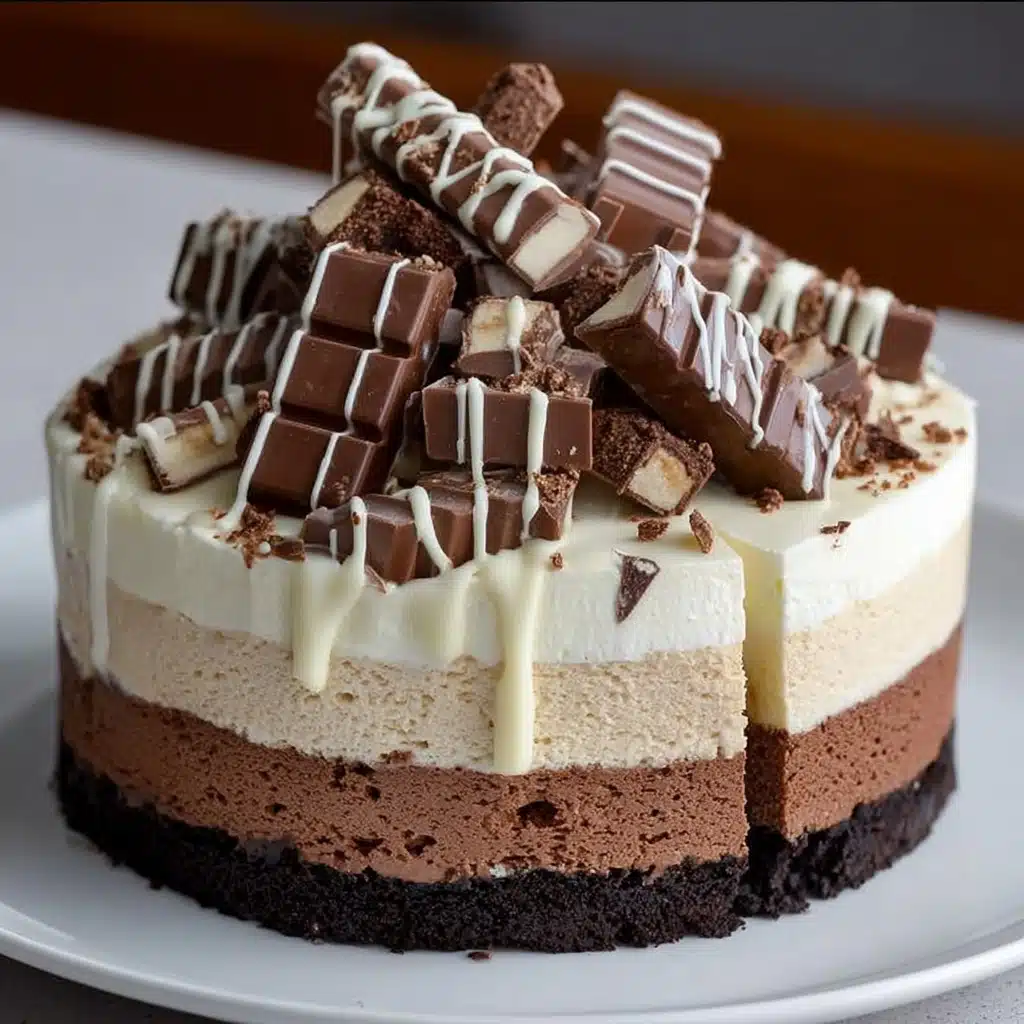
No-Bake Milk & White Chocolate KitKat Cheesecake Recipe
If you ever crave a dessert that’s as indulgent as it is effortless, let me introduce you to the No-Bake Milk & White Chocolate KitKat Cheesecake. This dreamy cheesecake combines the smooth, creamy texture of classic cheesecake with the irresistible crunch and sweetness of KitKat bars layered in silky milk and white chocolate blends. It’s a perfect treat for any occasion that promises to wow your friends and family without ever needing an oven. Trust me, once you try this, it will quickly become one of your favorites to whip up and share!
Ingredients You’ll Need
The beauty of the No-Bake Milk & White Chocolate KitKat Cheesecake lies in its simplicity. Each ingredient plays a vital role, whether creating that sturdy yet buttery base, a luxuriously creamy filling, or that oh-so-satisfying crunch and chocolatey bliss from the KitKat additions.
- Digestive biscuits (250 g): Crushed to form a crunchy, buttery base that holds everything perfectly.
- Unsalted butter (100 g), melted: Combines with the biscuits to create a firm, flavorful crust.
- Cream cheese (300 g), softened: The creamy heart of the cheesecake, lending richness and smoothness.
- Icing sugar (100 g), sifted: Adds just the right touch of sweetness without any graininess.
- Double cream (300 ml), chilled: Whipped to soft peaks for a light, airy texture in the filling.
- Milk chocolate (200 g), melted and slightly cooled: Infuses part of the filling with deep, luscious milk chocolate flavor.
- White chocolate (150 g), melted and slightly cooled: Adds a sweet, creamy contrast to the milk chocolate layer.
- KitKat fingers (8–10), chopped: The surprise crunch that makes the cheesecake exciting in every bite.
- Extra KitKat fingers for decoration: Because the more chocolate, the better, right?
- Milk & white chocolate drizzle (optional): For that elegant, swirled finish that’s as pretty as it is tasty.
- Whipped cream (optional): Adds extra indulgence if you want to really spoil yourself.
How to Make No-Bake Milk & White Chocolate KitKat Cheesecake
Step 1: Prepare the Base
Start by crushing your digestive biscuits into fine crumbs, creating the perfect texture for your cheesecake base. Mix these crumbs thoroughly with the melted unsalted butter to ensure every bit is coated and will hold together when pressed into your springform tin. Press the mixture firmly into the base of a 20 cm (8-inch) tin. Pop it into the fridge to chill and set while you prepare the filling. This step is crucial because it gives your cheesecake a solid foundation that balances creamy filling beautifully.
Step 2: Make the Cheesecake Filling
In a large bowl, beat the softened cream cheese with the sifted icing sugar until the mixture is silky smooth—no lumps here! Separately, whip the chilled double cream until you see those perfect soft peaks that hold their shape but still feel light and fluffy. Gently fold the whipped cream into the cream cheese mixture for a texture that’s dreamy but stable. Now comes the fun part: divide the filling evenly into two bowls. Fold the melted milk chocolate into one bowl, and the melted white chocolate into the other. This gives you two beautiful, contrasting flavors within one cheesecake. Finally, fold the chopped KitKat fingers into both mixtures, ensuring we get a little crunch in every bite.
Step 3: Assemble the Cheesecake
Take your chilled biscuit base and spread the milk chocolate mixture evenly over it, smoothing the top for a flawless layer. Next, spoon the white chocolate mixture on top, carefully spreading it out to create a striking two-tone effect. Cover the cheesecake with cling film and place it in your fridge for at least six hours, though overnight is even better to allow it to set completely and develop those rich flavors.
Step 4: Decorate Your Cheesecake
Here’s where you can get creative! Arrange extra KitKat fingers around the edge or pile them charmingly in the center for an inviting look. To take it up a notch, drizzle melted milk and white chocolate over the top in graceful swirls. Finish with whipped cream dollops if you want that additional touch of luxury. This decoration step is not only beautiful but adds a final burst of texture and flavor, making your dessert as stunning to look at as it is to eat.
How to Serve No-Bake Milk & White Chocolate KitKat Cheesecake

Garnishes
For serving, I love adding a fresh touch with a few sprigs of mint or some delicate edible flowers to balance the rich sweetness. A light dusting of cocoa powder or crushed KitKat crumbs sprinkled on top can also add visual appeal and a hint of extra crunch.
Side Dishes
This cheesecake is rich and satisfying on its own, but if you want to complement it, fresh berries or a tangy raspberry coulis provide an exciting contrast that cuts through the sweetness beautifully. A scoop of vanilla bean ice cream can pair just flawlessly for those who want an ultra-decadent dessert experience.
Creative Ways to Present
Why settle for the traditional slice? Try serving your No-Bake Milk & White Chocolate KitKat Cheesecake in individual glass jars or mini mason jars layered with extra KitKat crumbs and chocolate drizzle between layers for a fun, personalized touch. Another idea is to make a cheesecake trifle with alternating layers of the cheesecake filling and extra KitKat bites, turning it into an interactive and visually stunning dessert.
Make Ahead and Storage
Storing Leftovers
Once your cheesecake is beautifully set and decorated, you can store leftovers covered in the fridge for up to 3 days. Keeping it chilled ensures the texture stays firm and the flavors remain vibrant. Just make sure to use an airtight container or cover it tightly with cling film to prevent it from drying out or absorbing other fridge odors.
Freezing
If you want to enjoy the cheesecake later, it freezes quite well. Wrap it securely in plastic wrap and place it in a freezer bag or container, where it will keep for up to one month. Thaw it overnight in the fridge before serving. Keep in mind that while the texture may soften slightly after freezing, the flavor will still be just as delicious.
Reheating
This dessert is best enjoyed cold or at room temperature, so reheating is not recommended. Instead, allow it to sit at room temperature for about 15-20 minutes before serving if you want to soften the texture a bit. This way, you maintain that perfect balance of creamy and crunchy with every bite.
FAQs
Can I use different types of chocolate for this cheesecake?
Absolutely! While the classic combination of milk and white chocolates creates a lovely contrast, feel free to experiment with dark chocolate or even flavored chocolates like caramel or hazelnut to make the cheesecake your own.
Is it possible to make this cheesecake dairy-free?
You can substitute the cream cheese and double cream with dairy-free alternatives like coconut cream and vegan cream cheese, and choose dairy-free chocolates. The texture might differ slightly but the flavor will still delight.
How long does it take for the cheesecake to set properly?
You want to give it at least six hours in the fridge, but overnight chilling is ideal to allow all the layers to firm up perfectly and the flavors to meld into that signature creamy goodness.
Can I make this cheesecake in smaller or larger tins?
Definitely! Just adjust the quantities of ingredients proportionally to fit your chosen tin size. Smaller tins will mean thicker layers and a taller cheesecake; larger tins will spread those layers out thinner.
What’s the best way to cut the cheesecake without it crumbling?
Use a sharp knife dipped in hot water before each cut, wiping it clean in between slices. This gives you clean, smooth edges and a perfect slice every time without too much sweetness on the knife.
Final Thoughts
I truly believe the No-Bake Milk & White Chocolate KitKat Cheesecake is one of those magical recipes that brings the best of comfort food and indulgence together effortlessly. It’s perfect for sharing and impressing at gatherings or just treating yourself after a long day. So why not give it a try? I promise, biting into that creamy, crunchy, chocolaty masterpiece will make every moment in the kitchen worth it!