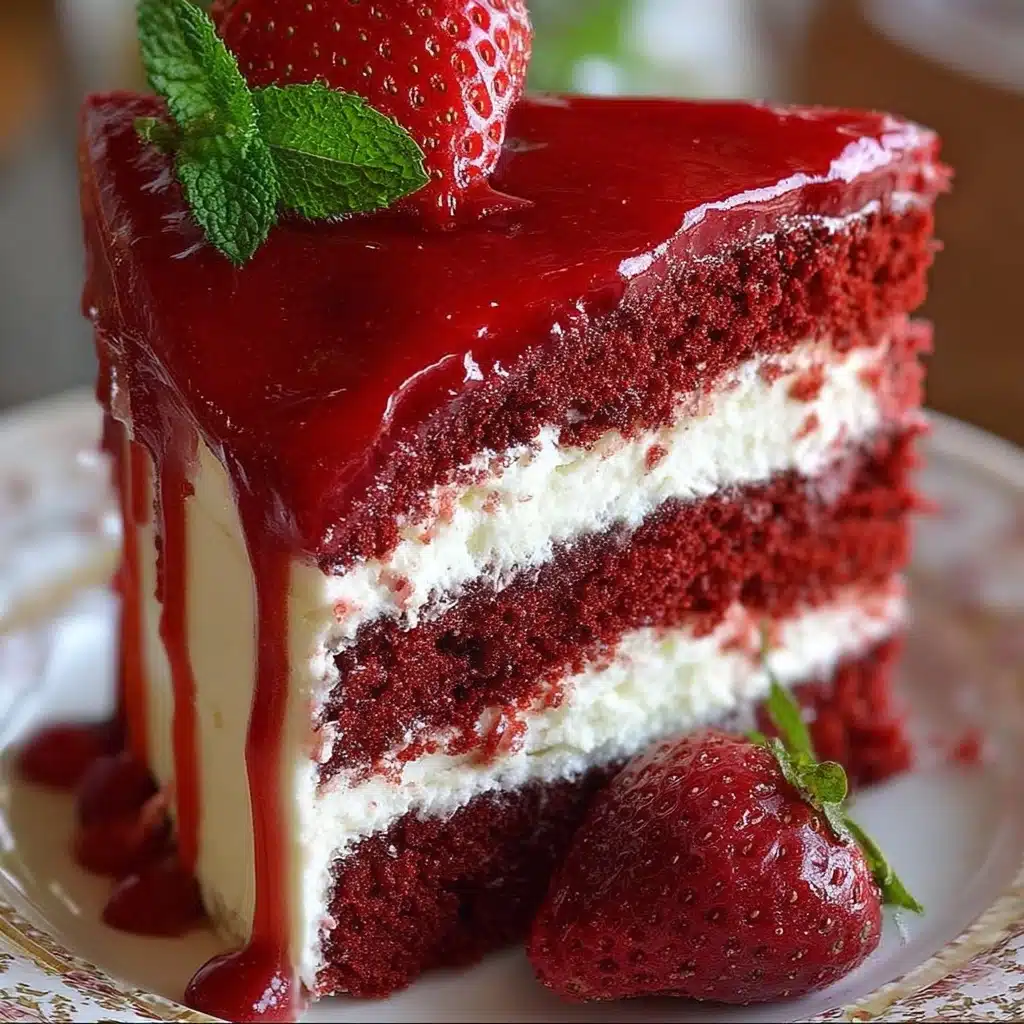
Best Strawberry Red Velvet Cheesecake Recipe
If you are searching for a dessert that combines rich, smooth creaminess with a vibrant pop of color and flavor, look no further than the Best Strawberry Red Velvet Cheesecake. This stunning treat layers the classic red velvet cake’s tender crumb with a luscious cheesecake filling, all crowned by a fresh, glossy strawberry topping. It’s a showstopper for parties, special occasions, or any time you want to impress your taste buds with a beautiful and indulgent slice. Trust me, every bite sings with the perfect balance of tangy, sweet, and velvety textures that make it your new favorite dessert obsession.

Ingredients You’ll Need
Creating the Best Strawberry Red Velvet Cheesecake couldn’t be simpler with just a handful of carefully chosen ingredients. Each component plays a vital role in delivering that perfect harmony of flavor, texture, and vibrant color you crave.
- All-purpose flour: The foundation for the tender red velvet cake layer, providing structure without heaviness.
- Unsweetened cocoa powder: Adds subtle depth and the signature red velvet flavor without overpowering sweetness.
- Baking soda and salt: Essential for leavening and balancing the flavors in the cake.
- Buttermilk: Brings moisture and a slight tang that keeps the cake tender and flavorful.
- White vinegar: Reacts with baking soda to help the cake rise while enhancing the red shade.
- Pure vanilla extract: A key layer of flavor in both the cake and cheesecake for warmth and richness.
- Red gel food coloring: Gives that iconic, eye-popping hue to the red velvet layer without affecting texture.
- Unsalted butter and granulated sugar: Creamed to add lightness and sweetness to the cake base.
- Eggs: Bind all the ingredients together while contributing to the soft and creamy texture.
- Cream cheese: The star of the cheesecake layer lending its unmistakably smooth, tangy profile.
- Sour cream: Adds extra creaminess and a slight tang, perfect for a velvety filling.
- Fresh strawberries: For that sweet, bright topping that effortlessly complements the richness below.
- Lemon juice and cornstarch: Help create a glossy, thick strawberry topping that stays put on every slice.
How to Make Best Strawberry Red Velvet Cheesecake
Step 1: Prepare the Red Velvet Cake Layer
Start by preheating your oven and readying a springform pan with parchment paper so nothing sticks. Then, whisk together your dry ingredients—flour, cocoa powder, baking soda, and salt—to ensure even distribution. Separately, mix buttermilk, vinegar, vanilla, and red food coloring to get that vibrant liquid base. Cream the softened butter and sugar until fluffy, then beat in the egg. Alternate adding the dry ingredients and wet mixture to keep the batter smooth and light. Pour the batter into the pan and bake just until set. This layer will be the plush foundation for the cheesecake, so resist the urge to fully bake it through at this step.
Step 2: Make the Cheesecake Layer
Next, cream together the softened cream cheese and sugar until luxuriously smooth. Beat in eggs one by one to maintain a silky texture, followed by sour cream and vanilla extract for richness and a hint of tang. Pour this luscious filling over the slightly cooled red velvet base, smoothing the surface carefully to prepare for baking. This layer is what transforms the cake into a decadent dessert worthy of the “best” title.
Step 3: Bake the Cheesecake
Set your springform pan on a baking sheet to catch any drips, then bake at a low temperature to prevent cracking and ensure even cooking. The cheesecake is done when the center is mostly set but retains a gentle wobble—this ensures creamy perfection. After baking, leave the cheesecake in the warm oven with the door slightly ajar, allowing gradual cooling that minimizes cracks. Finally, chill it well before the grand finale—the strawberry topping.
Step 4: Prepare the Strawberry Topping
While your cheesecake chills, simmer fresh strawberries with sugar and lemon juice until they release their natural juices. Stir in a cornstarch slurry to thicken the mixture and create a glossy, luscious fruit topping. Cool this completely before spreading it evenly over the cheesecake for a burst of fresh berry sweetness paired perfectly with the rich layers beneath.
Step 5: Assemble and Serve
Once cold, spread the strawberry topping gently over your cheesecake. For an extra touch of elegance, add whipped cream, white chocolate shavings, or more fresh strawberries. Slice with a warm knife for clean cuts and serve slices that ooze with flavor and beauty in every bite. This step is the moment where your effort transforms into pure, delightful magic.
How to Serve Best Strawberry Red Velvet Cheesecake
Garnishes
Visual appeal is half the dessert’s charm. Consider dollops of freshly whipped cream, extra strawberry slices fanned artfully, or a sprinkle of white chocolate shavings. These simple garnishes not only elevate presentation but also add texture contrasts and extra flavor layers that will keep everyone swooning.
Side Dishes
This cheesecake pairs wonderfully with light accompaniments. Try serving it alongside a scoop of vanilla bean ice cream, a refreshing mint leaf, or a cup of rich espresso. These complements enhance the overall dessert experience without overshadowing the cheesecake’s luscious profile.
Creative Ways to Present
To make your Best Strawberry Red Velvet Cheesecake truly unforgettable, try serving it in individual mini springform pans or as layered parfaits with crumbled red velvet crumbs and cheesecake mousse. You could also drizzle some strawberry sauce artistically on the serving plate or use edible flowers as a fresh, vibrant accent. These creative twists add a personal touch that guests will adore.
Make Ahead and Storage
Storing Leftovers
After enjoying your slices, store any leftovers tightly covered in the refrigerator. The cheesecake keeps beautifully for up to 4 days, allowing the flavors to meld even more. Make sure to avoid air exposure to maintain that creamy texture and fresh strawberry topping.
Freezing
If you want to save some for later, this cheesecake freezes surprisingly well. Wrap tightly in plastic wrap and then aluminum foil to prevent freezer burn. Thaw overnight in the fridge before serving to preserve its rich texture and vibrant colors.
Reheating
Because cheesecake is best served chilled, reheating is not recommended. However, you can bring refrigerated pieces to room temperature by setting them out for 15-20 minutes for a softer bite without warming them too much.
FAQs
Can I use frozen strawberries for the topping?
Absolutely! Just thaw them fully and drain any excess liquid before cooking. Using fresh strawberries is ideal for texture, but frozen work well in a pinch.
What if I don’t have buttermilk?
Easy fix: mix ½ cup milk with 1 teaspoon white vinegar or lemon juice and let it sit for 5 minutes. This homemade buttermilk substitute will give the cake the same tender crumb and tangy flavor.
How do I prevent cracks in the cheesecake?
Bake at a low temperature, avoid over-mixing the batter, and allow the cheesecake to cool gradually with the oven door ajar as instructed. These steps help minimize cracking.
Can I make this recipe gluten-free?
Yes! Substitute the all-purpose flour with a gluten-free baking blend that measures cup-for-cup. Make sure other ingredients are gluten-free certified to be safe.
Is there a way to make the red velvet more intense in color?
You can increase the amount of red gel food coloring slightly or choose a brighter, concentrated gel brand. Avoid liquid food coloring as it can affect batter consistency.
Final Thoughts
Making the Best Strawberry Red Velvet Cheesecake is a delightful journey that rewards you with a dessert bursting with flavor, color, and texture. It’s more than just a cake; it’s an experience that brings smiles, well-deserved compliments, and joyous moments around the table. Whether you serve it to loved ones or savor a quiet slice yourself, this cheesecake is sure to become a beloved favorite you’ll want to make again and again. So preheat that oven and dive into baking this unforgettable treat—you absolutely deserve every bite!