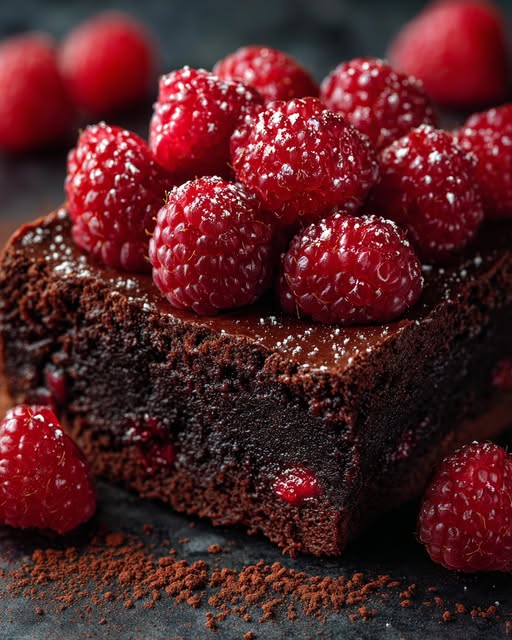
Raspberry No-Bake Brownie Recipe
If you’re searching for a luscious dessert that’s both easy to craft and irresistibly delicious, the Raspberry No-Bake Brownie is your new best friend. This delightful treat combines the deep richness of cocoa with the fresh brightness of ripe raspberries, all wrapped up in a naturally sweet, chewy base of dates and nuts. It’s perfect when you want something chocolatey without turning on the oven, and it brings a fantastic balance of flavors that will charm anyone lucky enough to taste it.

Ingredients You’ll Need
These ingredients may be simple, but each one plays a crucial role in delivering the perfect Raspberry No-Bake Brownie experience. From the natural sweetness of dates to the slight tartness of raspberries, every element contributes to the texture, flavor, and overall magic of this dessert.
- 1½ cups of pitted dates: Acts as the natural sweetener and sticky binder, eliminating the need for added sugars.
- 1 cup of raw almonds: Adds a satisfying crunch and nutty undertone to the chewy base.
- ½ cup of walnuts: Enhances the texture with buttery softness and a subtle earthy flavor.
- ⅓ cup of unsweetened cocoa powder: Provides that rich, chocolatey depth that defines the brownie.
- 1 teaspoon of vanilla extract: Lifts all the flavors and adds a hint of warmth to the mixture.
- ¼ teaspoon of salt: Balances the sweetness and intensifies the chocolate notes.
- 1 cup of fresh raspberries: Brings a fresh, juicy tartness that brightens every bite.
- ¼ cup of shredded coconut (optional for garnish): Adds a tropical twist and a delicate texture contrast.
How to Make Raspberry No-Bake Brownie
Step 1: Process the Nuts and Dates
Start by tossing the pitted dates, raw almonds, and walnuts into your food processor. Pulse until they’re finely chopped and begin to blend together. This mixture is the foundation of your Raspberry No-Bake Brownie, providing the chewy and nutty base that holds everything tightly without any baking.
Step 2: Add Cocoa and Flavorings
Next, sprinkle in the unsweetened cocoa powder, pour in the vanilla extract, and sprinkle a pinch of salt. Continue processing until you get a sticky, chocolatey dough that clings together. The cocoa powder is what brings that signature rich brownie flavor, and the vanilla plus salt really make the flavors pop.
Step 3: Press into Pan and Add Raspberries
Line an 8×8-inch square pan with parchment paper to prevent sticking, then press the dough evenly across the bottom. Take care to press it down firmly—you want a solid base to hold the raspberries. Now gently press the fresh raspberries into the surface, spacing them evenly to ensure each bite gets a juicy burst of fruit.
Step 4: Optional Coconut Topping and Chill
If you love a little extra texture and tropical vibe, sprinkle shredded coconut over the top. Then place the pan in the refrigerator and chill for at least one hour so the Raspberry No-Bake Brownie can set properly. This chilling step enhances the firmness and makes it easier to cut into neat squares.
How to Serve Raspberry No-Bake Brownie
Garnishes
To make these brownies even more inviting, consider topping them with a few extra fresh raspberries or a light dusting of powdered sugar. A dollop of whipped cream or a drizzle of melted dark chocolate can also elevate the presentation and add an indulgent touch.
Side Dishes
The Raspberry No-Bake Brownie pairs wonderfully with a scoop of vanilla ice cream or a cup of rich espresso. The cool creaminess or bold coffee complements the chocolate and fruit, transforming your snack time into a special occasion.
Creative Ways to Present
Try cutting your Raspberry No-Bake Brownie into small bite-sized squares for a party platter, or serve them alongside fresh fruit for a colorful dessert board. Placing individual portions in decorative cupcake liners makes for an adorable, shareable treat that looks as good as it tastes.
Make Ahead and Storage
Storing Leftovers
Once set, store your Raspberry No-Bake Brownie in an airtight container in the refrigerator. They’ll keep beautifully for up to five days, maintaining their chewy texture and fresh flavors without drying out.
Freezing
If you want to enjoy these brownies later, they freeze excellently. Wrap individual squares tightly or place them in a freezer-safe container. When frozen, they can last up to three months—perfect for quick desserts anytime.
Reheating
Because these are no-bake and rely on chilling to set, reheating isn’t necessary or recommended. Just let frozen brownies thaw in the refrigerator for a few hours before enjoying them at their best.
FAQs
Can I use dried raspberries instead of fresh for this Raspberry No-Bake Brownie?
Fresh raspberries offer a juicy burst that’s hard to replace, but if you only have dried raspberries, you can try soaking them briefly in warm water to rehydrate. That said, the texture and freshness won’t be quite the same as using fresh fruit.
Is it possible to substitute the nuts for allergy-friendly options?
Absolutely! You can swap almonds and walnuts for seeds like sunflower or pumpkin seeds if you’re avoiding tree nuts. Just keep in mind this will alter the flavor and texture slightly, but your Raspberry No-Bake Brownie will still be delicious.
How sweet is the Raspberry No-Bake Brownie without added sugar?
The dates provide a natural candy-like sweetness that balances out the tartness of raspberries and the bitterness of cocoa. This creates a well-rounded flavor that’s satisfyingly sweet but not overpowering.
Can I add other flavors to the brownie mixture?
Definitely! Some lemon zest, cinnamon, or even a pinch of cayenne can add exciting twists. Just be cautious with quantities to keep the core Raspberry No-Bake Brownie flavor shining through.
How do I ensure the brownies hold together when cutting?
Make sure you firmly press the mixture into the pan to compact everything well and chill the brownies for at least an hour. Use a sharp knife and wipe it clean between cuts for neat edges.
Final Thoughts
I hope you’ll give this Raspberry No-Bake Brownie a go because it’s one of those delightful desserts that feels both luxurious and effortlessly simple. Whether you’re craving a quick treat to satisfy your chocolate and fruit cravings or impressing friends with a homemade delight, this recipe checks all the boxes. Enjoy every bite of that rich, fresh, and chewy goodness!