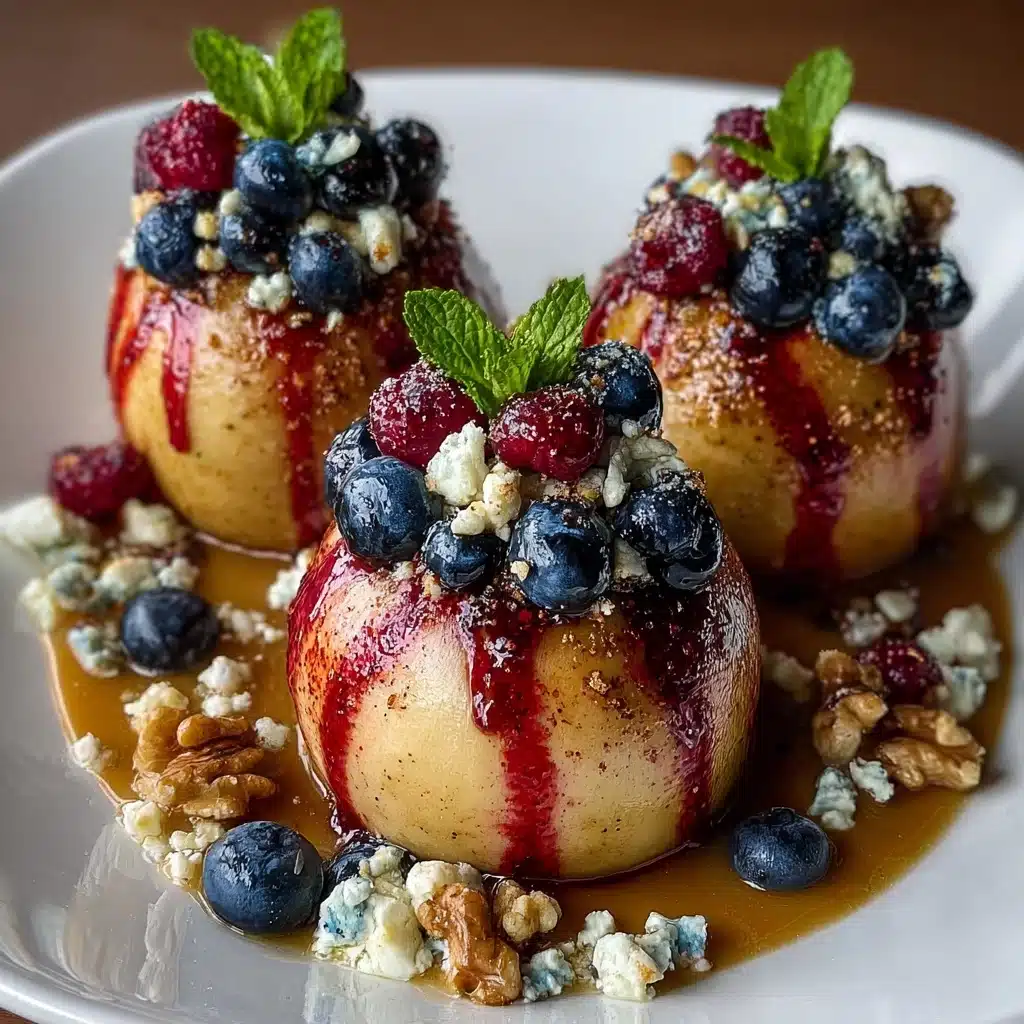
Baked Pears with Berries, Honey, Walnuts & Blue Cheese Recipe
If you love a dessert that feels both indulgent and surprisingly fresh, then you are absolutely going to fall head over heels for Baked Pears with Berries, Honey, Walnuts & Blue Cheese. This dish combines the juicy sweetness of ripe pears and mixed berries with the rich crunch of walnuts, the floral kiss of honey, and the bold creaminess of blue cheese. It’s the perfect harmony of flavors and textures that feels elegant and comforting all at once—ideal for a cozy night in or impressing guests with minimal effort.
Ingredients You’ll Need
The magic of this recipe lies in its simplicity. Each ingredient plays a crucial role in building layers of flavor, texture, and color that make the dish sing. You don’t need a long list of components, just the right ones to create that delightful balance.
- 4 ripe pears, halved and cored: Choose pears that are firm yet ripe for perfect baking softness without turning mushy.
- 1 cup mixed berries (blueberries, raspberries, or blackberries): These add vibrant color and bursts of juicy sweetness and tartness.
- ¼ cup walnuts, roughly chopped: For a satisfying crunch that contrasts beautifully with the soft fruits.
- 2–3 tbsp honey: Provides natural sweetness and a lovely sticky glaze when baked.
- 2 oz (55 g) blue cheese, crumbled: The star savory surprise that balances the sweetness with creamy tang.
- 1 tsp cinnamon (optional): Adds a gentle warmth and spice, perfect if you want a cozy hint of depth.
- 1 tsp lemon juice: Helps prevent the pears from browning and adds a touch of brightness.
How to Make Baked Pears with Berries, Honey, Walnuts & Blue Cheese
Step 1: Preheat the Oven
Start by heating your oven to 375°F (190°C). Lightly grease a baking dish to ensure the pears won’t stick, allowing you to easily transfer them after baking. This warm-up sets the stage for caramelization that brings out the pear’s natural sweetness.
Step 2: Prepare the Pears
Halve and core your pears, then arrange them cut-side up in the baking dish. A quick drizzle of lemon juice over each pear prevents that unwanted browning and adds a subtle zing that wakes up the flavors.
Step 3: Add Toppings
Next, fill the hollow center of every pear half with your mixed berries. Sprinkle the roughly chopped walnuts and a dash of cinnamon right on top. Finish by drizzling honey generously over everything to help everything caramelize beautifully in the oven.
Step 4: Bake
Pop the dish into your preheated oven and bake for 20 to 25 minutes. The pears should be tender yet still holding shape, with edges that have caramelized into perfection. The berries will soften but retain bursts of flavor, and the honey will create a glossy finish that’s utterly tempting.
Step 5: Add Blue Cheese
Once you take your baked pears out of the oven, sprinkle the crumbled blue cheese over the warm fruit. The cheese will slightly melt, creating creamy pockets of sharpness that contrast wonderfully with the sweetness and crunch.
Step 6: Serve
Serve the Baked Pears with Berries, Honey, Walnuts & Blue Cheese warm, either as a sophisticated dessert or a sweet-savory appetizer that will have everyone intrigued and asking for seconds.
How to Serve Baked Pears with Berries, Honey, Walnuts & Blue Cheese

Garnishes
Sprinkle a few extra walnuts or a drizzle of honey right before serving for an added touch of texture and shine. A small sprig of fresh thyme or mint leaves can also elevate the presentation and add a lovely fresh aroma.
Side Dishes
This dish shines on its own, but if you want to turn it into a fuller meal, pair it with lightly toasted crusty bread or a crisp green salad dressed with citrus vinaigrette. These sides complement the sweet and savory notes without overpowering the delicate flavors.
Creative Ways to Present
For a stunning twist, serve the baked pears in individual small ramekins or on a beautiful wooden board with extra berries scattered around. For dinner parties, add a small scoop of vanilla ice cream or a dollop of Greek yogurt to bring a creamy cool contrast to the warm, sweet, and tangy flavors.
Make Ahead and Storage
Storing Leftovers
You can store leftover baked pears in an airtight container in the refrigerator for up to 3 days. Keep the blue cheese separate if possible to maintain its texture and add it fresh when reheating.
Freezing
While this dish tastes best fresh, you can freeze the baked pears without blue cheese for up to 2 months. Thaw overnight in the refrigerator and add fresh cheese before serving for the best experience.
Reheating
Reheat gently in a low oven (around 300°F/150°C) for 10-15 minutes or until warmed through. Avoid microwaving to preserve the texture of the pears and nuts, and always add blue cheese after reheating to keep its creamy richness intact.
FAQs
Can I use other types of cheese instead of blue cheese?
Absolutely! While blue cheese gives a wonderful sharpness, crumbled goat cheese or feta can offer a milder tang that still complements the sweet and nutty flavors beautifully.
What kind of pears work best for this recipe?
Choose ripe but firm pears like Bosc, Anjou, or Bartlett to ensure they hold their shape while becoming tender and sweet when baked.
Can I substitute the walnuts with other nuts?
Yes, pecans or almonds make excellent substitutes if you prefer a different nut flavor or have allergies. Just use the same quantity and roughly chop them for the best crunch.
Is this recipe suitable for a vegan diet?
To make it vegan, skip the blue cheese or replace it with a plant-based cheese alternative. Also, use maple syrup or agave nectar instead of honey for a fully vegan dish.
How early can I prepare this dish before serving?
You can assemble the pears and toppings a few hours ahead, then refrigerate until ready to bake. Add blue cheese right after baking for that perfect melt and flavor balance.
Final Thoughts
There is something truly special about the effortless elegance of Baked Pears with Berries, Honey, Walnuts & Blue Cheese. It’s a dish that feels both homey and sophisticated, sweet and savory, simple yet striking. Whether you’re cooking for yourself or sharing it with loved ones, I can’t recommend trying this recipe enough—it’s sure to become one of your favorites too.