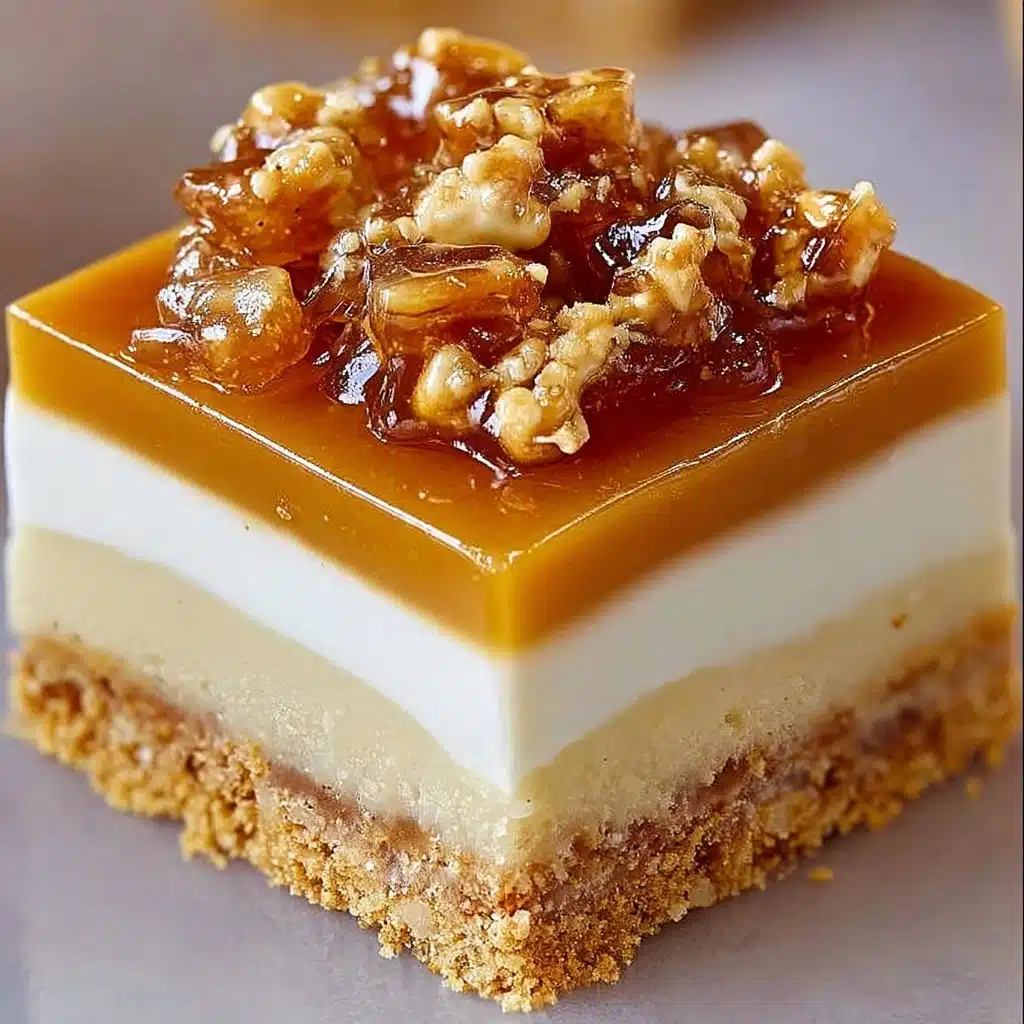
Butterscotch Graham Cracker Cheesecake Bars Recipe
If you have a love for creamy, dreamy desserts that offer a perfect balance of sweet and buttery flavors, then you are going to adore these Butterscotch Graham Cracker Cheesecake Bars. Imagine a rich, velvety cheesecake layer resting on a buttery, crunchy graham cracker crust, all topped off with a luscious, glossy butterscotch sauce that melts in your mouth. These bars aren’t just a treat—they are a celebration of flavors and textures that come together to create an unforgettable dessert experience. Whether you’re serving them at a party, a family gathering, or just craving something special after dinner, these bars bring warmth, comfort, and a hint of nostalgia in every bite.
Ingredients You’ll Need
These ingredients might be simple, but each one plays a critical role in building the texture and flavor of your Butterscotch Graham Cracker Cheesecake Bars. From the crumbly base to the silky filling and rich butterscotch topping, every element is essential for that perfect balance.
- 1 1/2 cups graham cracker crumbs: Provides a buttery, crunchy foundation that holds the cheesecake filling beautifully.
- 1/4 cup sugar: Sweetens the crust just enough without overpowering the other flavors.
- 1/2 cup unsalted butter, melted: Binds the crust ingredients and adds richness.
- 16 oz (2 packages) cream cheese, softened: The star of the cheesecake, creating a smooth and creamy filling.
- 1/2 cup sugar: Sweetens the filling to perfection, balancing the tang of the cream cheese.
- 2 large eggs: Helps set the cheesecake filling with a tender texture.
- 1 tsp vanilla extract: Adds a fragrant, warm note that enhances the overall flavor.
- 1/2 cup sour cream: Brings a subtle tang and extra creaminess to the filling.
- 1/2 cup butterscotch chips: Melts into a luscious topping that gives these bars their signature flavor.
- 2 tbsp unsalted butter: Adds richness and silkiness to the butterscotch sauce.
- 2 tbsp heavy cream: Makes the butterscotch topping smooth and pourable for the perfect drizzle.
How to Make Butterscotch Graham Cracker Cheesecake Bars
Step 1: Prepare the Graham Cracker Crust
Start by preheating your oven to 325°F (163°C). Combine the graham cracker crumbs and sugar in a medium bowl, then stir in the melted butter until the mixture resembles wet sand. Press this mixture firmly into the bottom of a greased 9×9-inch pan, using the back of a spoon or your fingers to create an even layer. Bake for 8 to 10 minutes until it turns a lovely golden brown. Let it cool while you prepare the filling. This crust provides a crispy contrast that perfectly supports the creamy cheesecake.
Step 2: Make the Cheesecake Filling
In a large bowl, beat the softened cream cheese and sugar with an electric mixer until the texture is completely smooth and creamy, no lumps here! Add the eggs one at a time, mixing well after each addition to blend everything seamlessly. Then stir in the vanilla extract and sour cream until the mixture is velvety and fully combined. This filling is what boosts these bars from ordinary to extraordinary with its luxurious texture and harmonious taste.
Step 3: Assemble and Bake the Cheesecake Bars
Pour the luscious cheesecake filling over your cooled crust and spread it out evenly using a spatula. Return the pan to the oven and bake at 325°F (163°C) for 30 to 35 minutes. You’ll know it’s done when the edges start to turn a delicate golden color and the center is just set but still slightly jiggly, which guarantees creamy softness. After baking, let the bars cool on the counter for about 30 minutes before refrigerating for at least 2 hours to set completely. Patience here rewards you with a perfect texture.
Step 4: Create the Butterscotch Topping
While the bars chill, gently melt the butterscotch chips, butter, and heavy cream in a small saucepan over low heat. Stir constantly until the mixture is smooth and glossy—no lumps allowed! Let this sauce cool just a little so it thickens but is still pourable. Drizzle generously over the refrigerated cheesecake bars right before serving. This topping adds a rich, buttery sweetness that brings every bite alive with extra indulgence.
How to Serve Butterscotch Graham Cracker Cheesecake Bars

Garnishes
Adding a personal touch to your Butterscotch Graham Cracker Cheesecake Bars through garnishes makes for a beautiful presentation and an explosion of flavor. Try sprinkling a handful of toasted chopped pecans or walnuts for a crunchy contrast, or top with a dollop of freshly whipped cream for lightness. A few flakes of sea salt over the butterscotch drizzle can also elevate the sweetness with a subtle salty kick.
Side Dishes
These cheesecake bars are definitely a star on their own, but pairing them with fresh fruit can brighten up the dessert plate. Think juicy sliced strawberries, tart raspberries, or even a small scoop of vanilla bean ice cream to complement the creamy texture. A light cup of coffee or spiced tea also pairs beautifully and completes the cozy dessert experience.
Creative Ways to Present
To impress your guests, slice the bars into neat squares and serve them individually on dessert plates drizzled with extra butterscotch sauce. Or create a dessert platter with mini bars accompanied by fresh berries, edible flowers, and small bowls of whipped cream or caramel sauce. For a fun twist, turn these bars into a layered parfait with crumbled bits on the bottom, cheesecake filling in the middle, and butterscotch sauce on top served in clear glasses.
Make Ahead and Storage
Storing Leftovers
Once cooled and fully set, you can cover the Butterscotch Graham Cracker Cheesecake Bars tightly with plastic wrap or transfer them into an airtight container. They will stay fresh in the refrigerator for up to 4 days without losing any of their creamy goodness or crusty texture, making it easy to enjoy them throughout the week.
Freezing
If you want to prepare these bars in advance, they freeze well! Wrap individual bars in plastic wrap and then place them in a freezer-safe container or bag. They can be stored for up to 2 months. When you’re ready to indulge, simply thaw the bars overnight in the refrigerator to preserve the delicate texture and flavor.
Reheating
These cheesecake bars are best enjoyed cold or at room temperature. If you prefer a softened texture, leave them out for about 15 minutes before serving. Avoid microwaving as the heat can change the texture of both the crust and filling. Instead, a gentle thaw is the way to go.
FAQs
Can I use store-bought graham cracker crumbs for the crust?
Absolutely! Store-bought graham cracker crumbs work perfectly and save time. Just make sure to measure them accurately, and you’re good to go.
Is sour cream necessary for the cheesecake filling?
Sour cream adds a subtle tang and creaminess that balances the sweetness and richness of the cheesecake. If you don’t have it, you can substitute with Greek yogurt, but the flavor will be slightly different.
Can I substitute the butterscotch topping with caramel sauce?
You can, but the flavor profile will change. Butterscotch has a unique buttery, buttery-sweet taste that caramel doesn’t completely mimic. The butterscotch topping is what makes these bars special and worth trying as is!
What’s the best way to cut the cheesecake bars without cracking them?
Use a sharp knife warmed in hot water, then wiped dry before slicing. This helps the knife glide through smoothly, resulting in clean, beautiful squares.
Can I double the recipe for a larger batch?
Yes, just double the ingredients and bake in a larger pan—like a 9×13-inch—adjusting the baking time slightly by checking for doneness as described in the recipe.
Final Thoughts
There’s something truly special about Butterscotch Graham Cracker Cheesecake Bars that makes every occasion sweeter and every moment cozier. The rich cream cheese filling, the buttery graham crust, and that irresistible butterscotch topping come together to create a dessert you’ll want to make again and again. Trust me, once you try these bars, you’ll find them stealing the spotlight at your dessert table—each bite is pure happiness. So go ahead, gather your ingredients and dive into making these delightful bars. Your taste buds will thank you!