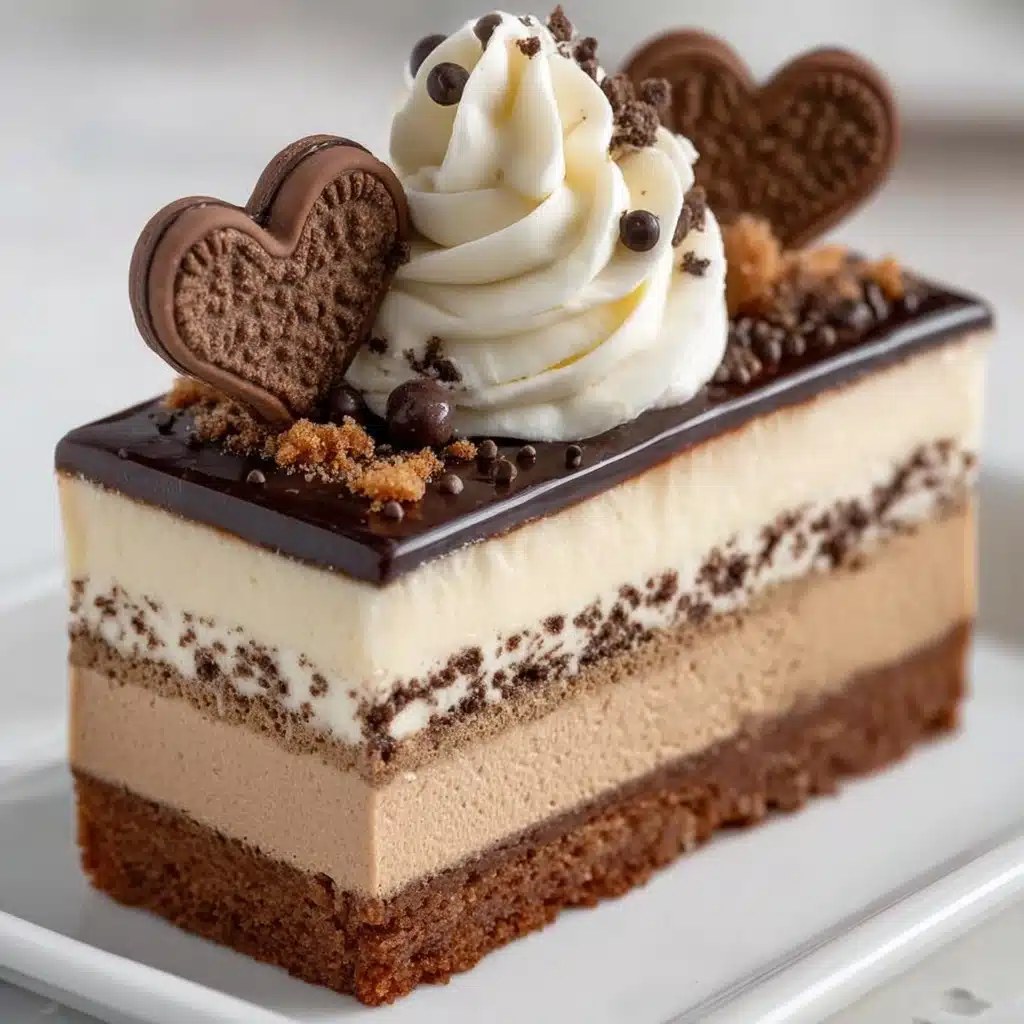
Chocolate Mousse Layer Cake Recipe
If you have a sweet tooth that demands something indulgent yet elegant, this Chocolate Mousse Layer Cake Recipe is your answer. Imagine soft, airy chocolate sponge cake layered with two different silky mousses—one with a hint of coffee or vanilla and the other rich milk chocolate—crowned with a decadent dark chocolate ganache. This cake is a celebration of textures and flavors that come together in perfect harmony, making it a standout dessert for any special occasion or simply a luxurious treat to brighten your day.

Ingredients You’ll Need
The beauty of this cake lies in how a handful of straightforward ingredients combine to create layers of flavor and luxurious textures. Each component, from the cocoa powder to the gelatin, plays a vital role in delivering a moist sponge, fluffy mousse, and glossy ganache that holds the whole cake together seamlessly.
- 3 large eggs: These give the sponge its body and help create a light, airy texture when beaten well.
- 90 g (¾ cup) granulated sugar: Sweetens the sponge while helping it rise and maintain fluffiness.
- 60 g (½ cup) all-purpose flour: Provides structure to the sponge without making it dense.
- 30 g (¼ cup) unsweetened cocoa powder: Delivers that rich chocolate flavor and color to the base.
- 1 tsp baking powder: A gentle lift agent that ensures the sponge rises just right.
- 60 ml (¼ cup) melted butter: Adds moistness and richness to the sponge layer.
- 200 ml (¾ cup) heavy cream: Essential for creating the luscious mousse layers and glossy ganache.
- 100 g (½ cup) white chocolate (melted): Brings sweetness and creaminess to the coffee or vanilla mousse layer.
- 2 tsp gelatin + 2 tbsp water (for each mousse layer): Key to stabilizing the mousse so it sets perfectly.
- 1 tsp instant coffee or 1 tsp vanilla extract: Choose your flavor twist for the first mousse layer.
- 120 g (¾ cup) milk chocolate (melted): The heart of the milk chocolate mousse layer, lending a smooth and rich intensity.
- 120 g (¾ cup) dark chocolate: For the intense, bittersweet ganache topping that balances the sweetness below.
- 120 ml (½ cup) hot cream: Used to melt the dark chocolate into a shiny ganache.
- Whipped cream, mini cookies, chocolate shavings or sprinkles: These decorative elements add texture and make the cake truly eye-catching.
How to Make Chocolate Mousse Layer Cake Recipe
Step 1: Make the Chocolate Sponge Base
Preheat your oven to 175°C (350°F). In a large mixing bowl, beat the eggs and granulated sugar together until the mixture becomes pale and fluffy—this is crucial because it builds the sponge’s delicate airiness. Next, sift in the flour, cocoa powder, and baking powder to avoid lumps and ensure even distribution. Gently fold the dry ingredients into the wet mixture to prevent deflating the batter. Finish by folding in the melted butter to give the sponge moisture and richness. Pour this lovely batter into a lined 20 cm (8-inch) pan and let it bake for 20 to 25 minutes. Once baked, allow it to cool completely; this ensures a firm base for your luscious mousse layers.
Step 2: Prepare the Mousse Layers
This is where the magic truly happens. Start by softening the gelatin in cold water to let it bloom for about five minutes—this step is key for a mousse that holds its shape. Warm the heavy cream slightly before mixing it with the melted chocolate until completely smooth. Stir in the prepared gelatin until fully dissolved. Then, whip the remaining cold cream into soft peaks, folding it gently into the chocolate mixture to keep the mousse airy but stable. For the first layer, incorporate either instant coffee or vanilla extract into melted white chocolate for a subtle, aromatic flavor. Pour this coffee or vanilla mousse evenly over the cooled sponge and chill it for 30 to 40 minutes to set slightly. Repeat the process with milk chocolate for the second layer, once again chilling before moving on.
Step 3: Make the Dark Chocolate Ganache
For a glossy, decadent finish, pour hot cream over chopped dark chocolate and stir until smooth and shiny. Cool it slightly so it thickens just enough to pour over the mousse layers without running off. This rich ganache ties all the layers together and adds a satisfying bittersweet touch that cuts through the sweetness. Once poured, refrigerate the entire cake for at least four hours, or even better, overnight to ensure every layer is perfectly set.
Step 4: Decorate
Time to have fun personalizing your cake! Pipe generous swirls of whipped cream atop the ganache, then scatter mini cookies, chocolate biscuits, or chocolate hearts for a festive touch. To finish, sprinkle chocolate shavings, cocoa nibs, or chocolate sprinkles for added texture and appeal. Each decoration not only looks beautiful but also adds extra delight to every bite.
How to Serve Chocolate Mousse Layer Cake Recipe
Garnishes
A simple garnish of whipped cream and chocolate shavings does wonders to elevate this dessert’s presentation. If you want to impress guests, try adding fresh berries or edible gold flakes—it transforms the cake into a luxurious centerpiece that tastes as gorgeous as it looks.
Side Dishes
Pairing this cake with a cup of strong espresso or a smooth black coffee enhances the cocoa flavors and balances the sweetness perfectly. For a cooler contrast, a scoop of vanilla bean ice cream or a light fruit sorbet makes a delightful companion that keeps the dessert feeling fresh and balanced.
Creative Ways to Present
Instead of the traditional round cake, try layering this mousse cake in individual clear glasses or elegant ramekins for a modern twist. This way, everyone gets their own perfectly portioned treat, showcasing those beautiful layers. Alternatively, create mini versions using cupcake molds for a fun, party-ready presentation.
Make Ahead and Storage
Storing Leftovers
This chocolate mousse layer cake keeps beautifully in the refrigerator for up to three days. Store it in an airtight cake box or cover it tightly with plastic wrap to maintain the moist textures and prevent the mousse from absorbing any fridge odors.
Freezing
If you’d like to prepare this dessert in advance, it freezes well. Wrap the cake securely in several layers of plastic wrap and then foil before freezing. When you’re ready to enjoy, thaw it in the refrigerator overnight for the best texture and flavor.
Reheating
Because this cake is best served chilled, reheating is generally not recommended. However, if you want to soften it slightly, let it sit at room temperature for about 20 minutes before serving—this lets the mousse set a bit softer while still maintaining its delightful structure.
FAQs
Can I substitute gelatin with agar-agar?
Yes, agar-agar can be used as a vegetarian alternative, but be careful to adjust the quantity and dissolve it according to package instructions. Agar sets firmer and faster than gelatin, so monitor the mousse’s texture to avoid it becoming too stiff.
What can I use instead of heavy cream?
Heavy cream is vital for the mousse’s texture, but if you need a substitute, you might try full-fat coconut cream for a dairy-free option. Keep in mind this will add a slight coconut flavor, which pairs nicely with chocolate.
Can I make this cake without the coffee flavor?
Absolutely! The coffee in the first mousse layer adds a lovely depth, but you can simply omit it or replace it with vanilla extract for a smooth, classic flavor profile.
How long does it take to assemble the cake?
From baking the sponge to chilling the mousse layers and setting the ganache, expect around 4 to 6 hours total, including chilling time. Planning ahead by making the cake the day before is highly recommended.
Is this cake suitable for beginners?
Definitely! While it involves a few steps, each is straightforward and well worth the effort. Take your time folding mousses gently and chilling properly, and you’ll create an impressive dessert that looks like you spent hours mastering it.
Final Thoughts
I genuinely hope you give this Chocolate Mousse Layer Cake Recipe a try because it’s a scrumptious way to elevate your dessert game. Its layers of rich chocolate combined with light, airy mousse create a celebration in every bite. Once you taste it, I’m sure this cake will become a beloved favorite in your baking repertoire. Happy baking!