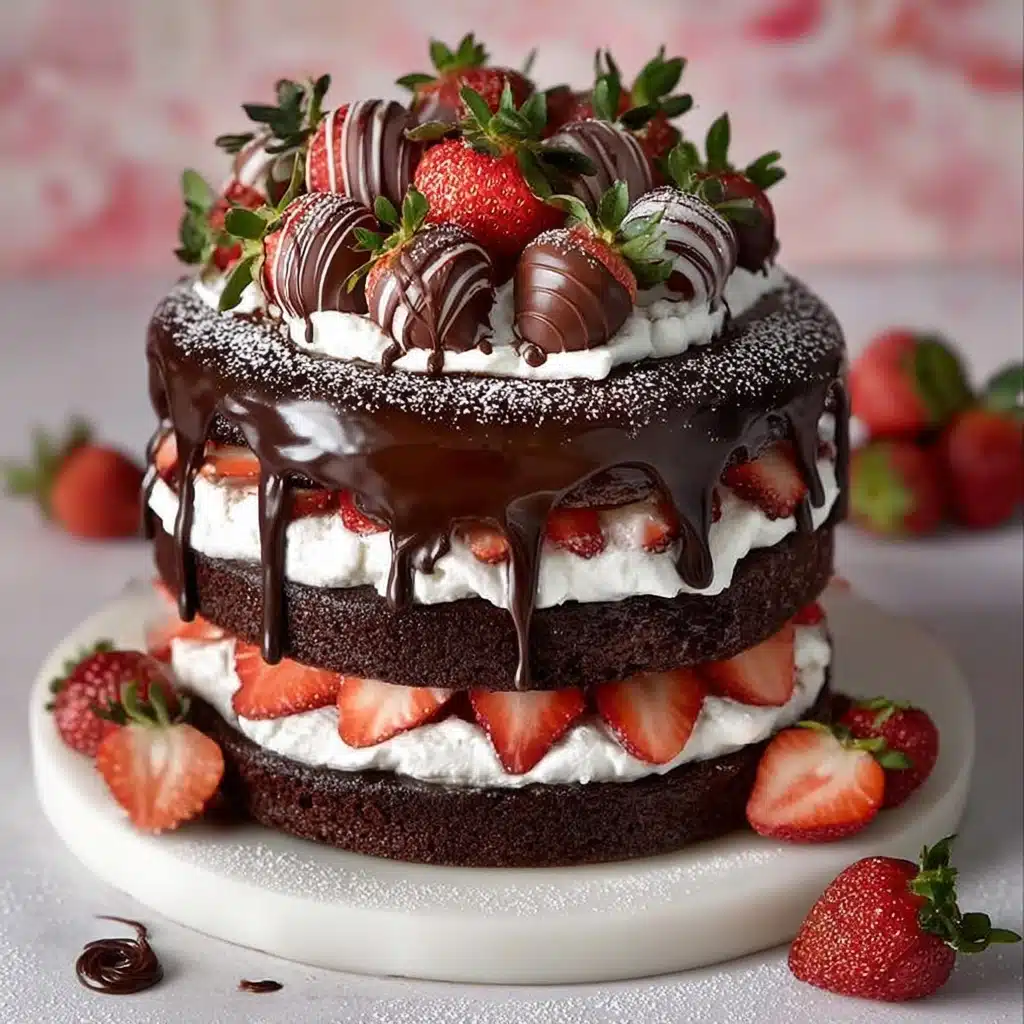
Chocolate Strawberry Layer Cake Recipe
This Chocolate Strawberry Layer Cake is a showstopper that tastes just as spectacular as it looks! Imagine tender, moist chocolate sponge layers enveloped in clouds of vanilla whipped cream, all crowned with a cascade of luscious ganache and jeweled with bright, juicy fresh strawberries. Every bite offers the perfect marriage of rich cocoa flavor and vibrant berry freshness, making this cake a true centerpiece for celebrations or a dreamy weekend treat.
Ingredients You’ll Need
The beauty of this Chocolate Strawberry Layer Cake is how simple yet impactful each ingredient is. Every element, from the deep cocoa to the glossy ganache, brings color, flavor, or texture that you absolutely don’t want to miss.
- All-purpose flour: The foundation for a light, tender cake crumb.
- Cocoa powder: Use unsweetened natural cocoa for deep chocolatey layers.
- Sugar: White granulated sugar balances the cocoa’s bitterness and adds structure.
- Baking powder & baking soda: These leaveners create just the right amount of lift for soft, fluffy layers.
- Salt: A pinch brightens and intensifies all the other flavors.
- Eggs: Large eggs add richness and hold everything together.
- Vegetable oil: Ensures your cake stays moist even if made ahead.
- Milk: Brings extra tenderness and soft crumb to each slice.
- Hot coffee: Enhances the cocoa flavor—don’t worry, it won’t taste like coffee!
- Vanilla extract: Rounds out all the flavors with its sweet, aromatic notes.
- Heavy cream: Essential for the airy, creamy filling between every layer.
- Powdered sugar: Dissolves easily into the whipped cream for smoothness and sweetness.
- Dark chocolate: The key to a glossy, decadent ganache drizzle.
- Fresh strawberries: Their juiciness and color take this cake from delicious to unforgettable.
- Blueberries & raspberries (optional): Add a pop of color and an extra layer of berry flavor.
- Chocolate bars or truffles: For a touch of pure indulgence on top.
- Fresh mint leaves: The ultimate finishing touch for visual contrast and a fresh aroma.
How to Make Chocolate Strawberry Layer Cake
Step 1: Bake the Chocolate Sponge Layers
Begin by preheating your oven to 175°C (350°F) and preparing three 15 cm (6-inch) round cake pans—grease and line them with parchment for easy removal later. In one big bowl, whisk together the flour, cocoa, sugar, baking powder, baking soda, and salt. Now add the eggs, vegetable oil, milk, and vanilla, mixing until the batter is smooth and glossy. The final flourish: pour in the hot coffee. This step intensifies the chocolate flavor and creates an extra-moist, tender crumb. Divide the batter evenly among your prepared pans and bake for 20–25 minutes. The cakes are ready when a toothpick poked in the center comes out clean. Let the layers cool completely before moving on.
Step 2: Whip Up the Cream Filling
While your cakes cool, it’s time to whip up clouds of vanilla cream. Pour your cold heavy cream into a chilled bowl, then add the powdered sugar and vanilla extract. Using a hand or stand mixer, whip the cream to stiff peaks—be careful not to overmix, as you want it luscious and airy. Keep the whipped cream in the refrigerator until ready to assemble so it stays perfect.
Step 3: Make the Chocolate Ganache Drizzle
For that signature glossy finish, heat the heavy cream to just steaming (watch closely!), then pour over your finely chopped dark chocolate. Wait a minute, then stir gently until a smooth, shiny ganache forms. Allow it to cool a bit so it thickens to the ideal drizzling consistency—this way, you get those lovely, dramatic drips down the sides of the cake.
Step 4: Assemble the Cake
Place the first chocolate sponge layer on your cake stand or serving plate. Pile on a generous layer of the whipped cream, spreading right to the edges so each bite gets plenty of filling. Repeat with the second layer and top with the final sponge. Finish with a thick layer of cream on top. The contrast of fluffy cream and rich chocolate is what makes this so irresistible!
Step 5: Decorate with Ganache and Berries
Here comes the fun, creative part! Carefully pour the cooled ganache over the center of the cake, letting it spill over the sides in beautiful chocolatey ribbons. Arrange fresh strawberries—some whole, some halved—on top, then scatter on blueberries, raspberries, and any extra chocolate treats. Fresh mint leaves add a gorgeous finishing touch that screams celebration. Pop the finished Chocolate Strawberry Layer Cake into the refrigerator for at least an hour. This makes slicing easier and keeps your layers looking sharp.
How to Serve Chocolate Strawberry Layer Cake

Garnishes
Go all out with the garnishes! Fresh strawberries are essential, but don’t hesitate to add blueberries, raspberries, or chunks of chocolate bar for dramatic effect. A few sprigs of mint really bring everything together, both visually and flavor-wise. The bright red berries and shiny chocolate make every slice look party-perfect.
Side Dishes
Since this cake is rich and decadent, opt for something light to pair with it—think unsweetened iced tea, a simple berry salad, or even a dollop of tangy Greek yogurt on the side. For the ultimate special occasion, serve slices with a scoop of vanilla bean ice cream or a dusting of powdered sugar.
Creative Ways to Present
If you want to make an impression, slice a wedge and lay it on its side, then drizzle extra ganache and scatter berries around the plate. Try making mini versions of the Chocolate Strawberry Layer Cake for individual desserts, perfect for parties or weddings. For a dramatic tableside finish, serve with chocolate-dipped strawberries on each plate.
Make Ahead and Storage
Storing Leftovers
Leftover slices of this Chocolate Strawberry Layer Cake keep beautifully in the fridge. Store them in an airtight container or cover the cut cake well with plastic wrap. The whipped cream and fresh fruit will stay tasty and fresh for 2–3 days—if you can resist eating it all before then!
Freezing
If you want to prepare in advance, bake and cool the chocolate sponges, then wrap tightly and freeze for up to 3 months. Assemble the whipped cream and ganache fresh for the best texture. While you can freeze assembled cake, fresh berries and whipped cream don’t always thaw gracefully, so it’s best to add those just before serving.
Reheating
This cake is wonderful served cold or at room temperature, so there’s no need to reheat. But if your kitchen is chilly and the ganache firms up a bit, let a slice sit out for 15–20 minutes before serving for the creamiest texture and flavor.
FAQs
Can I make this Chocolate Strawberry Layer Cake gluten-free?
Absolutely! Just swap out the all-purpose flour for your favorite gluten-free flour blend—look for one that’s designed for cup-for-cup baking. Check your cocoa and chocolate to ensure they’re gluten-free too, and you’re all set.
Can I substitute the strawberries with another fruit?
Definitely! Raspberries, blackberries, or even sliced peaches would all work nicely and offer their own delicious twist. Just make sure your fruit is fresh and not too watery to prevent the cake from becoming soggy.
What size pans should I use?
The recipe calls for three 15 cm (6-inch) round cake pans, perfect for a tall, striking presentation. If you only have 20 cm (8-inch) pans, you can make two layers instead—just adjust the baking time and check for doneness a few minutes early.
Can I use store-bought whipped cream instead of making my own?
Homemade whipped cream really gives the lightest, freshest taste, but if you’re short on time, high-quality store-bought whipped cream can work in a pinch. Just watch for sweetness and adjust as needed so it’s not overpowering with the chocolate layers.
How do I get clean slices for presentation?
The secret to neat slices is patience! Always chill the assembled Chocolate Strawberry Layer Cake well before serving. Use a long, sharp knife dipped in hot water and wiped dry between cuts for beautiful, café-worthy pieces.
Final Thoughts
If you’re looking for a dessert guaranteed to impress and delight, don’t wait to try this Chocolate Strawberry Layer Cake. Every step is worth it for that first perfect forkful of chocolate, berries, and cream—your guests will be raving, and you might just have a new favorite cake to add to your special occasion rotation!