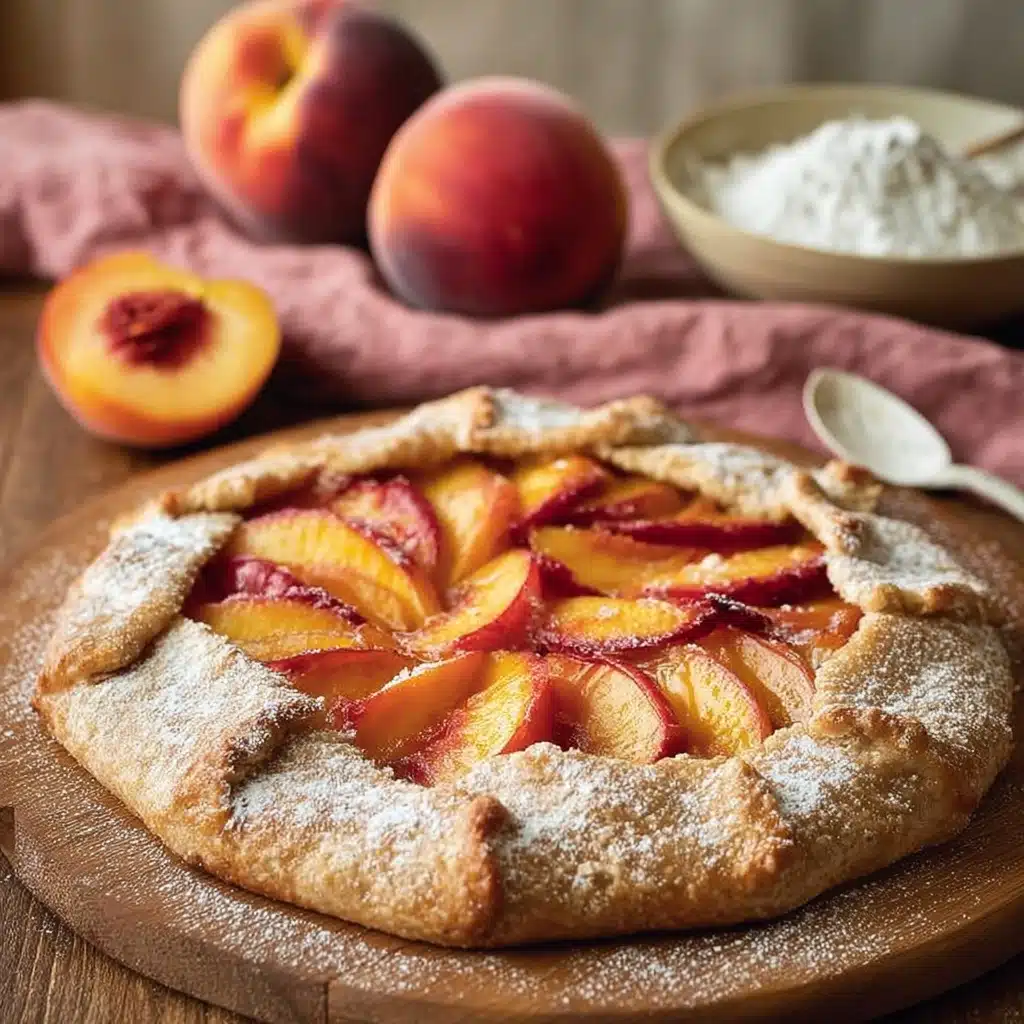
Easy Peach Galette with Golden Edges Recipe
There’s something truly irresistible about a rustic, flaky pastry filled with juicy summer fruit, and this Easy Peach Galette with Golden Edges is exactly that kind of delight. Every bite is bright with sweet peaches, wrapped in a golden, buttery crust that’s crisp and subtly sugared. With a straightforward homemade dough and a fresh peach filling that comes together in minutes, this is my absolute favorite way to showcase ripe peaches at their peak. Whether it’s for an afternoon treat or a casual dessert with friends, you’ll find yourself returning to this recipe over and over again.
Ingredients You’ll Need
The beauty of Easy Peach Galette with Golden Edges is how a handful of simple, quality ingredients create unmistakable flavor and texture. Each element has a clear purpose, from flakiness in the crust to the saucy, sunny filling that screams summer.
- All-Purpose Flour: The blank canvas that forms the backbone of your buttery crust, giving it structure and tenderness.
- Salt: Enhances all the flavors in both the filling and the pastry, making each fruit note pop.
- Cold Butter: Chilled and cubed, it’s the key to those addictive, crisp, golden edges in every slice.
- Ice Water: Keeps the dough tender and helps it come together without becoming tough or dense.
- Ripe Peaches: Juicy and fragrant, they turn luscious and jammy as they bake—choose the best you can find.
- Granulated Sugar: Sweetens the filling and helps the peaches release their juices just enough for a syrupy finish.
- Cornstarch: Thickens the filling so your galette is deliciously sliceable, not soggy.
- Lemon Juice: Balances sweetness and brings out the freshness of the peaches.
- Vanilla: Adds incredible depth and warmth to the filling.
- Milk: Brushed on the crust, it encourages that gorgeous golden glow in the oven.
- Coarse Sugar: For sparkle and a delightful crunch along the folded, caramelized edges.
How to Make Easy Peach Galette with Golden Edges
Step 1: Make the Pastry Dough
Start by mixing together the flour and salt in a medium bowl. Add in those cold, cubed pieces of butter and blend with a pastry cutter (or your fingers if you want to get a little messy) until you have a crumbly mixture that looks like coarse meal—think sandy with pea-sized butter bits. Gradually stir in the ice water, one tablespoon at a time, just until the dough gathers together and holds its shape. Pat it into a disk, wrap in plastic, and let it chill in the fridge for 30 minutes. This short nap lets the gluten relax and promises a supremely flaky crust!
Step 2: Prepare the Peach Filling
While your dough chills, get those peaches ready. Gently toss the thinly sliced peaches with granulated sugar, cornstarch, fresh lemon juice, and vanilla in a large bowl. Give them a few minutes to macerate, which draws out their juices and creates a syrupy, aromatic mixture. This step is simple but crucial for that luscious, thick filling Easy Peach Galette with Golden Edges is known for.
Step 3: Roll and Assemble
Preheat your oven to 375°F (190°C). Line a baking sheet with parchment paper for easy clean-up. On a floured surface, roll out your chilled dough into a rustic 12-inch circle—it’s perfectly fine if the edges are a bit uneven. Carefully transfer it onto the prepared baking sheet and pile your peach filling into the center, leaving a 2-inch border all around. Now, gently fold the dough edges over the fruit, loosely pleating as you go. This free-form style is what makes a galette so approachable and charming!
Step 4: Finish and Bake
Brush the exposed pastry edges with milk and shower them generously with coarse sugar. This is how you get those stunning, shiny, golden edges that everyone will swoon over. Pop the galette in the oven for 35 to 40 minutes. When it’s ready, the crust will be deeply golden while the peaches bubble gently in their syrupy bath—your kitchen will smell like a peach-scented dream.
Step 5: Cool and Serve
Once out of the oven, let your Easy Peach Galette with Golden Edges cool for at least 15 to 20 minutes so the juices thicken up a bit, making for prettier slices. Slice it up and serve just warm or at room temperature. If you love a little extra decadence, add a swirl of whipped cream or a scoop of vanilla ice cream.
How to Serve Easy Peach Galette with Golden Edges

Garnishes
A dusting of powdered sugar or a drizzle of honey elevates each slice with a little extra sweetness. Fresh mint leaves add refreshing color and aromatic contrast, making those golden edges look even more inviting. And of course, a quenelle of soft, billowy whipped cream melts gently over the warm fruit—simple, dreamy perfection.
Side Dishes
This galette truly shines with complimentary sides like vanilla ice cream, tangy crème fraîche, or even a dollop of Greek yogurt. For a summer brunch, offer alongside a crisp glass of sparkling wine or some buttery shortbread cookies, and you’ll have an elegant yet cozy spread everyone will adore.
Creative Ways to Present
Easy Peach Galette with Golden Edges is meant to be rustic, but you can slice it into wedges for a pie-like presentation, or cut smaller pieces for a dessert buffet. Try baking mini individual galettes for a fun twist, or stack slices with layers of whipped cream for a deconstructed trifle. However you serve it, those golden, sugar-crusted folds are always a conversation starter.
Make Ahead and Storage
Storing Leftovers
Leftover slices of Easy Peach Galette with Golden Edges keep beautifully. Simply cover the galette loosely with foil or plastic wrap and store it in the refrigerator for up to three days. You’ll love how the flavors meld and deepen overnight.
Freezing
To freeze, wrap the fully cooled galette tightly in plastic and then in aluminum foil. Store for up to two months. When a peach craving strikes, you’ll have homemade pastry waiting right in your freezer! Let it thaw at room temperature before reheating.
Reheating
To re-crisp the crust and warm up the filling, place slices of galette on a baking sheet in a 300°F (150°C) oven for about 10 minutes. Avoid the microwave if you love that crackling, golden edge—oven reheating will keep the texture as delicious as the day it was baked.
FAQs
Can I use frozen peaches for Easy Peach Galette with Golden Edges?
Yes, you can use frozen peaches if fresh are out of season. Thaw and drain them well to avoid excess liquid in the filling, and toss them with a touch more cornstarch if needed to thicken up any juices.
What if I don’t have coarse sugar for the crust?
No worries! Regular granulated sugar can be sprinkled over the crust for a sweet finish, though you’ll miss that delightful crunch. If you have turbinado or demerara sugar, those are fantastic substitutes for sparkling golden edges.
Can I make the dough ahead of time?
Absolutely. Prepare the dough and keep it wrapped in the refrigerator for up to two days. You can even freeze the dough disk for up to a month—just thaw it overnight in the fridge before rolling out for a quick, spontaneous Easy Peach Galette with Golden Edges.
How do I prevent a soggy bottom?
Be sure to use cornstarch in the filling and bake your galette on the lower-middle rack to help the bottom crust cook through. If you’re worried, you can also sprinkle a bit of flour or ground almonds directly on the dough before adding peaches—they soak up extra juices for a crispier base.
Can I add other fruits to this galette?
Definitely! Berries, plums, or nectarines pair delightfully with peaches, offering even more color and juicy flavor. Just maintain the same total amount of fruit so your galette bakes evenly and the signature golden edges remain intact.
Final Thoughts
If you want a fuss-free showstopper that proves homemade desserts can be easy and jaw-droppingly gorgeous, the Easy Peach Galette with Golden Edges is your new go-to. It’s pure summer sunshine in pastry form! I hope you give it a try and fall in love with this recipe as much as I have.