Four-Layer Red Velvet and Berry Cake with Berry Drip Recipe
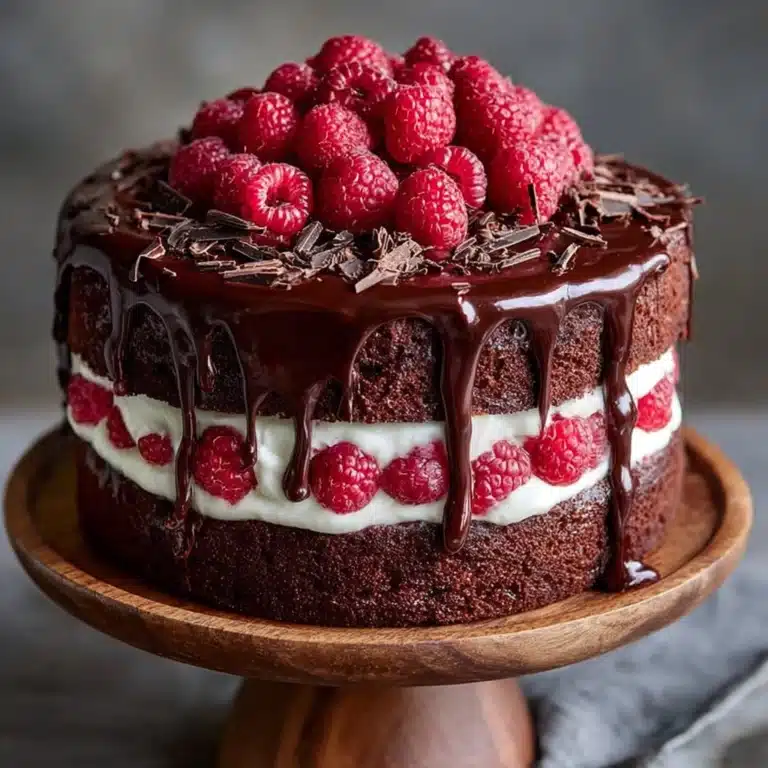
There are showstopping cakes, and then there’s the dramatic beauty of a Four-Layer Red Velvet and Berry Cake with Berry Drip. This striking dessert layers the lush tang of classic red velvet with silky cream cheese frosting, finishing with a gleaming jewel-toned berry glaze that tumbles down the sides like edible art. Light yet decadent, vibrantly colorful, and crowned generously with a tapestry of fresh berries, this cake doesn’t just beg for a celebration—it becomes the centerpiece. If you’re looking for a dessert that tastes as impressive as it looks, this one delivers in every possible way.

Ingredients You’ll Need
The lineup of ingredients for this Four-Layer Red Velvet and Berry Cake with Berry Drip is surprisingly straightforward, but every one plays a starring role. From creating the signature crimson sponge to achieving that rich frosting and glossy berry finish, here’s what makes this cake unforgettably delicious.
- All-purpose flour: Provides structure and tenderness to each soft, fluffy cake layer.
- Granulated sugar: Adds sweetness and contributes to a beautifully moist cake crumb.
- Baking soda: Helps the layers rise and stay light without getting dense.
- Salt: Turns up the flavors and balances both cake and frosting.
- Cocoa powder: Brings a subtle chocolate note and deepens the crimson color.
- Vegetable oil: Makes the cake ultra-moist and keeps the texture tender for days.
- Buttermilk, at room temperature: Provides signature tang and reacts with baking soda for delicate rise.
- Eggs, at room temperature: Bind everything together while enhancing the delicate crumb.
- Red food coloring (liquid or gel): Delivers that unmistakable, brilliant red hue.
- Vanilla extract: Adds a fragrant sweetness to both the cake and the frosting.
- White vinegar: Works with cocoa and buttermilk for depth of flavor and that classic red velvet character.
- Cream cheese, softened: Forms the luxurious, tangy base for the frosting.
- Unsalted butter, softened: Fluffs up the frosting and adds decadent flavor.
- Powdered sugar, sifted: Sweetens and thickens the frosting, keeping it cloud-like and smooth.
- A pinch of salt: Rounds out the sweetness in the cream cheese frosting.
- Mixed berries (fresh or frozen): Bring color, intense flavor, and juicy freshness to the berry drip.
- Lemon juice: Brightens the berry glaze, adding lift and tang.
- Cornstarch mixed with cold water: Thickens the berry drip to just the right, glossy consistency.
- Fresh raspberries, blackberries, and blueberries: For bold, colorful decoration and extra fresh flavor.
- Fresh strawberries, halved: These add a lovely visual contrast and juicy bite to the garnish.
- Fresh mint leaves (optional): Give a refreshing pop of green and an extra fragrant touch.
- Cocoa powder for dusting (optional): Gives a café-style finish and hints at the chocolatey notes within.
How to Make Four-Layer Red Velvet and Berry Cake with Berry Drip
Step 1: Prep Your Red Velvet Cake Layers
To start your Four-Layer Red Velvet and Berry Cake with Berry Drip journey, preheat your oven to 350°F and prepare your cake pans—greased and floured for easy release. Whisk the dry ingredients together, then combine the wet, mixing oil, buttermilk, eggs, food coloring, vanilla, and vinegar in a separate bowl. Blend the two mixtures until just combined, split the batter among your four pans, and bake until set and a toothpick comes out clean. Cooling is key: let the cakes rest in the pans a few minutes before turning out onto racks, allowing every layer to cool fully so your frosting won’t melt.
Step 2: Make the Dreamy Cream Cheese Frosting
While your cake layers cool, grab a big bowl and beat together softened cream cheese and butter to a creamy smoothness—no lumps, please! Add powdered sugar gradually, tasting as you go until you hit that balanced sweetness and fluffy, spreadable texture. Vanilla extract and a pinch of salt really make the flavors pop here. This frosting is rich, tangy, and impossibly silky—just what every bold red velvet cake craves.
Step 3: Whip Up the Berry Drip/Glaze
For showstopping flair, cook your berries, sugar, and lemon juice slowly in a saucepan until the berries collapse into a vibrant, jammy sauce. Strain out any large pieces for a glossy finish, then return to the pan and whisk in your cornstarch slurry. As it simmers, watch for the magic moment when it thickens into a pourable, jewel-colored glaze. Let it cool—you want it just warm enough to drip beautifully but not runny.
Step 4: Layer and Assemble the Cake
Here’s where excitement builds! Set your first layer on a cake stand or plate, slather generously with cream cheese frosting, and repeat with each remaining layer. Apply the final coat of frosting all around the cake, using your spatula to create a semi-naked look—some red velvet peeking through elegantly. This not only looks modern but also hints at what’s inside.
Step 5: Decorate with Berries and Glaze
When your cake’s perfectly stacked, slowly spoon or pour the cooled berry glaze on top, letting it flow naturally down the sides for that “berry drip” effect. Then, pile on the fresh berries—raspberries, blackberries, blueberries, and strawberry halves—pressing them gently into the glaze. Finish with a sprinkle of mint leaves and dusting of cocoa powder for a truly breathtaking presentation.
How to Serve Four-Layer Red Velvet and Berry Cake with Berry Drip
Garnishes
For the grandest impression, don’t skimp on the garnish! Arrange berries in clusters or as a winding trail across the top, tuck in a few mint leaves for color contrast, and sift just a kiss of cocoa powder over everything for drama. This cake is at its best when finished just before serving, so those fresh berries stay vibrant and juicy.
Side Dishes
Serve each slice alongside a swirl of softly whipped cream or a scoop of vanilla bean ice cream for an extra touch of indulgence. A simple berry coulis or drizzle of leftover glaze also turns every plated portion into its own little masterpiece and plays up the tart-sweet theme even more.
Creative Ways to Present
For birthdays, showers, or special gatherings, place the whole Four-Layer Red Velvet and Berry Cake with Berry Drip on a footed cake stand, surrounded by more fresh berries at the base. For an elegant twist, cut the cake into petite layered squares and serve each piece resting on a smear of berry sauce with a single berry and mint leaf for a bakery-worthy plated dessert.
Make Ahead and Storage
Storing Leftovers
Leftover slices of Four-Layer Red Velvet and Berry Cake with Berry Drip will keep beautifully covered in the refrigerator for up to 4 days. Store in an airtight container or wrap well in plastic wrap so the cake stays moist and those berries keep their freshness. If possible, keep any leftover garnishes or extra glaze separate to add just before enjoying.
Freezing
You can absolutely freeze both the cake layers and frosted cake (without berries or glaze) for longer storage. Wrap layers individually in plastic wrap and foil, then thaw overnight in the fridge before assembling. Cream cheese frosting holds up well to freezing, but for best berry drip results, make and add the glaze and fresh berries fresh on the day you serve.
Reheating
There’s no need to reheat, as this cake is best enjoyed chilled or at cool room temperature. If you’ve stored the cake in the fridge, let individual slices sit out for about 10-15 minutes before serving for the creamiest texture and brightest flavors.
FAQs
Can I use different berries or just a single type for the glaze?
Definitely! You can customize the berry drip with whatever you have—raspberries, blackberries, blueberries, or even strawberries alone work beautifully. Using a blend gives more depth and a more vibrant color, but the recipe is flexible to your taste.
What size pans should I use for this cake?
This recipe is designed for four 6-inch round pans to achieve that stunning tall, multi-layered effect. If you only have 8-inch pans, you can use two and slice each layer in half for four thinner layers. Just adjust your baking time as larger pans may bake a bit faster.
How do I get those clean, dramatic berry drips down the side?
For perfect drips, make sure your cake is chilled and your berry glaze is thick but still pourable. Use a spoon or squeeze bottle to gently guide the glaze just over the top edge so it trickles down at different lengths, mimicking bakery-style drips.
Can I make this cake gluten-free?
Absolutely! Swap the all-purpose flour for your favorite 1-to-1 gluten-free baking blend. Just remember to check other ingredients for hidden gluten if you’re serving someone with allergies or sensitivities.
How far ahead can I assemble and decorate the Four-Layer Red Velvet and Berry Cake with Berry Drip?
You can assemble and frost the cake layers up to a day in advance and keep the cake chilled. For the freshest look, add the berry drip and decorate with fresh berries and mint just an hour or two before serving to keep everything looking luscious.
Final Thoughts
If you’re looking to create pure dessert magic, don’t hesitate to try the Four-Layer Red Velvet and Berry Cake with Berry Drip. Whether you’re celebrating a milestone or just want an excuse to bake something breathtakingly beautiful, this cake is guaranteed to steal the show, slice after glorious slice. Gather your ingredients, invite your favorite people, and let those berry drips begin!