Green velvet cake recipe
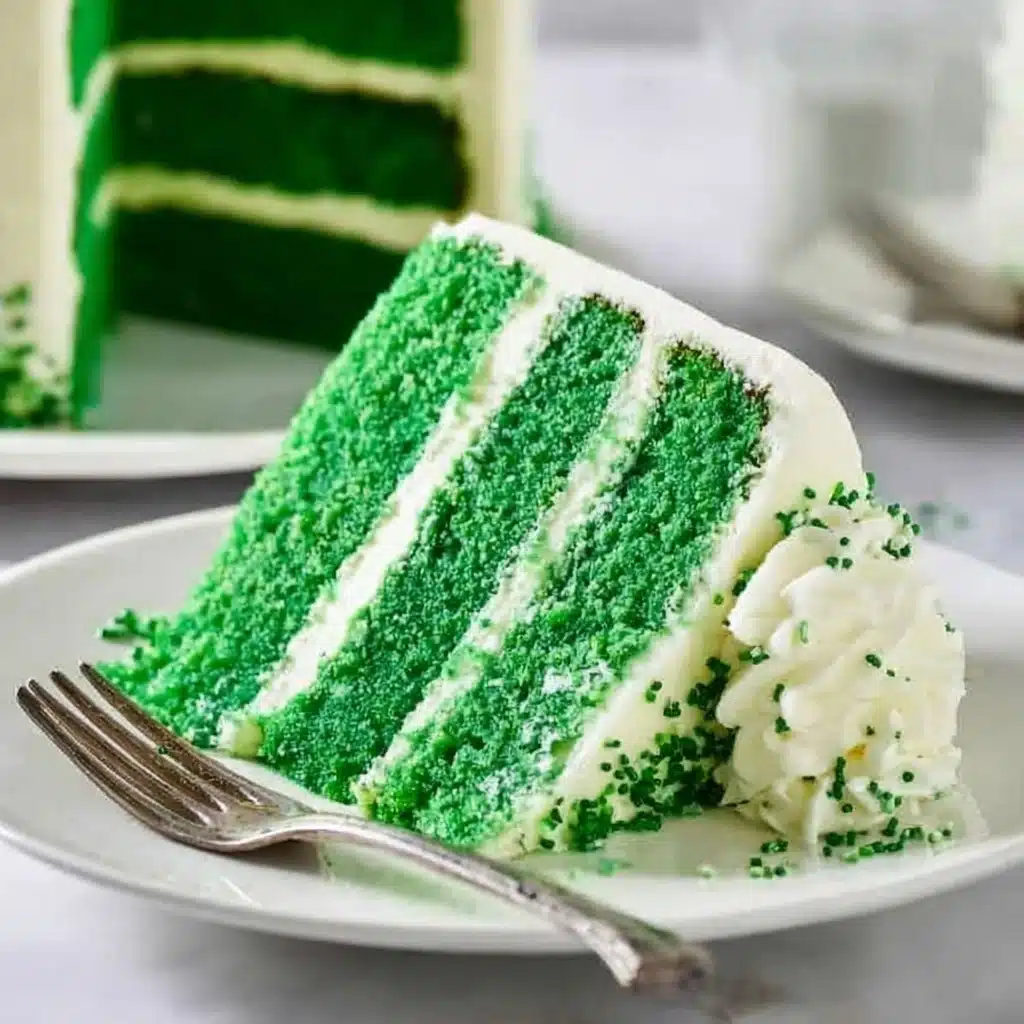
If you’re looking for a delicious showstopper that’s equal parts festive and indulgent, this Green velvet cake recipe deserves a spotlight at your next celebration. Picture layers of pillowy-soft, emerald-hued cake, each bite offering the signature tang and richness you know and love from classic velvet cakes, all finished with a dreamy, luxurious cream cheese frosting. It’s the kind of dessert that draws gasps at its first reveal and pleasant sighs with every forkful—a true treat from start to finish!

Ingredients You’ll Need
Everything in this list is essential for making the best Green velvet cake recipe possible. Each ingredient adds something special, so don’t be tempted to skip or swap—these are the building blocks for that vibrant color, irresistible texture, and signature flavor.
- All-purpose flour: The foundation for a soft, tender crumb and lovely layers.
- Granulated sugar: Delivers just the right sweetness without overwhelming the delicate vanilla and cocoa notes.
- Baking soda: Gives the cake its beautiful lift and keeps the crumb light and airy.
- Salt: Enhances every flavor; even desserts need a little salt to shine!
- Cocoa powder: Just a touch adds depth and that classic velvet cake taste.
- Vegetable oil: Keeps the crumb incredibly moist and tender—no dry cake here!
- Buttermilk (room temperature): Adds tanginess and richness while helping the cake rise perfectly.
- Eggs (room temperature): Bind everything together and help achieve a feather-light cake structure.
- Green food coloring: This is the magic that gives the Green velvet cake recipe its stunning, eye-catching color.
- White vinegar: Interacts with the baking soda for extra fluffiness and balances the sweetness.
- Vanilla extract: Rounds out the flavors, sweetening and warming up the cake’s overall profile.
- Unsalted butter (softened): The base for a silky, smooth frosting that melts in your mouth.
- Powdered sugar: Ensures the frosting is luscious, sweet, and wonderfully spreadable.
- Cream cheese (softened): Adds signature tang and creamy texture to the frosting—don’t skip it!
How to Make Green velvet cake recipe
Step 1: Prep Your Pans and Oven
Start by preheating your oven to 350°F (175°C). While it’s warming up, grease and flour three 8-inch round cake pans. Properly prepping the pans is key to easy release later on and helps those beautifully tall layers keep their perfect shape.
Step 2: Mix the Dry Ingredients
In a large bowl, sift together the all-purpose flour, granulated sugar, baking soda, salt, and cocoa powder. Sifting ensures there are no lumps, and mixing everything at this stage guarantees an even rise and smooth crumb in your Green velvet cake recipe.
Step 3: Combine the Wet Ingredients
In another bowl, whisk together the vegetable oil, buttermilk, eggs, green food coloring, white vinegar, and vanilla extract. Take a moment here to appreciate the gorgeous green as the color blooms into the liquid—this step is where the magic starts!
Step 4: Create the Batter
Gradually add the sifted dry ingredients to the wet mixture, whisking gently after each addition until just combined. Be careful not to overmix—stop as soon as you no longer see streaks of flour. Your Green velvet cake recipe batter should look silky and vibrantly green.
Step 5: Bake the Layers
Divide the batter evenly among your prepared pans for perfectly even layers. Slide them into the oven and bake for 25-30 minutes, or until a toothpick inserted in the center comes out clean. Resist overbaking to keep the cakes soft and moist!
Step 6: Cool the Cakes
Let the cakes cool in their pans for about 10 minutes, then gently turn them out onto a wire rack. Allow them to cool completely; this helps the frosting go on smoothly and prevents any melting mishaps.
Step 7: Make the Cream Cheese Frosting
In a large bowl, whip the softened butter and cream cheese together until light and fluffy. Gradually add powdered sugar and vanilla extract, continuing to beat until your frosting is smooth, creamy, and irresistibly spreadable.
Step 8: Frost and Assemble
Place the first cake layer on your serving plate and spread a generous layer of frosting over the top. Repeat with the next two layers, then cover the entire cake with frosting, smoothing the sides and top for a picture-perfect finish. Your Green velvet cake recipe is ready for its grand finale!
How to Serve Green velvet cake recipe
Garnishes
For a finishing touch with plenty of visual appeal, sprinkle cake crumbs, festive sprinkles, or even edible glitter on top. Fresh herbs like mint leaves or a few white chocolate curls can add both elegance and a nod to that lush green hue.
Side Dishes
Pairing a slice of this Green velvet cake recipe with a scoop of vanilla bean ice cream or a dollop of freshly whipped cream can take the experience up a notch. For something a bit different, try serving alongside a tart berry compote—the brightness plays beautifully with the cake’s richness.
Creative Ways to Present
Turn your Green velvet cake recipe into delightful cupcakes for parties, or layer slices in small mason jars with extra frosting for a trendy, portable treat. Mini cake stacks or cake pops using leftover crumbs and frosting are also fun ways to make use of every last bit!
Make Ahead and Storage
Storing Leftovers
Cover your cake with plastic wrap or store in an airtight cake keeper at room temperature for up to two days. If you want to keep it longer, refrigerate it—just be sure to bring it back to room temp for the best texture and flavor.
Freezing
The cake layers (unfrosted) freeze beautifully—just wrap each layer in plastic wrap and place them in freezer bags. They’ll stay fresh for up to two months. When ready to assemble, let them thaw at room temperature before frosting.
Reheating
While frosting is best enjoyed cool or at room temperature, you can microwave a refrigerated slice for 10-15 seconds for a just-baked softness. Avoid reheating the whole cake to keep the frosting in great condition.
FAQs
Can I use natural food coloring?
Yes, you can use a natural green food coloring, but expect a slightly more muted shade. Some people use spinach or matcha powders for coloring—just be aware these may subtly affect flavor.
How do I prevent my cake from turning out dry?
Measure your flour carefully, avoid overbaking, and don’t overmix the batter. The oil and buttermilk in this Green velvet cake recipe go a long way toward ensuring a moist crumb.
What can I substitute for buttermilk?
If you don’t have buttermilk, mix 1 cup of milk with 1 tablespoon of lemon juice or vinegar for a quick substitute that mimics the tangy, tenderizing effect.
Can I make this recipe gluten-free?
Absolutely—swap out the all-purpose flour for a trusted 1-to-1 gluten-free baking blend. Make sure your blend contains xanthan gum for structure.
Is it possible to make mini cakes or cupcakes?
Yes! Just adjust the baking time—cupcakes usually take about 18-22 minutes in the oven, but keep an eye out for that golden “clean toothpick” moment.
Final Thoughts
Give yourself—and anyone lucky enough to share a slice—the gift of this Green velvet cake recipe. It’s fun to make, gorgeous to serve, and absolutely unforgettable to eat. So gather your ingredients, add a splash of color, and enjoy every moment in the kitchen. Happy baking!