Healthy No-Bake Chocolate Peanut Butter Crunch Bars Recipe
If you’re craving a treat that feels indulgent but is actually good for you, these Healthy No-Bake Chocolate Peanut Butter Crunch Bars are about to become your new obsession! Picture this: rich chocolate flavor, creamy peanut butter, and a satisfying crunch—all packed into a no-fuss bar that comes together in minutes, with no oven required. Whether you want an after-school snack, a sweet bite after dinner, or a portable breakfast, you’ll fall hard for their delicious, wholesome simplicity. Not only are these bars a breeze to make, but they’re also packed with nourishing ingredients you probably already have in your pantry.

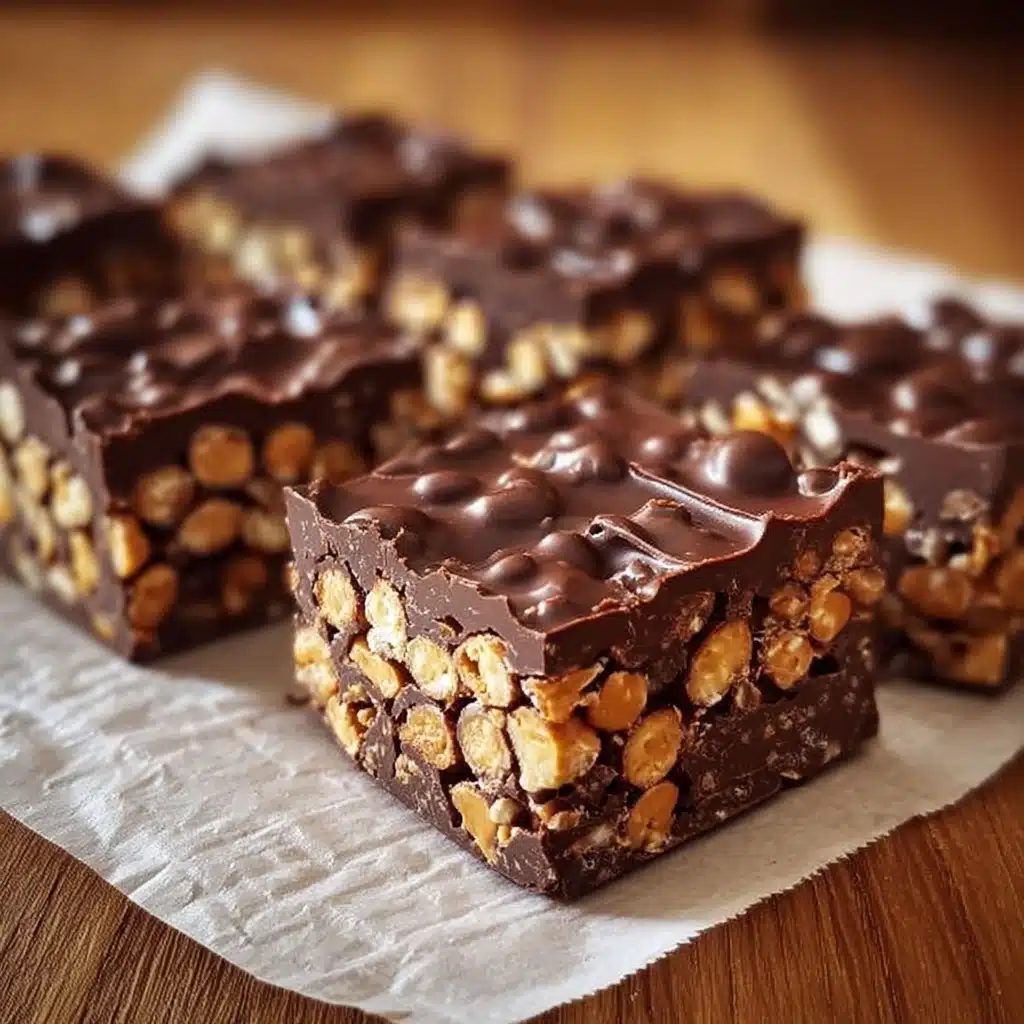
Ingredients You’ll Need
One of the best parts about these Healthy No-Bake Chocolate Peanut Butter Crunch Bars is how easy it is to gather everything. Each ingredient plays a special role, whether it’s building creamy richness, adding that all-important crunch, or simply tying all the flavors together for a crave-worthy treat.
- Crispy rice cereal: Delivers that essential airy crunch, making every bite satisfyingly crispy.
- Rolled oats: Lends a hearty texture and bonus fiber, keeping you full and happy.
- Natural creamy peanut butter: Brings in loads of rich flavor and heart-healthy fats, creating that classic combo with chocolate.
- Honey or maple syrup: Naturally sweetens the bars without any need for refined sugars—a little goes a long way.
- Cocoa powder: Offers intense chocolate flavor while keeping things wholesome and dairy-free.
- Vanilla extract: Just a dash lifts up all the flavors and adds comforting bakery-style notes.
- Pinch of salt: Enhances the sweetness and makes every flavor in the bar pop.
How to Make Healthy No-Bake Chocolate Peanut Butter Crunch Bars
Step 1: Melt the Wet Ingredients
Start by grabbing a small saucepan and setting it over low heat. Add the peanut butter, honey (or maple syrup), cocoa powder, and vanilla extract. Stir gently and constantly, watching everything meld into a glossy, smooth mixture. Not only does this step bring all the chocolate and peanut butter flavor together, but a gentle heat ensures your bars will hold firm once they’re chilled.
Step 2: Prepare the Crunchy Base
While your chocolate mixture is warming, toss the crispy rice cereal and rolled oats together in a mixing bowl. The combination of puffy cereal and hearty oats is the secret behind the awesome crunch and satisfying chew in these Healthy No-Bake Chocolate Peanut Butter Crunch Bars.
Step 3: Mix Everything Together
Once the wet ingredients are velvety and smooth, pour the warm chocolate mixture right over the dry cereal-oat blend. Don’t be shy—use a spatula or large spoon to thoroughly stir until every morsel is coated. The goal is to have no dry pockets; you want all that chocolatey goodness to hug every bit of oat and rice.
Step 4: Press into a Pan
Line an 8×8-inch baking dish with parchment paper, letting the edges hang over for easy removal later. Pour the sticky mixture into the pan and press it down firmly. You can use a spatula or even your (clean!) hands to compact it into a flat, even layer—this helps the bars stay together and creates that irresistible chewy texture.
Step 5: Let It Set
Slide the pan into your fridge and let the bars set for at least one hour, or until they’re cool, fully firm, and easy to lift from the tray. This patience pays off, I promise. The cold helps everything meld, giving you those perfect, crisp-tender bars every time.
Step 6: Cut and Enjoy
Once set, simply pull up the parchment and place your spectacular slab on a cutting board. Slice into bars or squares—however generous you’re feeling! Enjoy right away, or stash them in an airtight container so you’ll always have a grab-and-go treat that tastes like pure happiness.
How to Serve Healthy No-Bake Chocolate Peanut Butter Crunch Bars
Garnishes
For a fun touch, sprinkle the tops with flaky sea salt, a handful of mini chocolate chips, or even a light dusting of cocoa powder just before serving. All of these options bring a little extra flair—and an extra pop of flavor—to your Healthy No-Bake Chocolate Peanut Butter Crunch Bars.
Side Dishes
Pair your bars with a cold glass of almond or oat milk to keep the snack light and energizing, or serve alongside a bowl of fresh berries for a refreshing contrast to the chocolatey richness. If you’re making these for a fun brunch, they also go perfectly with a platter of sliced fruit and a creamy Greek yogurt dip.
Creative Ways to Present
Feeling fancy? Stack your Healthy No-Bake Chocolate Peanut Butter Crunch Bars high on a pretty cake stand for parties, or individually wrap squares in parchment and twine for easy lunchbox or picnic treats. You could even crumble one over Greek yogurt or ice cream for a DIY sundae with extra texture and taste—don’t be afraid to get creative!
Make Ahead and Storage
Storing Leftovers
Leftover bars keep beautifully! Just transfer them to an airtight container and store in the fridge for up to one week. This helps maintain their firm, satisfying crunch and keeps each bar tasting ultra-fresh every time you reach for one.
Freezing
If you’d like to stash some bars for even longer, freeze them! Arrange the Healthy No-Bake Chocolate Peanut Butter Crunch Bars in a single layer in a freezer-safe container, using parchment to separate layers if needed. They’ll last up to three months—just thaw at room temperature for a few minutes before enjoying.
Reheating
These bars are best eaten cold or at room temperature. No reheating is necessary, but if you prefer a slightly softer texture, leave a bar out on the counter for 10 to 15 minutes before eating. Avoid microwaving to keep that signature crunch!
FAQs
Can I use crunchy peanut butter instead of creamy?
Absolutely! Crunchy peanut butter adds an extra layer of texture and nutty flavor. Just be sure to stick with a natural version to keep the bars healthy and easy to mix.
Are these bars gluten-free?
They easily can be! Just check that your crispy rice cereal and rolled oats are certified gluten-free, and you’re good to go with your Healthy No-Bake Chocolate Peanut Butter Crunch Bars.
Can I substitute another nut butter?
Definitely! Almond butter, cashew butter, or even sunflower seed butter (for a nut-free version) can replace peanut butter—just use the same amount and make sure it’s a creamy, natural variety.
How sweet are these bars?
They have a gentle, natural sweetness from the honey or maple syrup, but aren’t over-the-top sugary. If you prefer a sweeter bite, feel free to add an extra tablespoon or two of your chosen sweetener.
Can I add mix-ins like seeds or dried fruit?
Of course! Chopped nuts, pumpkin seeds, chia seeds, or a handful of unsweetened dried cranberries all make fantastic add-ins. Just don’t overload the mixture so the bars still hold together nicely.
Final Thoughts
Give these Healthy No-Bake Chocolate Peanut Butter Crunch Bars a try and discover just how delicious simple, wholesome snacking can be. They’re a true crowd-pleaser you’ll want to make again and again—so don’t be surprised if they vanish from your fridge almost instantly!