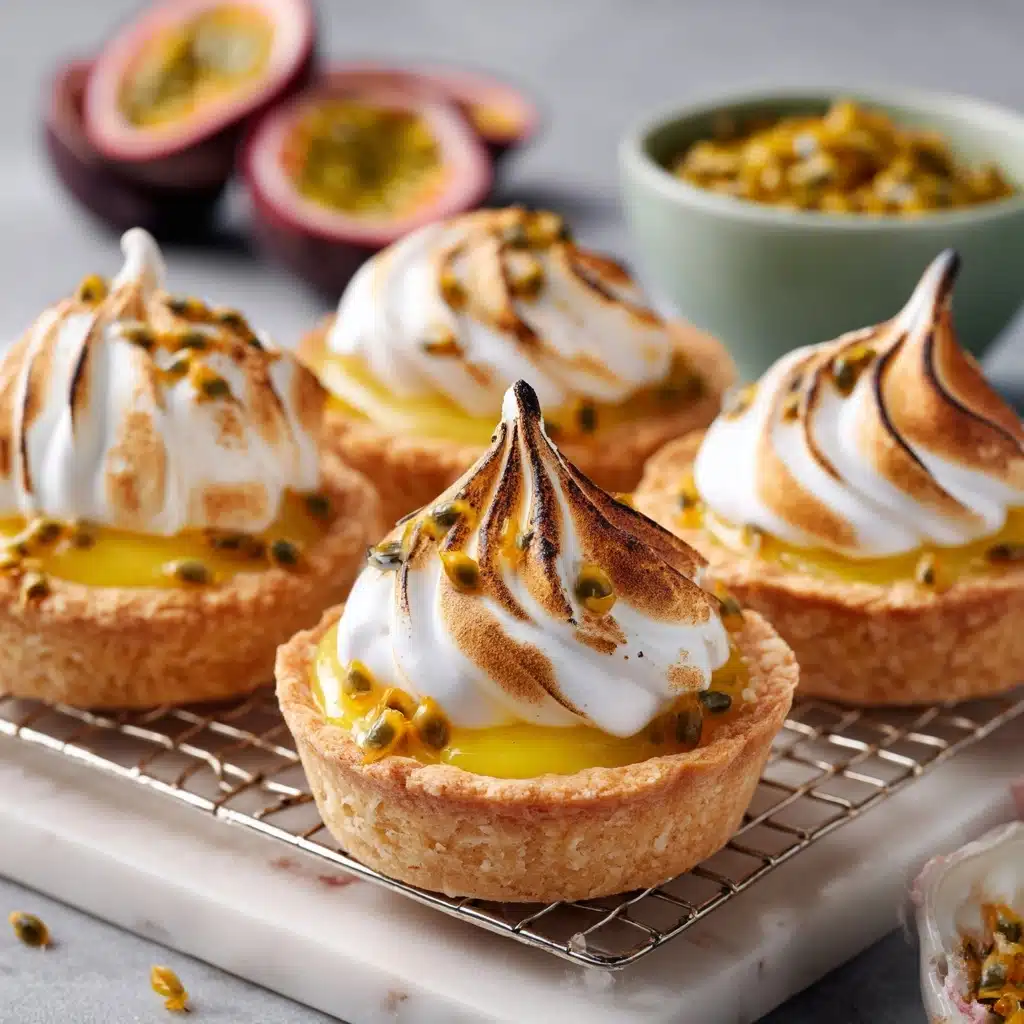
Lemon-Kissed Meringue Shells Recipe
If you’re ready to wow your guests with a dessert that looks as elegant as it tastes, Lemon-Kissed Meringue Shells are your ticket to culinary applause. Crisp on the outside, marshmallowy within, and crowned with tangy lemon curd and vibrant passionfruit, these delicate treats strike that magical balance between lightness and indulgence. Whether you’re hosting a spring brunch or want to bring some sunshine onto your table, Lemon-Kissed Meringue Shells will take your dessert game to new heights—all with just a handful of pantry staples!

Ingredients You’ll Need
This showstopping recipe proves that you don’t need a long ingredient list to achieve something extraordinary. Each component is carefully chosen to deliver the ideal cloud-like structure, zippy flavor, and a lovely sunny color in every bite. Here’s how each ingredient shines:
- Egg whites: The backbone of the meringue, egg whites whip up to create the signature crispy shell and soft center.
- Granulated sugar: Gradual addition is key for glossy, stable peaks and that sweet, melt-in-your-mouth finish.
- Cornstarch: Just a touch helps set the shells, giving them structure while keeping the inside divinely tender.
- Lemon juice: Not only brings a pop of citrus but also stabilizes the meringue and enhances that clean, fresh flavor.
- Vanilla extract: Adds a whisper of warmth and complexity that rounds out the lemon’s brightness.
- Lemon curd: The tangy, creamy center that makes Lemon-Kissed Meringue Shells unforgettable.
- Passionfruit pulp: Lovely flecks and tropical tartness make each shell utterly irresistible.
- Optional garnishes (edible flowers or lemon peel twists): These turn your shells into an edible work of art—perfect for impressing!
How to Make Lemon-Kissed Meringue Shells
Step 1: Prep Your Tools and Oven
Start by preheating your oven to 250°F (120°C) and lining a baking tray with parchment paper. This gentle, low heat is crucial for coaxing the meringue shells into their signature crispness without browning. A parchment-lined tray means they’ll lift off cleanly once baked—no sticky surprises!
Step 2: Whip the Egg Whites
In a clean, dry bowl, begin beating your egg whites until soft peaks form. You’ll recognize this stage when the whites look cloud-like and the peaks gently fold over when you lift the whisk. Any trace of yolk can prevent your whites from whipping properly, so make sure your eggs are separated with precision.
Step 3: Gradually Add Sugar
With the mixer running, slowly add the granulated sugar, one or two tablespoons at a time. This slow addition ensures that the sugar completely dissolves, creating a glossy, stiff meringue. The peaks should hold their shape firmly and feel satiny to the touch—not gritty. Take your time here; patience leads to perfection!
Step 4: Fold in Remaining Flavors
Gently fold in the cornstarch, lemon juice, and vanilla extract. Use a spatula to keep your meringue as airy as possible—stirring too vigorously will deflate your beautiful peaks! This trio is what gives Lemon-Kissed Meringue Shells their signature pillowy texture and irresistible citrusy aroma.
Step 5: Shape the Shells
Spoon the meringue mixture into a piping bag—or just use a spoon if you like a rustic look. Pipe or dollop the meringue onto your prepared tray, forming 6-8 little nests with a shallow well in the center for that luscious filling. These shells are meant to look inviting and whimsical, so don’t stress about perfect edges.
Step 6: Bake Low and Slow
Place the tray in the oven and bake for 75 minutes. Once the time is up, turn the oven off and let the shells cool inside—you want a gradual temperature drop to prevent cracks. When cooled, they’ll lift off the parchment with ease and hold their delicate shape.
Step 7: Fill and Garnish
Right before serving, spoon a generous bit of lemon curd into each shell, swirl in the passionfruit pulp, and add your favorite edible flowers or a whimsical twist of lemon peel. The combination of vibrant color, fragrant garnish, and creamy filling is what sets Lemon-Kissed Meringue Shells apart from the ordinary.
How to Serve Lemon-Kissed Meringue Shells
Garnishes
Try topping your Lemon-Kissed Meringue Shells with edible flowers for a botanically beautiful flourish, or lemon peel twists for an extra citrus punch. Powdered sugar, fresh mint leaves, or even a few passionfruit seeds make lovely touches that contribute both appearance and aroma.
Side Dishes
These shells are dazzling on their own, but pair perfectly with a cool scoop of vanilla ice cream or a handful of fresh berries for color and contrast. If you’re serving them at brunch, consider a platter of tea sandwiches or petit fours alongside your meringue creations—it’s a dreamy way to turn tea time into a celebration.
Creative Ways to Present
Arrange Lemon-Kissed Meringue Shells on a tiered dessert stand for wow factor at parties, or nestle each shell on a small plate with a swirl of coulis. For personal touches, serve them in individual glass ramekins or cupcake wrappers, or use a ribbon of passionfruit around the base for a sophisticated look.
Make Ahead and Storage
Storing Leftovers
If you have extra Lemon-Kissed Meringue Shells, keep them crisp by placing them in an airtight container at room temperature for up to three days. They’ll absorb moisture from the air quickly, so avoid humidity and wait to add the curd and fruit until just before serving.
Freezing
Unfilled meringue shells freeze beautifully! Lay them in a single layer in an airtight container, with parchment between layers to prevent sticking. When you’re ready to serve, simply let them thaw at room temperature—no need to re-bake, and they’ll maintain their signature crunch.
Reheating
If your meringue shells have softened a bit, reheating is easy: pop them in a low oven at 200°F (90°C) for about 10-15 minutes. Allow to cool before filling. This little trick revives their crisp exterior and marshmallowy interior, just like fresh from the oven.
FAQs
Why did my meringue shells crack in the oven?
Cracking is usually caused by temperature shock. Cool your Lemon-Kissed Meringue Shells slowly in the oven to prevent abrupt changes that can split the delicate crust. Also, avoid opening the oven door during baking or cooling.
Can I substitute another fruit for passionfruit?
Absolutely! Lemon-Kissed Meringue Shells are versatile—try raspberry coulis, diced mango, or even a touch of blueberry preserve for a twist. The shells are a lovely base for any tangy or sweet fruit you have on hand.
What’s the secret to getting stiff, glossy peaks?
Start with a spotless bowl and room temperature egg whites. Gradually add sugar as you beat, and don’t rush—letting each stage fully whip up will give you that signature shine and hold.
Is it okay to make meringue on a humid day?
Meringue and humidity don’t mix well! If your kitchen is muggy, the shells may get sticky or collapse. Try to make Lemon-Kissed Meringue Shells on a dry day, or use a dehumidifier to get those crisp results.
Can I assemble the shells in advance?
For best texture, keep your meringue shells and fillings separate until just before serving. Assembled shells will soften over time, especially with juicy fillings, so assemble shortly before enjoying for the perfect bite.
Final Thoughts
It’s hard not to fall for these Lemon-Kissed Meringue Shells—their cloud-like crunch, bright lemony heart, and sunshine-y good looks will make them a fast favorite with everyone who tries them. I hope you’re inspired to create them soon and share a little sweet magic with friends and family. Happy baking!