Light & Creamy Strawberry Cheesecake Roll Recipe
If you love strawberries, cheesecake, and fun desserts that look as dazzling as they taste, this Light & Creamy Strawberry Cheesecake Roll is about to become your next baking obsession. Imagine a soft, billowy sponge cake wrapped around a luscious cheesecake filling, all brightened up with juicy strawberries and finished with a glistening jam glaze. It’s that rare treat that manages to be both impressive and inviting—perfect for spring gatherings, family celebrations, or any time you want to spoil yourself a little. The best part? It’s lighter than your classic cheesecake, and the rolled presentation always gets ooohs and aaahs!
Ingredients You’ll Need
The ingredients for this Light & Creamy Strawberry Cheesecake Roll are blissfully simple, and each one truly matters. Together, they create the softest sponge, the dreamiest filling, and the freshest pop of fruity color. Here’s what you’ll need—and a little tip for each:
- Eggs (4 large, separated): Whipping the whites separately gives the cake its pillowy, cloudlike texture.
- Granulated sugar (¾ cup, split): This not only sweetens the batter and meringue, but helps the cake brown beautifully.
- All-purpose flour (½ cup): Just enough to bind the sponge while staying feather-light.
- Baking powder (½ teaspoon): Gives the cake its gentle lift.
- Salt (¼ teaspoon): Balances the sweetness and enhances every flavor.
- Cream cheese (1 cup, softened): The star of the filling—let it come to room temperature for a creamier result.
- Powdered sugar (2 tablespoons): Whisks smoothly into the filling for the silkiest texture.
- Pure vanilla (1 teaspoon): Don’t skip this—it makes the cheesecake filling sing.
- Fresh strawberries (1 cup, thinly sliced): Use ripe, flavorful berries for color and taste.
- Strawberry jam (1 tablespoon, warmed): Brushed on for a glossy, irresistible finish.
- Extra whipped cream and berries (for serving): Adds a festive, bakery-style flourish.
How to Make Light & Creamy Strawberry Cheesecake Roll
Step 1: Prep Your Pan and Heat the Oven
Start by preheating your oven to 350°F (175°C). Line a 10×15-inch jelly roll pan with parchment paper, making sure to leave some overhang for easy lifting later. Lightly grease and flour the parchment so nothing sticks—a quick and simple trick for perfect release every time.
Step 2: Whip the Egg Yolks and Sugar
In a large mixing bowl, beat your egg yolks with ½ cup of the granulated sugar. Keep mixing until the mixture becomes thick and almost doubles in volume; you’re aiming for a pale, lemony color. This base will ensure your sponge turns out both light and rich.
Step 3: Fold in the Dry Ingredients
Gently stir the flour, baking powder, and salt into your yolk mixture. Go slow to keep things light—overmixing can deflate the batter, so just blend until you see no more dry patches.
Step 4: Beat and Fold the Egg Whites
Using a clean bowl and beaters, whip the egg whites with the remaining ¼ cup of sugar until firm peaks form. This step is the secret to that airy, melt-in-your-mouth cake. Carefully fold the meringue into your yolk batter in two additions, working smoothly to preserve as much volume as possible.
Step 5: Bake the Sponge Cake
Spread the batter gently and evenly in your prepared pan, smoothing out the top with an offset spatula. Bake for 12–14 minutes—watch for a light golden color, and check if the cake bounces gently back when touched. That’s your cue that it’s ready!
Step 6: Roll the Cake While Warm
Dust a clean kitchen towel with powdered sugar and lay it flat on your counter. While the cake is still warm, invert it onto the towel, peel off the parchment, and immediately roll it up (towel and all) from the short side. Let it cool completely—rolling early prevents cracks later.
Step 7: Make the Cheesecake Filling
Once your cake is cool, whip together softened cream cheese, powdered sugar, and vanilla in a bowl until creamy and dreamy. Aim for ultra-smooth—no lumps allowed! This is where the “Light & Creamy Strawberry Cheesecake Roll” earns its name.
Step 8: Fill and Roll
Very gently unroll the cooled cake. Spread the cheesecake filling right to the edges, then top with a single layer of thinly sliced strawberries. Now, slowly re-roll the cake, using the towel to guide a tight but gentle roll. You’ll see those beautiful strawberry swirls peeking through when you slice it!
Step 9: Glaze and Chill
Warm up your strawberry jam and brush it all over the outside of the roll for a picture-perfect shine. Place the roll in the fridge for at least 1 hour—this helps the flavors blend and makes neat slicing (and serving) a snap.
Step 10: Slice and Serve
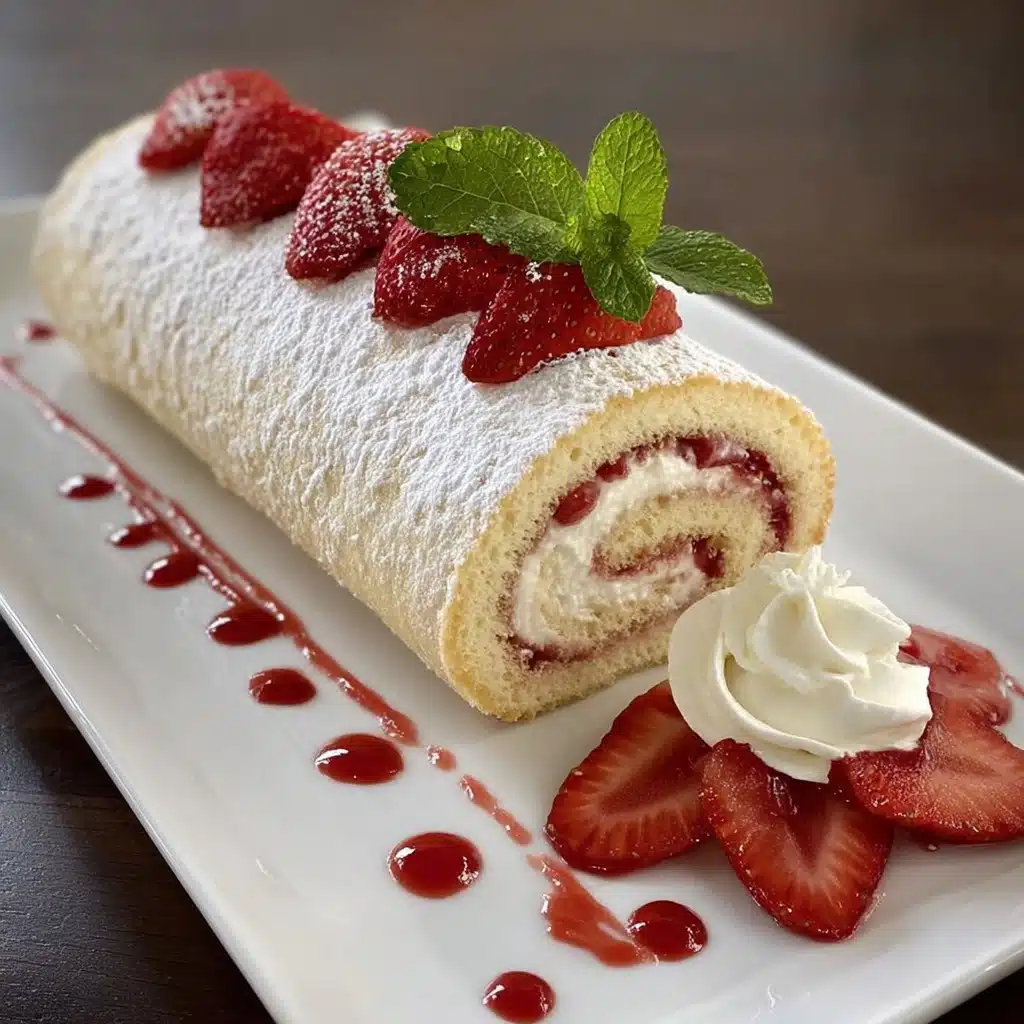
When it’s time to serve, use a sharp serrated knife to gently cut the roll into rounds. Arrange them on a platter and finish with clouds of whipped cream and extra fresh berries. Your Light & Creamy Strawberry Cheesecake Roll is a feast for every sense!
How to Serve Light & Creamy Strawberry Cheesecake Roll

Garnishes
Let your creativity shine with garnishes! I love extra dollops of whipped cream, a generous sprinkle of sliced fresh strawberries, and even a little fresh mint for color and fragrance. A dusting of powdered sugar always adds that special, bakery-style finish to the Light & Creamy Strawberry Cheesecake Roll.
Side Dishes
This roll makes a stunning centerpiece for dessert, so simple sides work well—think a bowl of mixed berries, a light fruit salad, or even just crisp butter cookies on the plate. If serving for brunch, pair it with fresh coffee or a citrusy tea to balance the sweetness.
Creative Ways to Present
You can serve the Light & Creamy Strawberry Cheesecake Roll whole and slice at the table for a dramatic reveal, or pre-slice it and layer the rounds upright for a charming “strawberry swirl” display. For summer parties, individual slices can be plated with a pinch of lemon zest, drizzled chocolate, or even a scoop of vanilla bean ice cream for a decadent twist.
Make Ahead and Storage
Storing Leftovers
If you happen to have leftovers (lucky you!), wrap the roll snugly in plastic wrap and store in the refrigerator. It’s best enjoyed within 2–3 days, when the sponge cake remains tender and the cheesecake filling is at its creamiest.
Freezing
The Light & Creamy Strawberry Cheesecake Roll can absolutely be frozen! Wrap the roll or individual slices tightly in plastic wrap and then foil, and freeze for up to a month. Thaw overnight in the fridge before serving; just note that the texture of the berries may soften slightly.
Reheating
This dessert is at its best served cold, straight from the fridge. No reheating is needed—just a quick slice and you’re ready to wow your guests. If you want to bring out the flavors even more, let it sit at room temperature for 10 minutes before serving.
FAQs
Can I use frozen strawberries instead of fresh?
Fresh strawberries give the best taste and texture since they’re less watery, but you can use frozen in a pinch. Just thaw and blot well to remove excess moisture before layering. The flavor will still be delicious in your Light & Creamy Strawberry Cheesecake Roll!
What’s the secret to avoiding cracks in the cake?
Rolling the cake in a towel dusted with powdered sugar while it’s still warm is the key. This helps the sponge remember its shape, so when you unroll and fill, it stays intact without cracking.
Can I make the roll a day in advance?
Yes! In fact, making the Light & Creamy Strawberry Cheesecake Roll a day ahead deepens the flavors, and it slices even more beautifully. Just wrap well and refrigerate until ready to serve.
Is there a gluten-free version?
Absolutely! Replace the all-purpose flour with your favorite gluten-free baking blend, preferably one with xanthan gum. The results will be just as dreamy, and everyone can enjoy a slice.
Can I use other fruits for the filling?
Definitely! While strawberries steal the show, you can swap in raspberries, blueberries, or a mix of seasonal fruits. Just keep the berry layer thin so the roll hugs together nicely.
Final Thoughts
I can’t recommend giving this Light & Creamy Strawberry Cheesecake Roll a try enough. It’s the ultimate feel-good dessert—fresh, light, and stunning on any table. Happy baking, and don’t forget to snap a photo before everyone dives in!