No-Bake Chocolate Sponge Cake Recipe
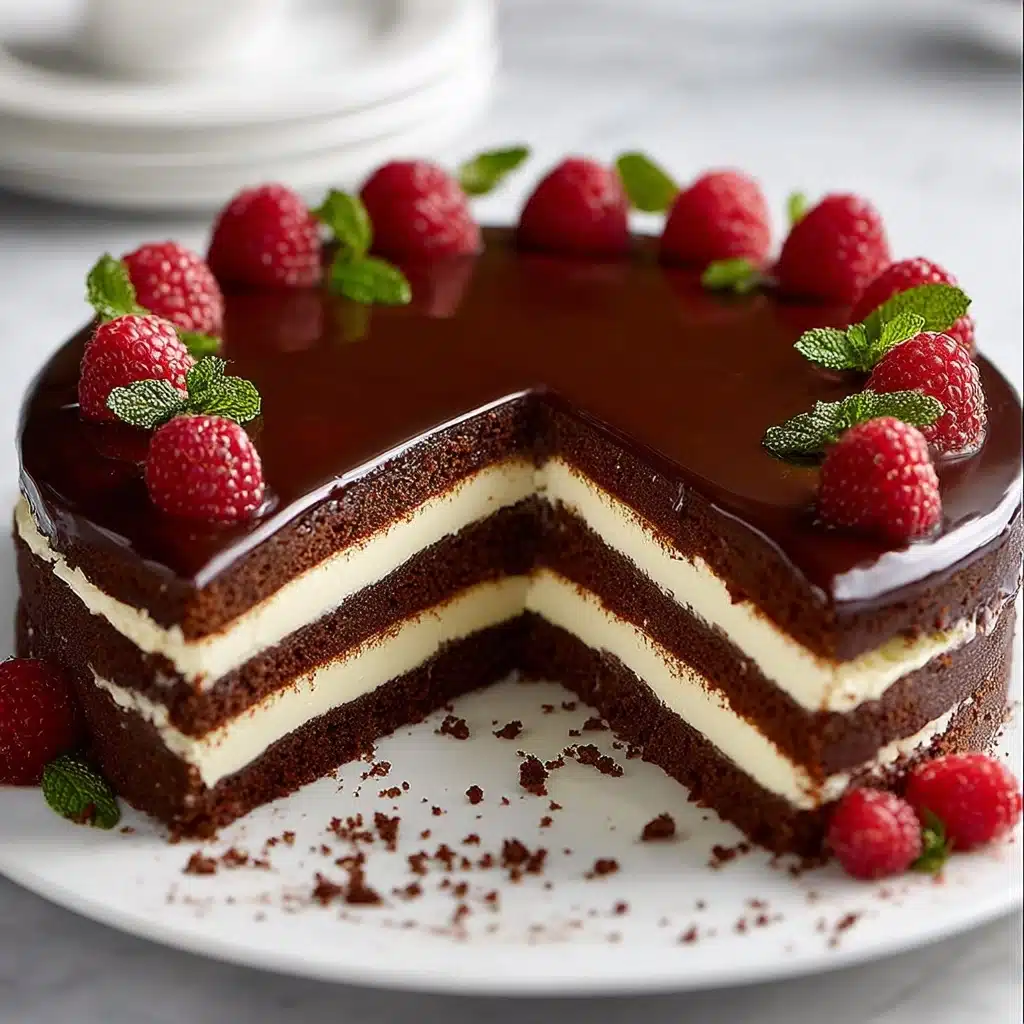
If you’re on the hunt for a no-fuss, surprisingly elegant dessert that comes together with little effort, look no further than this wonderful No-Bake Chocolate Sponge Cake. Imagine layers of rich chocolate cookie crumbs and silky whipped cream, all crowned by a glossy chocolate topping—no oven required! Whether you’re entertaining guests or simply treating yourself after a long day, it’s the ultimate crowd-pleaser with big flavor, doable steps, and a texture that’s impossible to resist.

Ingredients You’ll Need
The magic of a No-Bake Chocolate Sponge Cake lies in its simplicity, yet each ingredient plays a key role in delivering layers of decadence. With just a handful of pantry staples and some cream, you’ll have a dessert that tastes like it took all day!
- Crushed Chocolate Biscuits: Provides the cake’s signature “sponge” structure with a rich, chocolatey base that comes together in minutes.
- Melted Butter: Binds the biscuit crumbs, creating a cohesive, sliceable layer with a melt-in-your-mouth texture.
- Cocoa Powder: Intensifies the chocolate flavor, giving the “cake” an added depth and beautiful dark color.
- Milk: Softens the biscuit mixture to ensure tender, moist layers that don’t crumble apart.
- Heavy Whipping Cream: The key to cloud-like cream layers, adding a creamy contrast to the chocolate.
- Powdered Sugar: Sweetens the cream just enough without grittiness, keeping the filling smooth.
- Vanilla Extract: A dash of vanilla brightens and balances the richness of the chocolate and cream.
- Dark Chocolate (chopped): Makes the topping ultra-luxe with a bittersweet finish that pairs perfectly with the sweet cream layers.
- Heavy Cream (for topping): Helps create a silky, pourable ganache that locks in moisture and flavor for the final flourish.
How to Make No-Bake Chocolate Sponge Cake
Step 1: Prepare the Base Layer
Start by mixing your crushed chocolate biscuits with melted butter, cocoa powder, and milk in a large bowl. Stir until the mixture is evenly moistened and holds together when pressed between your fingers. Press half of this mixture firmly into the bottom of your cake pan, forming a sturdy, chocolatey foundation for your No-Bake Chocolate Sponge Cake.
Step 2: Whip the Cream Filling
In a chilled bowl, combine the heavy whipping cream, powdered sugar, and vanilla extract. Using an electric mixer, whip until soft, fluffy peaks form. Be careful not to overwhip; you want the cream to be smooth and spreadable. Dollop and gently spread half of the cream over the biscuit base.
Step 3: Build the Layers
Take the remaining chocolate biscuit mixture and spread it carefully over the whipped cream layer, pressing lightly to create an even surface. Then, finish with the rest of the whipped cream, spreading it out gently for a pillowy top layer. The alternating layers give your No-Bake Chocolate Sponge Cake its show-stopping stripes!
Step 4: Make the Chocolate Topping
For the final touch, heat your remaining heavy cream just until it’s steaming—not boiling—then pour it over the chopped dark chocolate in a heatproof bowl. Let it sit for a few moments before stirring to create a smooth, luscious ganache. Once glossy and combined, pour this over the cake, using a spatula to coax it to the edges for tempting coverage.
Step 5: Chill and Set
Patience is key here! Cover your masterpiece and refrigerate for at least four hours (or overnight if you can wait), giving all the flavors and textures time to meld. The chilling transforms the layers into a cohesive, sliceable No-Bake Chocolate Sponge Cake—perfectly set and irresistibly creamy.
How to Serve No-Bake Chocolate Sponge Cake
Garnishes
When it’s time to serve, dress up your cake with a handful of chocolate shavings, a light dusting of cocoa powder, or fresh berries for a pop of color. Even a sprig of mint can make each slice feel extra special. The simplicity of the cake means a tiny flourish goes a long way!
Side Dishes
This cake is rich, so balancing it with something a little tart or fresh—like raspberries, a scoop of cherry sorbet, or even a dollop of tangy Greek yogurt—will really elevate each bite. For a more decadent table, you might pair it alongside a simple vanilla ice cream or espresso for grown-up flair.
Creative Ways to Present
Don’t hesitate to think outside the pan! Individually layered desserts in cups or jars are both adorable and portion-controlled. You can even cut the cake into small, square bites for a dessert platter or create a tiered trifle by alternating cake and cream in a glass bowl. No-Bake Chocolate Sponge Cake is nothing if not adaptable.
Make Ahead and Storage
Storing Leftovers
Wrap leftover slices in plastic wrap or store them in an airtight container in the fridge. They’ll keep fresh and creamy for about 3-4 days, making midnight treats easy and just as delicious as day one.
Freezing
You can absolutely freeze No-Bake Chocolate Sponge Cake! Simply slice and wrap pieces individually, then place them in a freezer-safe container. Thaw the slices overnight in the fridge for best results. The texture holds up remarkably well, so you’re never far from a sweet chocolate fix.
Reheating
Actually, this cake is best enjoyed straight from the fridge or at cool room temperature—no heating required. If you do prefer it just slightly softer, let it sit out for 10-15 minutes before serving so the cream and ganache gently soften to perfection.
FAQs
Can I use a different type of cookie for the base?
Absolutely! While chocolate biscuits provide that signature flavor, you can experiment with graham crackers, digestive biscuits, or even oreo cookies for a unique twist. Just keep the ratio of crumbs and butter the same so your No-Bake Chocolate Sponge Cake holds together.
What kind of pan works best?
A springform pan is ideal because it makes unmolding the cake a breeze, but a standard cake pan lined with parchment or plastic wrap works well too. The cake is sturdy enough for creative shapes, so even loaf or square pans are fair game for your No-Bake Chocolate Sponge Cake adventures!
Can I make this recipe dairy-free?
Yes, you can swap in coconut cream for the whipped cream and use plant-based butter and milk. Look for dairy-free chocolate for the topping. The result will still be impressive and just as satisfying for those needing dairy alternatives.
How do I get tidy layers and clean slices?
For neat layers, make sure to press and level each component gently but firmly. When slicing, use a sharp knife dipped in warm water and wipe between cuts. This helps you achieve those perfect bakery-style slices of No-Bake Chocolate Sponge Cake.
What can I do if my cream won’t whip?
Make sure both the cream and mixing bowl are very cold. If you still have trouble, try whisking by hand over a bowl of ice, or add a tablespoon of mascarpone cheese for extra stability. Soft peaks are key—don’t overwhip or the cream may separate.
Final Thoughts
I can’t tell you how many times this No-Bake Chocolate Sponge Cake has come to the rescue for birthdays, potlucks, or just because we needed something sweet, fast. I hope you’ll give it a try and make it your own—one taste and you’ll have a new go-to dessert that requires hardly any effort but delivers pure chocolate bliss every single time.