Orange Dream Cheesecake Recipe
If you’re searching for a show-stopping dessert that sparkles with citrusy brightness and creamy decadence, this Orange Dream Cheesecake is exactly what your taste buds have been waiting for. Imagine the luscious velvety texture of classic cheesecake, but with a burst of fresh orange that dances in every bite—wrapped in a rich chocolate cookie crust for a little extra indulgence. It’s a dessert that turns even a weeknight dinner into a celebration, and when you share it, you’re guaranteed to be asked for the recipe!

Ingredients You’ll Need
The ingredient list for this Orange Dream Cheesecake is refreshingly simple, yet each item packs a major punch when it comes to taste, texture, and color. These carefully chosen ingredients come together to create that unmistakable dreamy citrus flavor with just the right amount of chocolatey crunch.
- Chocolate cookie crumbs: These give the cheesecake a deep, cocoa-rich base that contrasts beautifully with the light orange filling.
- Melted butter: Helps bind the cookie crumbs into a sturdy, flavorful crust that holds up to every slice.
- Cream cheese, softened: The heart of any cheesecake—softened cream cheese ensures a silky-smooth filling that’s wonderfully rich.
- Sugar: Lends sweetness and balances the tart citrus notes from the orange juice and zest.
- Large eggs: These set the cheesecake and create a luxuriously creamy structure as it bakes.
- Orange juice: Brings a fresh, tangy punch, infusing the entire cake with fragrant citrus flavor.
- Orange zest: Don’t skip the zest—it intensifies the orange essence in every forkful.
- Vanilla extract: Adds warmth and depth, complementing the bright citrus perfectly.
- Sour cream: Folds into the filling for added tang and an ultra-smooth, velvety texture.
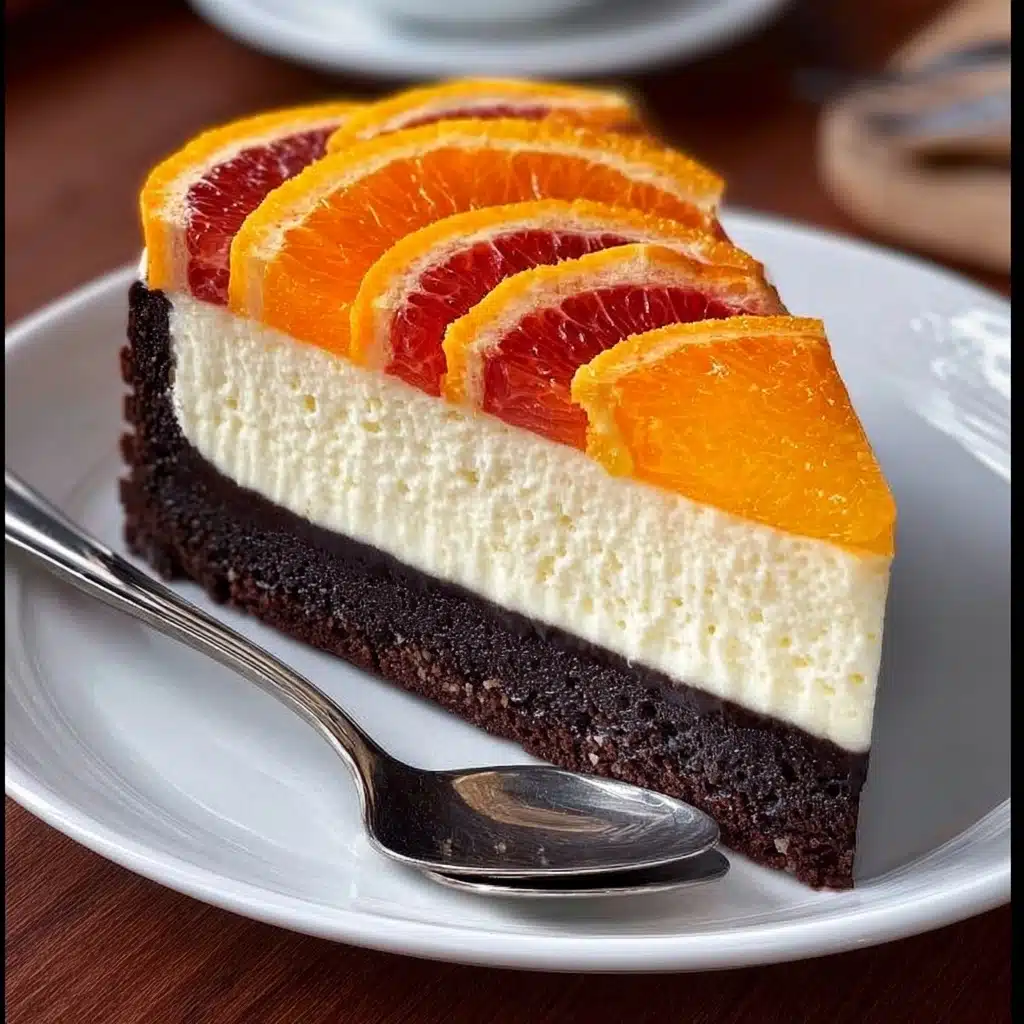
- Oranges, thinly sliced: These beautiful slices finish the cheesecake with a pop of color and a burst of fresh flavor.
How to Make Orange Dream Cheesecake
Step 1: Prepare the Pan and Preheat Oven
Start by preheating your oven to 325°F (165°C). Grease a springform pan generously—this makes for easy removal after your masterpiece is complete. The springform pan is a must because it allows you to unveil perfectly clean edges and that signature cheesecake look.
Step 2: Make the Chocolate Crust
In a bowl, combine your chocolate cookie crumbs and melted butter. Mix until it feels like damp sand—every crumb should be coated in butter. Press this mixture into the bottom of your pan, forming an even layer. The chocolate base not only looks stunning but also offers a decadent counterpoint to the citrusy filling.
Step 3: Beat the Cream Cheese and Sugar
With a mixer, beat the softened cream cheese and sugar together until silky and smooth. This is where your cheesecake gets its signature creamy texture—make sure to scrape down the sides of the bowl to avoid any lumps.
Step 4: Add the Eggs
Add the eggs to the mixture, one at a time, beating well after each addition. Slow and steady wins the race here, as this method ensures your cheesecake filling remains light and airy, without pockets of unmixed egg.
Step 5: Mix in Orange Goodness and Vanilla
Now is when the Orange Dream Cheesecake flavor really comes alive: stir in the orange juice, orange zest, and vanilla extract. These ingredients infuse the batter with irresistible brightness and sweet, aromatic notes.
Step 6: Fold in Sour Cream and Fill the Pan
Gently fold in the sour cream, adding a little tang and an ultra-creamy texture to your cheesecake. Pour the finished mixture over your prepared crust, smoothing the top with a spatula so it bakes evenly.
Step 7: Bake and Cool
Bake your cheesecake for 50–60 minutes. You’ll know it’s done when the center is set but still slightly wobbly—the residual heat will finish the job as it cools. Let it cool completely before refrigerating, as this prevents cracks and helps the flavors meld.
Step 8: Top with Orange Slices and Chill
Once cooled, arrange thin orange slices on top for a vibrant, inviting finish. Pop the cheesecake into the fridge and let it chill for at least 4 hours (overnight is even better!). This step ensures your Orange Dream Cheesecake slices up perfectly and the flavors are at their best.
How to Serve Orange Dream Cheesecake
Garnishes
Take your Orange Dream Cheesecake presentation up a notch with a few easy garnishes. Dust the top lightly with powdered sugar, scatter a few curls of orange zest, or add a handful of chocolate shavings for an extra touch of glamour. A dollop of whipped cream beside each slice is always welcome and lets the citrus notes shine all the brighter.
Side Dishes
While this cheesecake is absolutely the star, pairing it with sides adds to the full dessert experience. Fresh summer berries provide a juicy, tart contrast, while a cold scoop of vanilla bean ice cream is pure bliss with each creamy bite. Coffee or a glass of dessert wine beautifully complement the cake’s rich, zesty flavors.
Creative Ways to Present
If you’re looking to make Orange Dream Cheesecake a true centerpiece, try slicing it into petite bars for a stunning dessert platter, or serve mini cheesecakes in individual ramekins for special-occasion flair. For a playful, retro vibe, top each slice with a twist of candied orange peel or a drizzle of warm chocolate sauce.
Make Ahead and Storage
Storing Leftovers
Leftover Orange Dream Cheesecake can be covered tightly and refrigerated for up to 5 days. Make sure you store it in an airtight container or wrap the pan with plastic wrap to keep the flavors fresh and prevent the cake from absorbing any fridge odors.
Freezing
Orange Dream Cheesecake holds up beautifully in the freezer! Simply wrap individual slices or the whole cake in plastic wrap, then a layer of aluminum foil. Freeze for up to 2 months, and thaw overnight in the refrigerator before serving. The creamy texture and citrusy punch stay wonderfully intact.
Reheating
Cheesecake is best enjoyed chilled or at room temperature, so skip the microwave. If you like your slice just slightly softened, leave it out at room temp for about 15 minutes before serving—this takes the chill off and gives that perfect creamy bite.
FAQs
Can I use a different type of citrus for this recipe?
Absolutely! While orange gives the signature “dream” quality, you can experiment with lemon, lime, or even tangerine for a fun twist. The flavors will shift, but you’ll still get a bright, zesty cheesecake.
What’s the best way to slice cheesecake cleanly?
For pristine slices, dip a sharp knife in hot water, wipe it clean, and cut—wiping the blade between each slice. This keeps the filling smooth and prevents sticking, making every piece bakery-worthy.
How do I prevent cracks on top of my Orange Dream Cheesecake?
Cracks typically form from overbaking or rapid cooling. To avoid them, don’t overbake the cheesecake and let it cool gradually in the oven with the door slightly open before moving it to the fridge. Even if a few cracks appear, those gorgeous orange slices on top will cover them right up!
Can I make this cheesecake gluten-free?
Yes—just swap the chocolate cookie crumbs with your favorite gluten-free chocolate cookies or graham crackers. The rest of the recipe is naturally gluten-free and just as tasty.
How far ahead can I make Orange Dream Cheesecake?
You can make it up to 2 days in advance, which actually enhances the flavor as it sits. Just hold off on adding the fresh orange slices until a few hours before serving for the prettiest presentation.
Final Thoughts
You’re in for a truly memorable treat with this Orange Dream Cheesecake—it’s endlessly creamy, sparkling with orange essence, and just the right touch of chocolate. Don’t hesitate to try this recipe the next time you want to brighten someone’s day, or simply indulge in a slice of citrus sunshine for yourself!