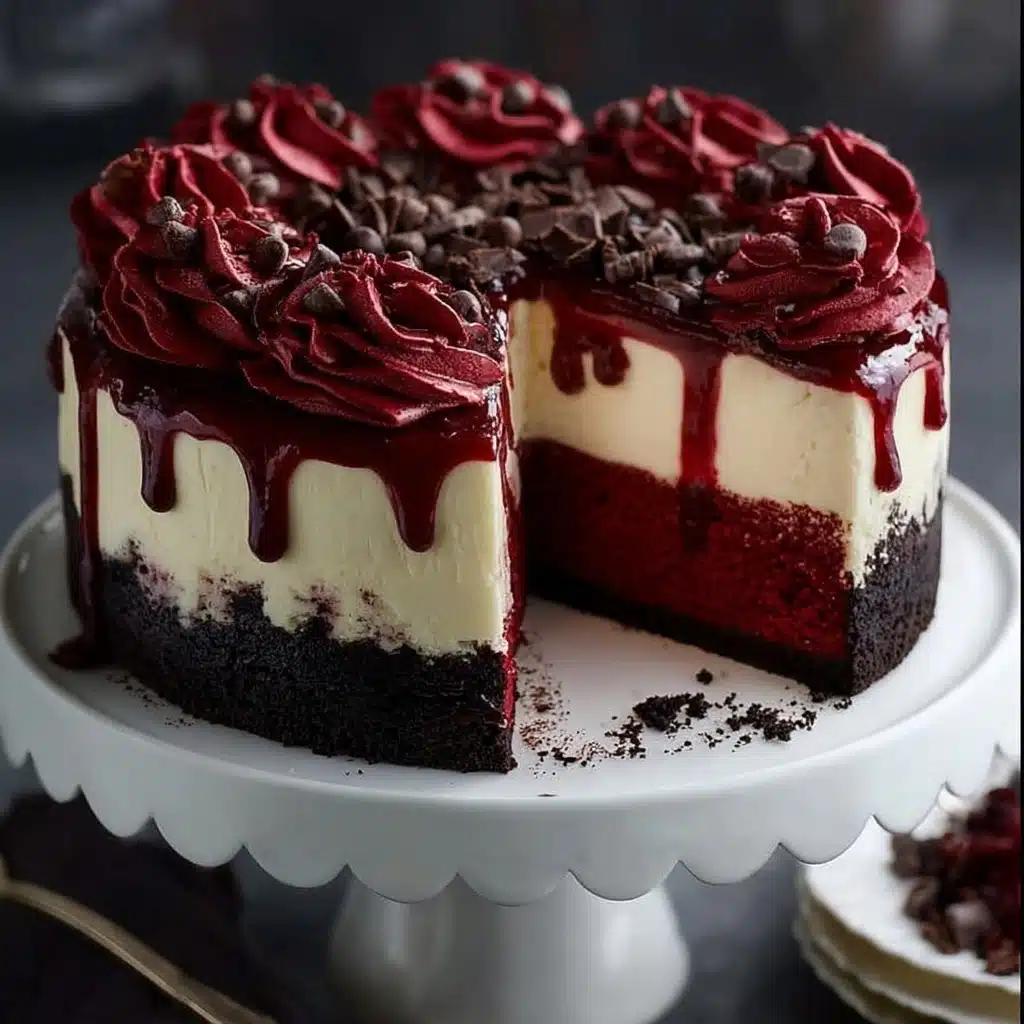
Red Velvet Cheesecake Layer Cake Recipe
If you are ready to wow your friends and family with a show-stopping dessert, the Red Velvet Cheesecake Layer Cake is an absolute must-try. This luscious treat combines the tender, cocoa-kissed layers of red velvet cake with a creamy, tangy cheesecake center, all enveloped in a rich cream cheese frosting. With a hint of chocolate cookie crust at the base and a glossy red berry glaze on top, every bite offers a harmonious blend of textures and flavors that feel both decadent and perfectly balanced. Whether it’s a special occasion or just a day when you deserve something extraordinary, this cake delivers happiness in every forkful.
Ingredients You’ll Need
Don’t let the list intimidate you—each ingredient in this Red Velvet Cheesecake Layer Cake is straightforward and essential, contributing to its signature taste, moisture, and vibrant color. With common pantry staples and a few special touches, you’ll create a dessert everyone will rave about.
- Chocolate cookie crumbs: These create a deliciously crisp base that adds depth and contrast to the creamy cheesecake.
- Unsalted butter: Used melted in the crust and softened in the frosting, butter adds richness and helps form the perfect texture.
- All-purpose flour: The foundation for the cake layers, ensuring a tender crumb with just the right structure.
- Sugar: Sweetens both cake and cheesecake while helping to create moisture and tenderness.
- Cocoa powder: Adds a subtle chocolate flavor that’s essential for that classic red velvet taste.
- Baking soda, baking powder, and salt: Help the cake rise beautifully and balance sweetness.
- Buttermilk (or milk plus vinegar): Provides acidity for flavor and reacts with leaveners to keep the cake light.
- Vegetable oil: Keeps the cake moist and tender without overwhelming the flavor.
- Eggs: Give structure and richness to both the cake and the cheesecake layers.
- Vanilla extract: Enhances the overall flavor with warm, aromatic notes.
- White vinegar: Reacts with baking soda for lift and preserves the vibrant red color.
- Red gel food coloring: Delivers that signature vivid red hue without thinning the batter.
- Cream cheese: The star of the cheesecake layer and frosting, supplying smooth tanginess and richness.
- Sour cream or heavy cream: Added to the cheesecake for extra creaminess and silkiness.
- Powdered sugar: Sweetens and stabilizes the cream cheese frosting to a silky finish.
- Strawberry or raspberry jam: Used in the red berry glaze to provide a fresh, fruity brightness that complements the cake.
- Lemon juice and water: Thin out the glaze and add a bit of zesty balance.
- Red velvet crumbs, dark chocolate chips, extra frosting: Perfect for decorating and adding texture.
How to Make Red Velvet Cheesecake Layer Cake
Step 1: Make the Cookie Crust
Start by combining the chocolate cookie crumbs with melted butter until the mixture resembles wet sand. This step is optional but highly recommended for added texture and a slight crunch that contrasts the soft layers above. Press this crumbly base into the bottom of a 9-inch springform pan and bake it briefly at 350°F (175°C) for about 10 minutes, then allow it to cool. This forms the perfect foundation for your cheesecake layer.
Step 2: Bake the Red Velvet Cake Layers
Preheat your oven to 350°F (175°C) and prepare two 9-inch cake pans with greasing and parchment. In a large bowl, whisk together the dry ingredients—flour, cocoa powder, baking soda, baking powder, and salt. In another bowl, mix the sugar, vegetable oil, eggs, buttermilk, white vinegar, vanilla extract, and red gel food coloring until smooth and vibrant. Gently fold the dry ingredients into the wet until just combined, being careful not to overmix. Divide the batter evenly between your two pans and bake for 25 to 30 minutes, or until a toothpick inserted near the center comes out clean. Let the cakes cool completely before assembling.
Step 3: Prepare the Cheesecake Layer
Using softened cream cheese, beat it with sugar until completely smooth and creamy. Add the eggs one at a time, blending well after each addition, then mix in vanilla and sour cream. If you used the cookie crust, pour this cheesecake batter over the cooled crust in your springform pan; if not, bake it in a lined pan alone. Bake at 325°F (160°C) for 40 to 45 minutes until the cheesecake is set but still has a slight jiggle in the center. Once done, cool it fully and refrigerate to chill it thoroughly before assembly. This cheesecake layer adds that irresistible creamy texture contrast that defines the Red Velvet Cheesecake Layer Cake.
Step 4: Assemble the Cake
Start with one layer of your cooled red velvet cake on a serving plate and spread a thin layer of cream cheese frosting on top to “glue” layers together. Carefully place the chilled cheesecake layer atop the cake, then add a light coating of frosting before placing the second red velvet cake layer on top. Now frost the entire cake generously with cream cheese frosting, smoothing out the sides and the top for that professional finish.
Step 5: Add Glaze and Decorations
Warm the strawberry or raspberry jam with water and lemon juice just enough to make it pourable, then let it cool a bit. Pour this luscious red berry glaze over the top of the cake, allowing it to drip down the sides in tempting ribbons. To finish, pipe extra frosting, sprinkle red velvet crumbs (taken from your trimmed cake edges), and scatter dark chocolate chips for looks and bursts of chocolate flavor. Chill the whole cake to set and keep it fresh.
How to Serve Red Velvet Cheesecake Layer Cake

Garnishes
While the cake itself is a work of art, adding garnishes can elevate its presentation and flavor. Sprinkle fresh red velvet crumbs for a rustic, homemade look, pipe delicate rosettes of cream cheese frosting around the edge, or scatter dark chocolate chips for a bit of texture and visual contrast. A light dusting of cocoa powder or a handful of fresh berries also adds a charming touch.
Side Dishes
This cake pairs beautifully with fresh fruit such as raspberries, strawberries, or even a small bowl of mixed berries to echo the glaze’s fruity notes. For a more indulgent experience, a dollop of whipped cream or a scoop of vanilla bean ice cream on the side complements the creamy texture wonderfully, balancing the tanginess of the cheesecake.
Creative Ways to Present
If you’re serving this at a party or special event, consider layering individual slices in clear dessert cups, alternating cake and cheesecake with a drizzle of berry glaze on top to showcase each component visually. For an elegant touch, plate each slice with a fresh mint leaf and a few chocolate curls. The Red Velvet Cheesecake Layer Cake is as gorgeous to look at as it is delicious to eat.
Make Ahead and Storage
Storing Leftovers
One of the great things about this cake is that it keeps beautifully in the refrigerator for 4 to 5 days. Store leftovers in an airtight container or covered tightly with plastic wrap to maintain moisture and freshness. This also allows the flavors to meld even further, often tasting better a day after baking.
Freezing
If you want to prepare the cake in advance or save some for later, freezing is an excellent option. Wrap the cake tightly in plastic wrap followed by foil to prevent freezer burn. You can freeze the whole cake or individual slices for up to 2 months. When ready to eat, thaw overnight in the refrigerator for best results.
Reheating
This cake is best enjoyed chilled, so reheating is generally not recommended. However, if you prefer a slightly warmer slice, allow it to come to room temperature for about 30 minutes before serving. Avoid microwaving as it can alter the texture of the cheesecake and frosting.
FAQs
Can I make this cake without the chocolate cookie crust?
Absolutely! The cookie crust is optional and can be skipped if you prefer a classic cheesecake layer or simply want a lighter dessert. The cake will still be delicious and hold together perfectly without it.
What if I don’t have buttermilk on hand?
No worries! You can easily substitute buttermilk by adding 1 tablespoon of vinegar or lemon juice to 1 ½ cups of regular milk. Let it sit for 5 minutes before using to mimic the acidity and thickness of buttermilk.
How do I get that vibrant red color in the cake?
Using gel food coloring is key because it delivers a deep, rich red without adding liquid to your batter. Avoid liquid food coloring, which can thin the batter and affect texture.
Can I use regular cream cheese for the cheesecake and frosting?
Yes, full-fat cream cheese works best for the smoothest texture and richest flavor. Make sure it’s softened to room temperature to avoid lumps in your batter or frosting.
How should I transport this cake for a party?
Keep the cake chilled until just before serving, and transport it in a sturdy cake carrier or box. Freezing the cake slightly before travel can help it stay firm and reduce the risk of sliding or frosting damage.
Final Thoughts
Trust me, once you try this Red Velvet Cheesecake Layer Cake, it might just become your new favorite indulgence for every celebration or whenever you want to treat yourself. The spectacular combination of smooth cheesecake nestled between layers of moist, colorful red velvet, crowned with luscious frosting and a shimmering berry glaze, is simply unforgettable. So grab your apron, gather the ingredients, and prepare to create magic that tastes as good as it looks. Your taste buds will thank you!