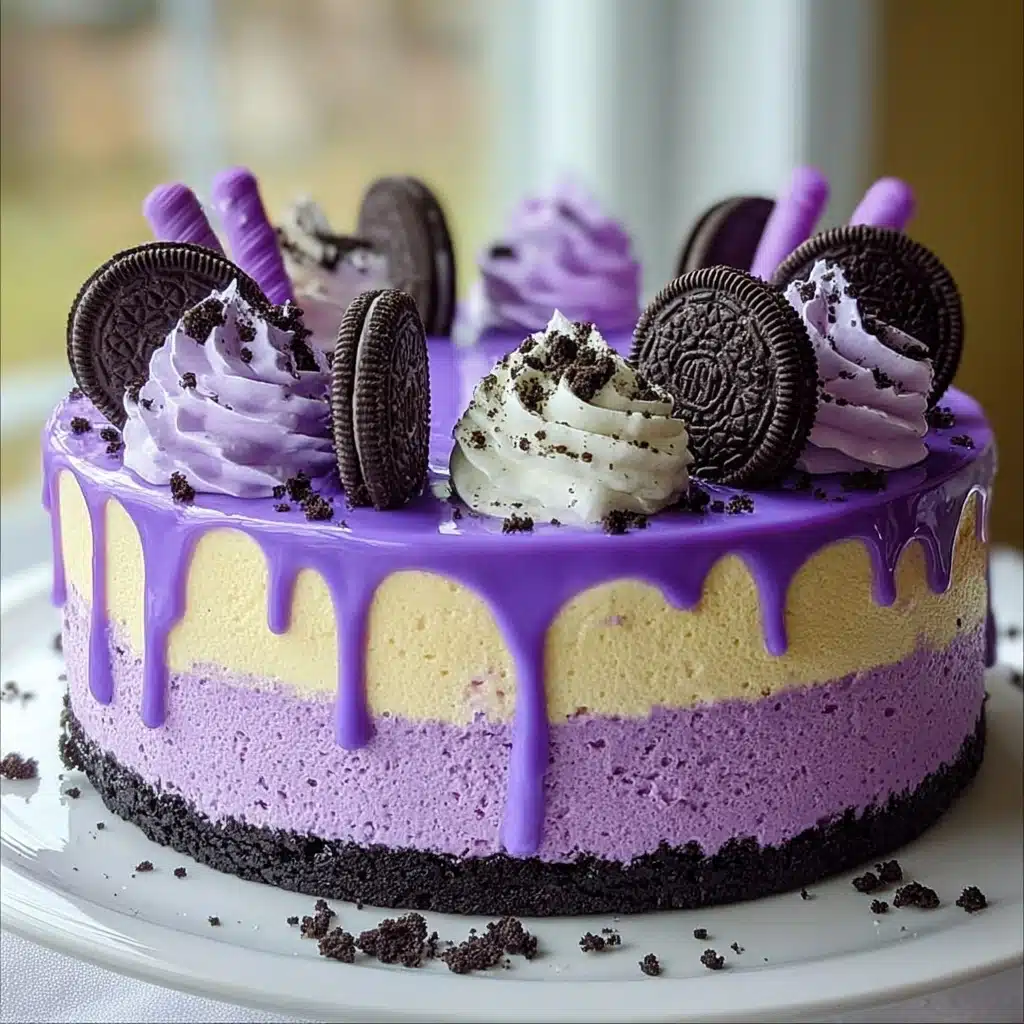
Ube Oreo Cheesecake Recipe
If you’ve been looking for a showstopper dessert that’s as Instagrammable as it is delicious, the Ube Oreo Cheesecake is your new best friend. This swirl of creamy cheesecake, vibrant purple yam (ube), and dangerously chocolatey Oreos brings a fusion of Filipino flair and classic comfort to your dessert table. With its gorgeous purple hue and cloud-like texture, this cheesecake is a dreamy treat for birthdays, gatherings, or just because you deserve something extraordinary. Once you taste it, you’ll be hooked on the sweet and nutty depth that only a real Ube Oreo Cheesecake can deliver.

Ingredients You’ll Need
Gathering the ingredients for this Ube Oreo Cheesecake is delightfully simple, but each one plays a crucial role—whether providing luscious creaminess, signature color, or that unmistakable Oreo crunch. Let’s break down what makes this cheesecake truly irresistible.
- Oreo Cookies: The backbone of our crust, lending deep chocolate flavor and a satisfying bite.
- Melted Butter: This binds the crushed Oreos together for that perfect, sliceable base.
- Cream Cheese: Essential for the classic cheesecake richness—make sure it’s softened for a smooth filling!
- Sugar: Balances the tang of the cream cheese and highlights the natural sweetness of ube.
- Heavy Cream: Adds an extra layer of silkiness and helps the filling set to cloud-like perfection.
- Eggs: The secret to a luscious, unified filling—bring them to room temperature for even mixing.
- Vanilla Extract: Rounds out the flavors and deepens the overall aroma.
- Ube Halaya (Purple Yam Jam): The heart and soul of this cheesecake—choose a good-quality jam or homemade puree.
- Ube Extract (Optional): For an extra hit of flavor and that signature, bold purple hue.
- White Chocolate: Melts into a creamy, dreamy ganache for the topping.
- More Heavy Cream (for GANACHE): Makes the melted white chocolate pourable and luxurious.
- Purple Food Coloring: For extra vibrancy in the topping—or simply blend in more ube halaya for a natural touch.
- Whipped Cream: For piping on top, bringing lightness and a bakery finish.
- Extra Oreo Cookies and Wafers: The final flourish—a crunchy and playful garnish.
How to Make Ube Oreo Cheesecake
Step 1: Prepare the Oreo Crust
Start by blitzing the Oreo cookies in a food processor until you get fine, uniform crumbs. Stir in the melted butter so all the crumbs are coated and glossy. Pour this mixture into the bottom of a springform pan and press firmly with the back of a spoon or measuring cup, making sure you create an even base all the way to the edges. Pop the crust into the fridge to chill while you prepare the glorious ube filling.
Step 2: Beat the Cheesecake Filling
In a large mixing bowl, blend the softened cream cheese and sugar until silky smooth and fluffy—this helps avoid lumps later on. Next, add the heavy cream, vanilla extract, and that stunning cup of ube halaya. If you want extra color and ube flavor, add a couple of drops of ube extract here. Beat gently until the filling is totally combined and a gorgeous lavender color.
Step 3: Incorporate the Eggs
Crack in the eggs, one at a time, mixing on low just until each one disappears before adding the next. This step helps you avoid over-mixing (which can cause cracks). The filling will be creamy, cohesive, and vibrantly purple—absolutely tempting!
Step 4: Assemble and Bake
Pour the ube cream cheese filling onto your chilled Oreo crust, smoothing the top with a spatula. To ensure your cheesecake bakes evenly and remains crack-free, place the pan in a larger baking tray and fill the tray with hot water, making a gentle water bath. Bake in a preheated oven at 160°C (320°F) for 60 to 70 minutes; you’ll know it’s done when the edges are set but the middle gives a little wobble. Let it cool in the turned-off oven with the door ajar for an hour, then refrigerate for at least 4 hours or, preferably, overnight.
Step 5: Prepare the White Chocolate Ube Ganache
For an eye-catching finish, heat the heavy cream and pour it over your melted white chocolate, mixing until smooth and glossy. Stir in a tiny bit of purple food coloring or more ube halaya for that signature ube look. Once the cheesecake is fully chilled, pour the ganache over the top, letting it drip artfully down the sides.
Step 6: Decorate for Wow Factor
Use a piping bag (or even a zip-top bag with the corner cut off) to swirl whipped cream in soft peaks across the top of the cheesecake. Gently press whole Oreo cookies or Oreo wafer sticks into the whipped cream for crunch and style. Let the finished Ube Oreo Cheesecake chill for a final 30 minutes in the fridge before slicing and serving your masterpiece.
How to Serve Ube Oreo Cheesecake
Garnishes
The sky’s the limit! Classic piped whipped cream and Oreo cookies give your Ube Oreo Cheesecake a playful, bakery-style look. You could finish with a dusting of ube powder, a sprinkle of gold flakes, or even edible flowers for a subtle touch of elegance. Every garnish adds another layer of fun (or sophistication) and draws out the colors and textures.
Side Dishes
Because this cheesecake is so decadent, keep your sides simple and refreshing. Slices of fresh mango, pineapple, or a tart berry compote perfectly balance all that creamy sweetness. A mug of black coffee or hot tea is a classic pairing, helping each forkful of the Ube Oreo Cheesecake shine even brighter.
Creative Ways to Present
For parties, slice your cheesecake into mini bars, serve on lollipop sticks for an adorable “cheesecake pop,” or layer in mini jars for an easy-to-eat trifle. Ube Oreo Cheesecake makes a stunning centerpiece on a simple white cake stand, or go bold with purple-hued serving plates to really let the colors pop. However you present it, this dessert is guaranteed to draw a crowd.
Make Ahead and Storage
Storing Leftovers
Leftover Ube Oreo Cheesecake (if you’re lucky enough to have any) should be covered tightly and stored in the refrigerator. It keeps beautifully for up to 4 or 5 days, and actually tastes even richer a day or two after it’s made, as the flavors meld and the texture sets.
Freezing
To freeze, chill the cheesecake thoroughly, remove it from the pan, and wrap slices (or the whole cake) in plastic wrap and foil. Stored this way, Ube Oreo Cheesecake will keep its flavor and texture for up to 2 months. Thaw it in the refrigerator overnight before serving—still just as show-stopping as day one!
Reheating
Since cheesecake is best enjoyed chilled or at cool room temperature, there’s no need to reheat. Just remove your slices from the fridge 10–15 minutes before serving to take the chill off and unlock the full flavor potential.
FAQs
Can I use homemade ube halaya instead of store-bought?
Absolutely! Homemade ube halaya will make your Ube Oreo Cheesecake taste extra fresh and authentic. Just ensure it’s smooth and not overly sweet so the cheesecake flavor shines through.
What if I don’t have ube extract?
Ube extract deepens the purple color and boosts the flavor, but if you don’t have it, simply use more ube halaya or go without—the cheesecake will still be absolutely delicious, just a bit lighter in color and flavor.
Can I make this recipe gluten free?
Yes! Simply use gluten-free chocolate sandwich cookies in place of Oreos for the crust. All other ingredients are naturally gluten free, so your Ube Oreo Cheesecake will be safe for those with gluten sensitivities.
How do I prevent cracks in my cheesecake?
The key is a gentle water bath, blending the batter just until smooth, and letting the cheesecake cool slowly in the oven with the door open. These steps help your Ube Oreo Cheesecake stay silky and smooth every time.
Can I make a no-bake version?
Definitely! Skip the baking and dissolve about 2 tablespoons of gelatin in hot water, then mix it into the filling before chilling. This will set your Ube Oreo Cheesecake beautifully without baking, perfect for warmer days.
Final Thoughts
This Ube Oreo Cheesecake is pure joy in dessert form—a playful collision of Oreos, creamy ube, and velvety cheesecake, all wrapped up in one unforgettable slice. I can’t wait for you to try it and see just how magical this recipe can be for your next special occasion (or sweet craving). Gather your ingredients, share it with friends, and watch this cheesecake disappear!