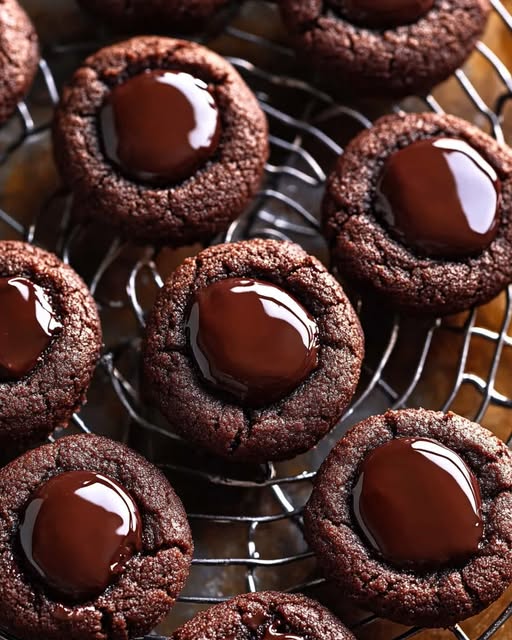
Chocolate Thumbprint Cookies Recipe
If you’ve been searching for that heavenly, melt-in-your-mouth treat that combines rich cocoa flavor with a luscious chocolate center, look no further than these Chocolate Thumbprint Cookies. They’re buttery and soft with just the right hint of cocoa in the dough, all crowned with a silky ganache filling that feels like a little gift in every bite. Whether you’re baking for a special occasion, holiday trays, or just because you deserve a sweet moment of joy, these cookies deliver a perfect balance of texture and chocolaty bliss that’s hard to resist.

Ingredients You’ll Need
These ingredients may be simple, but each one plays an essential role in creating the perfect harmony of taste, texture, and color in your Chocolate Thumbprint Cookies. From the creamy butter to the rich cocoa powder, every component brings something special to the table.
- Unsalted butter (1/2 cup): Softened butter adds richness and tenderness to the cookie dough, giving you that melt-in-your-mouth feel.
- Granulated sugar (1/2 cup): Sweetens the dough while helping with the cookie’s structure and slight crispiness on the edges.
- Large egg yolk (1): Binds the ingredients while lending moisture and a tender crumb.
- Vanilla extract (1/2 tsp): Enhances the overall flavor with a warm, sweet aroma.
- All-purpose flour (1 cup): The base of your dough, providing structure and softness in balance.
- Unsweetened cocoa powder (1/4 cup): Infuses deep chocolate flavor and that beautiful dark color into the cookie.
- Salt (1/4 tsp): Balances the sweetness and intensifies the cocoa notes.
- Semi-sweet chocolate chips or chopped chocolate (1/2 cup): Melts into the ganache, delivering a glossy, rich center.
- Heavy cream (2 tbsp): Blended with chocolate to create the luscious ganache filling that’s smooth and indulgent.
How to Make Chocolate Thumbprint Cookies
Step 1: Prepare Your Oven and Baking Sheet
Start by preheating your oven to 350°F (175°C). Line a baking sheet with parchment paper to ensure your cookies don’t stick and bake evenly—this small step really makes a difference in the finished texture.
Step 2: Cream Butter and Sugar
In a mixing bowl, beat the softened butter and granulated sugar until the mixture is light and fluffy. This process incorporates air that helps the cookies become delightfully tender on the inside with just the right bit of snap on the outside.
Step 3: Add Egg Yolk and Vanilla
Mix in the egg yolk and vanilla extract to the creamed butter and sugar. This enriches the dough, making it moist and flavorful while helping everything bind perfectly.
Step 4: Combine Dry Ingredients
In a separate bowl, whisk together the all-purpose flour, unsweetened cocoa powder, and salt. This ensures the cocoa powder is evenly distributed, giving each cookie that deep chocolate color and richness.
Step 5: Form the Dough
Gradually add the dry ingredients to the wet mixture, stirring until a soft dough forms. This dough will be smooth, rich, and ready to shape into the individual cookies.
Step 6: Shape and Press The Thumbprints
Scoop the dough into 1-tablespoon portions and roll them into balls. Place them on your lined baking sheet, then gently press your thumb or the back of a spoon into the center of each ball to create that iconic indentation—this is where the ganache goodness will go!
Step 7: Bake the Cookies
Bake for 10 to 12 minutes. Right after removing from the oven, if the centers have puffed up a bit, gently press them again to deepen the thumbprint before the cookies cool.
Step 8: Prepare and Add the Ganache Filling
While the cookies cool completely, heat the heavy cream until it’s just steaming—not boiling—and pour it over the semi-sweet chocolate chips or chopped chocolate. Let it sit for 1 to 2 minutes, then stir until silky smooth. Spoon or pipe this luscious ganache into each cooled cookie indentation. Let them set at room temperature or pop them in the fridge to firm up faster.
How to Serve Chocolate Thumbprint Cookies
Garnishes
To elevate your Chocolate Thumbprint Cookies, consider sprinkling a pinch of sea salt over the ganache right after filling. This enhances the chocolate’s depth and adds a subtle crunch that’s just delightful. You can also dust a little cocoa powder or finely grated orange zest for a bright twist.
Side Dishes
These cookies pair beautifully with a warm cup of coffee, a creamy hot chocolate, or even a cold glass of milk. The luscious ganache filling complements these beverages perfectly, making each bite a moment of comfort.
Creative Ways to Present
Arrange your Chocolate Thumbprint Cookies on a decorative platter adorned with fresh berries or mint leaves for a festive look. You can also individually wrap them in little clear bags tied with ribbon—making these a gorgeous party favor or a sweet homemade gift.
Make Ahead and Storage
Storing Leftovers
If you happen to have leftovers (which is rare, trust me), store your cookies in an airtight container at room temperature. They’ll stay fresh and soft for up to five days, allowing you to enjoy that rich ganache filling without losing any charm.
Freezing
You can freeze these cookies before filling them with ganache or even after, but if freezing post-ganache, place them in a single layer on a tray first, then transfer them to a container to avoid squishing. They keep beautifully for up to 2 months—perfect for prepping ahead of holidays or special occasions.
Reheating
Warm your refrigerated or frozen Chocolate Thumbprint Cookies slightly in a microwave for 10 to 15 seconds. This brings back that soft, tender texture and slightly melts the ganache for a heavenly experience, as if they just came out of the oven.
FAQs
Can I use dark chocolate instead of semi-sweet for the ganache?
Absolutely! Dark chocolate will create a richer and slightly more intense ganache, perfect if you prefer a less sweet cookie. Just make sure you adjust the sweetness if needed elsewhere.
Is it possible to make these cookies gluten-free?
Yes! You can swap the all-purpose flour for a gluten-free blend designed for baking. Be mindful to choose one that contains xanthan gum or similar binding agents to keep the cookies tender.
Can I make the dough ahead of time?
Definitely. The dough can be refrigerated for up to 24 hours before shaping and baking. This resting time even enhances the flavors and makes the dough easier to handle.
What if I don’t have a thumb or spoon handy for the indentation?
Don’t worry—using the end of a small wooden spoon or even the back of a rounded measuring spoon works beautifully to create the perfect thumbprint indentations.
How do I prevent the cookies from spreading too much during baking?
Make sure your butter is softened but not melted, and chill the dough briefly if it’s too soft. This helps the cookies hold their shape and keeps the thumbprint centers intact for filling.
Final Thoughts
There’s something truly magical about Chocolate Thumbprint Cookies. They’re simple to make but deliver such rich satisfaction, blending buttery dough with decadent ganache in an unforgettable bite. I can’t wait for you to try this recipe and find yourself reaching for just one more cookie—because these are the kind you’ll want to share and savor for every special moment.